
Assembly Instructions

Assembly Instructions Instrucciones de Ensamblaje Directives d’assemblage
Customer Service
US: 1-800-645-2986
Servicio de atención al Cliente
US: 1-800-645-2986
Service à la clientèle
Canada: 888-645-2986
1
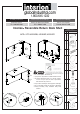
Hardware & Tools
Ref. Qty. Description
A 13
B 13
v 10
M8X40
D 13
E 5
30X45X2
F 30
#8X5/8
G 4
M6X25
H 2
I 1
Wrench
J 3
NOTE
• Do not use power drill in Part A.
• 2 people are requried to assemble and move desk.
• Assemble laminate boards on a smooth surface,
such as a rug or capet, in order to prevent the
board from being scratced.
• Inspect item carefully for missing parts or damage.
• Do not assemble if parts are missing or damaged.
• During assembly, keep hardware away from
children.
Interion
®
Reversible Return Desk Shell
48"W x 24"D: 695934MH, 695934MC, 695934GY
Assembly Instructions
MODEL NO. N145
3
2
1
STEP3
COMPLETED ASSEMBLY
a
b
REV-2
STEP1
IMPORTANT:
FUNCTION OF KLIX CAM
1/4 RIGHT TURN FOR
LOCKING Make Sure The Arrow Is Pointing
Upwards Before Inserting Into The Panel's Hole
TWO PEOPLE ARE REQUIRED TO
ASS EMBL E AND MOVE THI S MODEL
c
a
c
a
MF-SBOLT-JT-10257
8PCS
A
A
D
a
B
DECO-STC-20-COM
16PCS
C
MF-CAM-JJ-10107
11PCS
D
DW-WD-M8X40
4PCS
E
BK-L6H-30X45X2
3PCS
F
G
ADJ-TOP-M6X25
4PCS
B
H
GRO-PLC-RD80A
2PCS
C
I
BK-4H-80X60X3
3PCS
b
c
H
H
g
D
D
D
Remark: Insert DW-WD-M8X40
depend on left or right position for Panel 1
E
F
b
IMPORTANT NOTE:
· Do not use power drill for part [A]
· Place all laminated parts on a clean and smooth surface such as a rug or carpet to avoid the parts from being scratched.
· Check to be sure that you have all parts and hardware.
· Remove all wrapping materials, including staples & packing straps before you start to assemble.
· Keep all hardware parts out of reach of children
· If the product is not working properly, is missing a part, is damaged, or if you have any questions, please call customer service hotline before returning.
· Customer Service Hotline: 1-800-593–1888 For further assembly instructions, please visit our website at www.bosschair.com
J
Wrench
1PCS
g
STEP2
S-CSKR-#8X5/8
30PCS
Assembly Instructions
MODEL NO. N145
3
2
1
STEP3
COMPLETED ASSEMBLY
a
b
REV-2
STEP1
IMPORTANT:
FUNCTION OF KLIX CAM
1/4 RIGHT TURN FOR
LOC KING Make Sure The Arrow Is Pointing
Upwards Before Inserting Into The Panel's Hole
TWO PEOPLE ARE REQUIRED TO
ASSEMBLE AND MOVE THIS MODEL
c
a
c
a
MF- SBOLT-JT-10257
8PCS
A
A
D
a
B
DECO- STC-20-COM
16PCS
C
MF- CAM-JJ-10107
11PCS
D
DW-WD-M8X40
4PCS
E
BK-L6H-30X45X2
3PCS
F
G
AD J-TOP-M6X25
4PCS
B
H
GR O-PLC-RD80A
2PCS
C
I
BK-4H-80X60X3
3PCS
b
c
H
H
g
D
D
D
Remark: Insert DW-WD-M8X 40
depend on left or right position for Panel 1
E
F
b
IMPORTANT NOTE:
· Do not use power drill for part [A]
· Place all laminated parts on a clean and smooth surface such as a rug or carpet to avoid the parts from being scratched.
· Check to be sure that you have all parts and hardware.
· Remove all wrapping materials, including staples & packing straps before you start to assemble.
· Keep all hardware parts out of reach of children
· If the product is not working properly, is missing a part, is damaged, or if you have any questions, please call customer service hotline before returning.
· Customer Service Hotline: 1-800-593–1888 For further assembly instructions, please visit our website at www.bosschair.com
J
Wrench
1PCS
g
STEP2
S-CSKR-#8X5/8
30PCS
Assembly Instructions
MODEL NO. N145
3
2
1
STEP3
COMPLETED ASSEMBLY
a
b
REV-2
STEP1
IMPORTANT:
FUNCTION OF KLIX CAM
1/4 RIGHT TURN FOR
LOCKING Make Sure The Arrow Is Pointing
Upwards Before Inserting Into The Panel's Hole
TWO PEOPLE ARE REQUIRED TO
ASSEMBLE AND MOVE THI S MODEL
c
a
c
a
MF-SBOLT-JT-10257
8PCS
A
A
D
a
B
DECO-STC-20-COM
16PCS
C
MF-CAM-JJ-10107
11PCS
D
DW-WD-M8X40
4PCS
E
BK-L6H-30X45X2
3PCS
F
G
AD J-TOP-M6X25
4PCS
B
H
GRO- PLC-RD80A
2PCS
C
I
BK-4H-80X60X3
3PCS
b
c
H
H
g
D
D
D
Remark: Insert DW-WD-M8X40
depend on left or right position for Panel 1
E
F
b
IMPORTANT NOTE:
· Do not use power drill for part [A]
· Place all laminated parts on a clean and smooth surface such as a rug or carpet to avoid the parts from being scratched.
· Check to be sure that you have all parts and hardware.
· Remove all wrapping materials, including staples & packing straps before you start to assemble.
· Keep all hardware parts out of reach of children
· If the product is not working properly, is missing a part, is damaged, or if you have any questions, please call customer service hotline before returning.
· Customer Service Hotline: 1-800-593–1888 For further assembly instructions, please visit our website at www.bosschair.com
J
Wrench
1PCS
g
STEP2
S-CSKR-#8X5/8
30PCS
Assembly Instructions
MODEL NO. N145
3
2
1
STEP3
COMPLETED ASSEMBLY
a
b
REV-2
STEP1
IMPORTANT:
FUNCTION OF KLIX CAM
1/ 4 RIGHT TURN FOR
LOCKING Make Sure T he Arrow Is Pointing
Upwards Before Inserting Into The Panel's Hole
TWO PEOPLE ARE REQUIRED TO
ASSEMBLE AND MOVE THIS MODEL
c
a
c
a
MF-SBOLT-JT-10257
8PCS
A
A
D
a
B
DECO-STC-20-COM
16PCS
C
MF-CAM-JJ-10107
11PCS
D
DW-WD-M8X40
4PCS
E
BK-L6H-30X45X2
3PCS
F
G
AD J-T OP-M6X25
4PCS
B
H
GR O-PLC-RD80A
2PCS
C
I
BK-4H-80X60X3
3PCS
b
c
H
H
g
D
D
D
Remark: Insert DW-WD-M8X40
depend on left or right position for Panel 1
E
F
b
IMPORTANT NOTE:
· Do not use power drill for part [A]
· Place all laminated parts on a clean and smooth surface such as a rug or carpet to avoid the parts from being scratched.
· Check to be sure that you have all parts and hardware.
· Remove all wrapping materials, including staples & packing straps before you start to assemble.
· Keep all hardware parts out of reach of children
· If the product is not working properly, is missing a part, is damaged, or if you have any questions, please call customer service hotline before returning.
· Customer Service Hotline: 1-800-593–1888 For further assembly instructions, please visit our website at www.bosschair.com
J
Wrench
1PCS
g
STEP2
S-CSKR-#8X5/8
30PCS
Assembly Instructions
MODEL NO. N145
3
2
1
STEP3
COMPLETED ASSEMBLY
a
b
REV-2
STEP1
IMPORTANT:
FUNCTION OF KLIX CAM
1/ 4 RIGHT TURN FOR
LOCKING Make Sure The Arrow Is Pointing
Upwards Before Inserting Into The Panel's Hole
TWO PEOPLE ARE REQUIRED TO
ASSEMBLE AN D MOVE THIS MODEL
c
a
c
a
MF-SBOLT-JT-10257
8PCS
A
A
D
a
B
DECO-STC-20-COM
16PCS
C
MF-CAM-JJ-10107
11PCS
D
DW-WD-M8X40
4PCS
E
BK-L6H-30X45X2
3PCS
F
G
AD J-TOP-M6X25
4PCS
B
H
GR O-PLC-RD80A
2PCS
C
I
BK-4H-80X60X3
3PCS
b
c
H
H
g
D
D
D
Remark: Insert DW-WD-M8X40
depend on left or right position for Panel 1
E
F
b
IMPORTANT NOTE:
· Do not use power drill for part [A]
· Place all laminated parts on a clean and smooth surface such as a rug or carpet to avoid the parts from being scratched.
· Check to be sure that you have all parts and hardware.
· Remove all wrapping materials, including staples & packing straps before you start to assemble.
· Keep all hardware parts out of reach of children
· If the product is not working properly, is missing a part, is damaged, or if you have any questions, please call customer service hotline before returning.
· Customer Service Hotline: 1-800-593–1888 For further assembly instructions, please visit our website at www.bosschair.com
J
Wrench
1PCS
g
STEP2
S-CSKR-#8X5/8
30PCS