X70/X80 Multimedia Projector Operator's Guide Thank you for purchasing this projector. CAUTION Before using, read the "Product Safety Guide" and this "Operator's guide" to ensure correct usage through understanding. After reading, store them in a safe place for future reference. NOTE • The information in this manual is subject to change without notice. • The manufacturer assumes no responsibility for any errors that may appear in this manual.
Projector Features This multimedia projector is used to project various computer signals as well as NTSC/PAL/SECAM video signals onto a screen. Little space is required for installation and large images can easily be realized. ●Ultra High Brightness Crisp, ultra-bright presentations is achieved by using a UHB (ultra high brightness) lamp and a highly efficient optical system. ●Whisper Mode Equipped Special mode is available for reducing projector noise to achieve quieter operation.
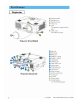
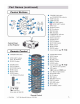
Contents Projector Features …………………2 Preparation …………………………2 Part Names …………………………4 Projector ……………………………4 Control Buttons ……………………5 Remote control ……………………5 Setting Up ……………………………6 Arrangement ………………………6 Adjusting The Projector’s Elevator ……………………………7 Using The Lens shift Buttons (X80 only) …7 Connecting Your Devices…………8 Connecting The Power Supply …11 Remote Control ……………………12 About The Laser Pointer ………12 Putting Batteries …………………12 Operating The Remote Control …………………13 Using The Remote ID Feature……………
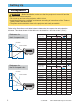
Setting Up Arrangement WARNING • Before installation, make sure that the projector is turned off and the power cord is disconnected. • Do not set up and move the projector, while it is hot. • Install the projector in a suitable environment according to instructions of the “Product Safety Guide” and this manual. • The power outlet should be close to the projector and easily accessible. Refer to the illustrations and tables below to determine the screen size and projection distance.
Setting Up (continued) Connecting Your Devices WARNING • Whenever attempting to connect other devices to the projector, read thoroughly the "Product Safety Guide", this manual and the manual of each device to be connected. Incorrect connecting could result in fire or electrical shock. CAUTION • TURN OFF ALL DEVICES prior to connecting them to the projector.
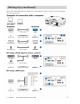
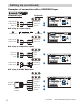
Setting Up (continued) Examples of connection with a VCR/DVD Player VCR/DVD Player Projector control Audio out (R) Audio out (L) Video out network remote control audio in1 R-audio in-L video in R-audio in audio in-L video in audio out audio in2 H I R/CR/PR rgb G/Y B/CB/PB rgb out H Y CR/PR Ca/Pa HI V R-audio in-L video in S-video in BNC ■ If using a s-video signal J S-video out S-video cable S -video in control audio out audio in2 R-audio in-L rgb out rgb H R/CR/PR G/Y
Remote Control About The Laser Pointer WARNING • The laser pointer of the remote control is used in place of a finger or rod. Never look directly into the laser beam outlet or point the laser beam at other people. The laser beam can cause vision problems. CAUTION • Use of controls or adjustments or performance of procedures other than those specified herein may result in hazardous radiation exposure.
Remote Control (continued) Using The Mouse/Keyboard Control Function CAUTION • Before connecting, read the manuals of the device you will connect. Mistaken use of the mouse/keyboard control could damage your equipment. • Only connect to a PC or an USB Hub connected PC. • Do not unplug the connector cables while the computer is operating. Using the USB control feature, you can use the remote control as a simplified mouse or keyboard of the computer.
Operating Selecting An Input Signal 1 Select an input signal. ■ Using the INPUT dial Turn the INPUT dial of the projector. Turning the dial cycles through the input ports as shown below. Select the signal you wish to project. M1-D rgb SEARCH button search M1-D input rgb reset BNC component BNC ENTER menu S-video video S-video video component INPUT dial ■ Using SEARCH button Press the SEARCH button of the projector or the remote control.
Operating (continued) Selecting The Aspect Ratio 1 Press the Aspect button to toggle between the modes for aspect ratio. ■ At a M1-D signal NORMAL LASER INDICATOR STANDBY/ON VIDEO 16:9 4:3 memo NORMAL keeps the original aspect ratio of the + + LENS SHIFT FOCUS + ZOOM – – – BLANK ASPECT LASER PREVIOUS ASPECT button NEXT MOUSE input signal.
Operating (continued) Adjusting The Picture Position memo This function is available only for RGB signals. 1 Press the POSITION button. As illustrated on the right, a dialog will appear on the screen to aid you in adjusting the position. LASER INDICATOR STANDBY/ON VIDEO + + LENS SHIFT FOCUS POSITION RGB + ZOOM – – – BLANK ASPECT LASER PREVIOUS NEXT Cursor buttons MOUSE 2 Use the cursor buttons / / / to adjust the position.
Operating (continued) Adjusting The Volume 1 2 3 Press the VOLUME button. As illustrated on the right, a dialog will appear on the screen to aid you in adjusting the volume. Use the cursor buttons adjust the volume. / VOLUME LASER INDICATOR STANDBY/ON VIDEO + RGB + + LENS SHIFT FOCUS to ZOOM – – – BLANK ASPECT LASER PREVIOUS NEXT Cursor buttons MOUSE 16 Press the VOLUME button again to close the dialog and complete this operation.
Operating (continued) Freezing The Screen 1 Press the FREEZE button. As illustrated on the right, a dialog will appear on the screen, and the screen will freeze at the current image. LASER INDICATOR STANDBY/ON VIDEO + LENS SHIFT FOCUS FREEZE Press the FREEZE button again to restore the screen to normal. The icon “||” will change to the icon “ ”. And after a couple of seconds, the dialog will be closed and the screen will be restored to normal.
Operating (continued) Displaying The Child Window memo This feature called "PinP (Picture in Picture)" is available only when a RGB signal is selected to main screen. 1 2 Press the PinP button. The child window with a picture of a video signal will appear. Press the PinP button again to change the size of the child window or close the window.
Multifunctional Settings Using The Menu Functions This projector has the following menus: MAIN, PICTURE-1, PICTURE-2, INPUT, AUTO, SCREEN, OPTION and NETWORK. Each of these menus is operated using the same methods. The basic operations of these menus are as follows. 1 Press the MENU button. The menu will appear on the screen. ex. Turning off the built-in speaker LASER INDICATOR STANDBY/ON VIDEO + + LENS SHIFT FOCUS RGB – – – BLANK ASPECT LASER PREVIOUS 1) Press the MENU button.
Multifunctional Settings (continued) MAIN Menu With the MAIN menu, the items shown in the table below can be performed. Perform each operation in accordance with the instructions in the table below. Item MENU MAIN PICTURE-1 PICTURE-2 INPUT AUTO SCREEN OPTION NETWORK : SELECT BRIGHT CONTRAST ASPECT WHISPER MIRROR LANGUAGE [Language] RESET +0 +0 4:3 NORMAL NORMAL ENGLISH Description BRIGHT CONTRAST ASPECT WHISPER Adjust the brightness using the Adjust the contrast using the / / buttons. : buttons.
Multifunctional Settings (continued) PICTURE-1 Menu With the PICTURE-1 menu, the items shown in the table below can be performed. Perform each operation in accordance with the instructions in the table below. Item MENU MAIN PICTURE-1 PICTURE-2 INPUT AUTO SCREEN OPTION NETWORK : SELECT GAMMA COLOR BAL R COLOR BAL G COLOR BAL B SHARPNESS COLOR TINT MY MEMORY NORMAL +0 +0 +0 +0 +0 +0 LOAD1 Description Select a gamma mode using the / buttons.
Multifunctional Settings (continued) PICTURE-1 Menu (continued) Item Description Select a command to load or save using the / buttons, and then press the (or the ENTER) button to perform the function.: LOAD1 LOAD2 LOAD3 LOAD4 SAVE1 SAVE2 SAVE3 SAVE4 MY MEMORY RESET © 3M 2004 This projector has 4 numbered memories for adjustment data. Performing the SAVE1, SAVE2, SAVE3 or SAVE4 puts the current adjustment data on the memory whose number corresponds with the command’s number.
Multifunctional Settings (continued) MENU MAIN PICTURE-1 PICTURE-2 INPUT AUTO SCREEN OPTION NETWORK : SELECT PICTURE-2 Menu With the PICTURE-2 menu, the items shown in the table below can be performed. Perform each operation in accordance with the instructions in the table below. V POSITION H POSITION H PHASE H SIZE OVER SCAN RESET 20 142 31 1344 95 memo This menu cannot be selected at a M1-D signal. Item V POSITION Adjust the vertical position using the / buttons.
Multifunctional Settings (continued) INPUT Menu With the INPUT menu, the items shown in the table below can be performed. Perform each operation in accordance with the instructions in the table below. MENU MAIN PICTURE-1 PICTURE-2 INPUT AUTO SCREEN OPTION NETWORK : SELECT COLOR SPACE COMPONENT VIDEO 3D-YCS VIDEO NR P. INP. INPUT P. INP. POSIT. POWERUP INPUT AUTO COMPONENT AUTO TURN OFF LOW VIDEO RGB Item Description COLOR SPACE Select a color space mode using the / buttons.
Multifunctional Settings (continued) INPUT Menu (continued) Item Description P.IN P. INPUT Select a signal input port for the child window using the / buttons. : video S-video memo About the child window, please refer to the section “Displaying the Child Window”. P.IN P. POSIT. Select the display position of the child window using the / buttons. : memo About the child window, please refer to the section “Displaying the Child Window”.
Multifunctional Settings (continued) AUTO Menu With the AUTO menu, the items shown in the table below can be performed. Perform each operation in accordance with the instructions in the table below. MENU MAIN PICTURE-1 PICTURE-2 INPUT AUTO SCREEN OPTION NETWORK : SELECT ADJUST POWER OFF POWER ON SEARCH RESET 0 min TURN ON TURN ON Item Description ADJUST Pressing the (or the ENTER) button performs the automatic adjustment.
Multifunctional Settings (continued) AUTO Menu (continued) Item Description Select the TURN ON or the TURN OFF using the / buttons. : TURN ON TURN OFF When the TURN ON is selected, detecting no signal cycles through input ports and displays the picture of retrieved signal. SEARCH M1-D video rgb S-video BNC component memo When the TURN ON is selected, pressing the RGB button selects the M1-D ports, and pressing the VIDEO button selects the component port.
Multifunctional Settings (continued) SCREEN Menu With the SCREEN menu, the items shown in the table below can be performed. Perform each operation in accordance with the instructions in the table below. Item MENU MAIN PICTURE-1 PICTURE-2 INPUT AUTO SCREEN OPTION NETWORK : SELECT BLANK START UP MyScreen MyScreen SIZE MyScreen LOCK MENU POSITION MESSAGE RESET BLACK ORIGINAL x1 TURN OFF TURN ON Description Select a type of the BLANK screen using the / buttons.
Multifunctional Settings (continued) SCREEN Menu (continued) Item Description MESSAGE RESET Select the TURN ON or the TURN OFF using the / buttons. : TURN ON TURN OFF When the TURN ON is selected, the following message function works. The message of the “AUTO IN PROGRESS” for the auto adjustment. The message of the ”NO INPUT IS DETECTED” The message of the ”SYNC IS OUT OF RANGE” The message of the ”Searching …” The message of the “Detecting …” The indication of the input signal by input change.
Multifunctional Settings (continued) OPTION Menu With the OPTION menu, the items shown in the table below can be performed. Perform each operation in accordance with the instructions in the table below.
Multifunctional Settings (continued) OPTION Menu (continued) Item Description Pressing the (or the ENTER) button calls the SERVICE SERVICE FANSPEED menu. AUTO ADJUST LENS TYPE SERVICE Menu LENS LOCK Select an item using the / buttons, and press the (or : SELECT the ENTER) button to per form each function. : FANSPEED AUTO ADJUST LENS TYPE LENS LOCK FANSPEED Select the fan speed level using the / buttons. : HIGH NORMAL The HIGH ups rotation speeds of fans, though.
Multifunctional Settings (continued) MENU MAIN PICTURE-1 PICTURE-2 INPUT AUTO SCREEN OPTION NETWORK : SELECT NETWORK Menu This projector provides the NETWORK function. If you use this function, please set up the projector according to the Network environment in which you use it. SETUP DHCP INFORMATION RESET TURN OFF memo The following settings is not required If your network can assign an IP address through its DHCP server. The projector is set to DHCP by default.
Network Setting Up This projector provides the NETWORK function. When you start to use this function, please consult your dealer for further information. To start, connect the network port to a gateway device via a CAT-5 cable, then set up the projector according to the Network environment in which you use it. When your Network enables the DHCP function The IP Address can be set automatically if the DHCP is "TURN ON" using the NETWORK menu. Please refer to the section "NETWORK Menu".
Lamp WARNING HIGH VOLTAGE HIGH TEMPERATURE HIGH PRESSURE The projector uses a high-pressure mercury glass lamp. The lamp can break with a loud bang, or burn out, if jolted or scratched, handled while hot, or worn over time. Note that each lamp has a different lifetime, and some may burst or burn out soon after you start using them. In addition, when the bulb bursts, it is possible for shards of glass to fly into the lamp housing, and for gas containing mercury to escape from the projector’s vent holes.
Lamp (continued) Replacing The Lamp If the indicators or a message prompts you to replace the lamp, replace the lamp as soon as possible. 1 Turn off the projector, and unplug the power cord. Allow the lamp bulb to cool for at least 45 minutes. 2 Contact your dealer to prepare a new lamp. Tell the dealer your lamp type number. If the projector is mounted on the ceiling, or if the lamp has broken, also ask the dealer to replace the lamp.
Air Filter WARNING • Please carefully read the “Product Safety Guide. • Before caring, make sure the power switch is off and the power cable is not plugged in, then wait at least 45 minutes for the lamp to cool sufficiently. • Use only the air filter of the specified type 78-8118-9187-4. . • Do not use the projector with the air filter and filter cover removed. The use without the air filter could result in damage.
Other Care WARNING • Please carefully read the “Product Safety Guide”. • Before caring, make sure the power switch is off and the power cable is not plugged in. • Be cautious of high temperature. Do not touch about the lens and ventilation openings during use or immediately after use prevent a burn. • Never try to care for the inside of the unit yourself. Doing so is dangerous. • Do not use cleaner or chemicals other than those listed below, including benzene and paint thinner.
Troubleshooting Related Messages When the unit's power is on, messages such as those shown below may be displayed. When any such message is displayed on the screen, please respond as described below. If the same message is displayed after the treatment, or if a message other than the following appears, please contact your dealer or service company. memo Although these messages will be automatically disappeared around several minutes, it will be reappeared every time the power is turned on.
Troubleshooting (continued) Related Messages (continued) Message Description CLEAN THE AIR FILTER POWER OFF FIRST, THEN CLEAN THE AIR FILTER. AFTER CLEANING THE AIR FILTER, RESET THE FILTER TIMER. The time the filter timer has counted has reached 100 hours. Please clean or change the air filter by referring to the section “Air Filter”. After caring for the air filter, please be sure to reset the filter timer. The internal portion temperature is rising.
Troubleshooting (continued) Regarding The Indicator Lamps Lighting and flashing of the standby/on indicator, the lamp indicator, and the temp indicator have the meanings as described in the table below. Please respond in accordance with the instructions within the table. If the same indication is displayed after the treatment, or if an indication other than the following is displayed, please contact your dealer or service company.
Troubleshooting (continued) Regarding The Indicator Lamps (continued) standby/on indicator lamp indicator temp indicator Description Either there is no lamp and/or lamp door, or either of these has not been properly fixed. Lighting in Red Blinking in Red Turned off Please turn the power off, and allow the unit to cool down at least 45 minutes. After the projector has sufficiently cooled down, please make confirmation of the attachment state of the lamp and lamp door, and then turn the power on again.
Troubleshooting (continued) Phenomena That May Easily Be Mistaken For Machine Defects WARNING • Never use the projector if abnormal operations such as smoke, strange odor, excessive sound, damaged casing or elements or cables, penetration of liquids or foreign matter, etc. should occur. In such cases, immediately turn off the power switch and then disconnect the power plug from the power outlet After making sure that the smoke or odor has stopped, contact your dealer or service company.
Troubleshooting (continued) Phenomena That May Easily Be Mistaken For Machine Defects (continued) Phenomenon Cases not involving a machine defect The signal cables are not correctly connected. Correctly connect the connection cables. Pictures are displayed, but no sounds are heard. Sounds are heard, but no pictures are displayed. Colors have a faded- out appearance, or Color tone is poor. Pictures appear dark. 8, 9 The volume is adjusted to an extremely low level. Adjust the VOLUME to a higher level.
Specifications NOTE • This specifications are subject to change without notice. Item Product name Liquid crystal panel Specification Liquid crystal projector Panel size 2.5 cm (0.99 type) Drive system TFT active matrix Pixels 786,432 pixels (1024 horizontal x 768 vertical) Lens Zoom lens F=1.7 ~ 2.4 f=30.5 ~ 45.8 mm Lamp X70:275W UHB X80:310W UHB Speaker 1.0W + 1.0W (Stereo) Power supply X70:AC100 ~ 120V, 4.7A / AC220 ~ 240V, 2.0A X80:AC100 ~ 120V, 5.2A / AC220 ~ 240V, 2.
Accessories Accessories ............................................................... Part Number UHB Lamp, 275W (X70) ............................................................................. 78-6969-9718-4 UHB Lamp, 310W (X80) ............................................................................. 78-6969-9719-2 Air Filter ...................................................................................................... 78-8118-9187-4 Power Cord (US) .......................................
Intended Use Before operating this machine, please read this entire manual thoroughly. The 3MTM Multimedia Projectors are designed, built, and tested for use indoors, using 3M lamps, 3M ceiling mount hardware, and nominal local voltages. The use of other replacement lamps, outdoor operation, or different voltages has not been tested and could damage the projector peripheral equipment and/or create a potentially unsafe operating condition.