
Installation Manual


4 / 8 P/N 466-5410 (EN) • REV D • ISS 19MAR18
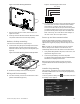
Press and hold the Enter button for approximately five
seconds. The following screen will appear:
The emulated keypad works and functions the same as the
600-1070-E keypad. To enter programming mode press 8,
followed by a valid installer or master code, 0, 0.
For additional details on programming with the touchscreen,
see Concord 5 in TouchScreen Quick Operation Guide.
To exit programming, press the “Exit “ button or press and hold
the top white bar where info is displayed.
Verifying touch screen bus enrollment and panel
programming touch screen options
Enter programming emulation mode as described above. For
more information on alphanumeric touch pad operation, refer
to the Concord 4 Installation Manual.
1. Go to the Bus Device Programming section in Concord
(System Programming / Security / Accessory Modules /
Bus Devices (shortcut 10,000 for unit ID 0).
The display shows the lowest device address and it’s ID.
This example shows what a device address display may
look like:
UNIT - ID
02110185*
* The 8-digit SuperBus ID number is also located on a
label on the back of the alphanumeric keypad.
2. Cycle through all bus device addresses until the
alphanumeric keypad appears.
3. To program the following touch screen options, choose the
touch screen bus device address.
Change ID
With this menu, change the bus device ID number when
replacing a defective bus device.
To change a device ID:
1. With the display showing the desired bus device, press #,
#.
The display shows DEVICE ID (current ID).
2. Enter the ID of the new bus device.
The display flashes the entered selection. Press # and the
display shows the new setting.
3. Exit programming mode.
4. Remove AC and battery power from the panel.
5. Replace the defective bus device with a new one.
6. Apply AC and battery power to the panel.
Partition assignment
With this menu, assign bus devices to work in the desired
partition.
To assign bus devices to partitions:
1. With the display showing the desired bus device, press #.
2. Press A or B until the display shows DEVICE PTN and
then press #. The display shows PARTITION ASSIGN.
3. Press 1 to 6 to select the desired partition.
The display flashes the entered selection.
4. Press # and the display shows the new setting.
Status beeps
Option not used with touch screen. Touch screen status beeps
can be changed in the touch screen settings menu.
Key beeps
Option not used with touch screen. Touch screen key beeps
can be changed in the touch screen settings menu.
Panel sensor text programming guidelines
Programming for touch screen At-A-Glance (AAG) icons
For best results, do not program sensor names that contain a
combination of the words Door, Window, and/or Motion.
The designator words Door, Window, or Motion should be
programmed within the first three words of the sensor text
sequence. If not, the wrong AAG association may occur.
Door - Sensor names must contain “Door” (item number 50).
When programming a name for a sensor, enter 50 and the
word Door is added to the text. These sensors should be a
sensor group that requires a restoral.
Window - Sensor names must contain “Window” (item number
183). When programming a name for a sensor, enter 183 and
the word Window is added to the text. These sensors should
be a sensor group that requires a restoral.
Motion - Sensor names must contain “Motion” (item number
119). When programming a name for a sensor, enter 119 and
the word Motion is added to the text. These sensors should be
a sensor group that does not require a restoral.
Property - Any sensor that does not contain the words Door,
Window, or Motion. They may be a restoral or non-restoral
sensor.
If a sensor contains the AAG keyword of Door, Window, or
Motion, but the sensor appears in the Property AAG when
tripped, the name of the sensor is too long. The AAG keyword
needs to be moved closer to the start of the sensor name.