
Installation Instructions


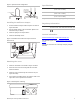
Table Of Contents

Figure
4: Installation of 2.87 x 6 in. (7.29 x 15.24 cm) circuit board
6.00 in
(15.24 cm)
2.87 in
(7.29 cm)
Installing smaller width boards
1. Remove the adjustable board supports from the housing.
2. Remove the appropriate wiring knockout.
3. Attach housing to wall.
Note: Be sure adjustable board supports and knockouts are
removed before mounting the housing.
4. Place the board on appropriate supports.
5. Wire the board as needed.
6. Position adjustable board supports as needed for board
size (See the following figures).
7. Attach supports with screws.
Figure 5: Installation of 3.2 x 4 in. (8.13 x 10.16 cm) circuit board
4.00 in
(10.16 cm)
3.20 in
(8.13 cm)
Figure 6: Installation of 4 x 3.77 in. (10.16 x 9.59 cm) circuit board
3.77 in
(9.59 cm)
4.00 in
(10.16 cm)
Figure 7: Installation of 3.83 x 4 in. (9.72 x 10.16 cm) circuit board
4.00 in
(10.16 cm)
3.83 in
(9.72 cm)
Figure 8: Installation of 4.47 x 4.38 in. (11.35 x 11.11 cm) board
4.38 in
(11.11 cm)
4.47 in
(11.35cm)
Installing the optional antenna
See the documentation for your board for complete antenna
installation instructions. The antenna can be attached through
the supplied silicone plugs as shown in the figure on the left.
Or in the case of a wire antenna, the plastic housings and o-
rings can be directly attached to the antenna holes in the top of
the housing.
2 Multi-Purpose Housing Installation Instructions