Simon XT User Manual P/N 466-2266 • REV E • OCT12
Copyright Disclaimer © 2012 UTC Fire & Security Americas Corporation, Inc. Interlogix is part of UTC Climate Controls & Security, a unit of United Technologies Corporation. All rights reserved. The information in this document is subject to change without notice.
Software license agreement Im portant: This end-user license agreement (“Agreement”) is a legal agreement between UTC FIRE & SECURITY and You. Read the follow ing terms and conditions carefully before installing or using this Software. This agreement provides a license from UTC FIRE & SECURITY to use the Software. It also contains warranty information, disclaimers, and liability limitations. Installing and/or using the Software confirms Your agreement to be bound by these terms and conditions.
5. Limited warranty UTC FIRE & SECURITY w arrants that for one (1) year from the date of delivery of the Licensed Product (Software Warranty Period), the functions contained in the Software will be fit for their intended purpose as described in the applicable Documentation from UTC FIRE & SECURITY, and w ill conform in all material respects to the specifications stated in such Documentation. UTC FIRE & SECURITY does not w arrant that the operation of the Software will be uninterrupted or error-free.
If this equipment does cause harmful interference to radio or television reception, which can be determined by turning the equipment off and on, the user is encouraged to try to correct the interference by one or more of the following measures: Reorient or relocate the receiving antenna. Increase the separation between the equipment and receiver. Connect the affected equipment and the panel receiver to separate outlets, on different branch circuits.
This equipment may not be used on coin service provided by the telephone company. Connection to party line service is subject to state tariffs. Contact the state public utility commission, public service commission, or corporation commission for information. If you experience trouble with this equipment, please contact the company that installed the equipment for service and repair information.
Content Introduction 3 Communicating with your system 4 Using the Simon XT security system 6 Panel controls 6 Simon XT features 8 Home security 9 Exit/entry delay 10 Bypassing sensors 12 Alarms 13 Light control (optional) 14 Chimes 14 Latchkey 15 System status 15 Using an offsite phone 16 Using touchpads 16 How your system communicates 19 Status beeps 19 Alarm sirens and lamp modules 19 Panel indicator lights 20 Trouble beeps 20 Programming 23 System menu 23 Code options 23 Menu navigation 23 Top-level menu
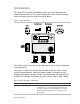
Introduction The Simon XT uses wireless technology to warn your family about intrusion, carbon monoxide and fire. The system communicates with a central monitoring station and sends voice messages to an offsite phone. Figure 1: Simon XT system The security system uses sensors that communicate alarms to the control panel using radio waves. The system is supervised, meaning that the panel checks the status of each sensor to detect problems.
Component Type Description Touchpads Remote handheld Controls the security system primarily from within the house. Key fob* This keychain touchpad controls the security system from within or near the outside of your home. Indoor motion Detects motion in protected indoor area. When motion is detected, the panel may respond by sounding chimes or an alarm. Outdoor motion Detects motion in a protected outdoor area.
Table 2: System communication devices Device Description Control panel You can enter commands for your security system through simple key presses on the panel. Depending on how your system is programmed, you may need to enter an access code for certain commands. An access code is a numeric code that allows authorization to operate your security system. Remote handheld touchpad This touchpad gives you the option to enter commands from any room in your house.
Using the Simon XT security system You can operate the self-contained security system through several different methods: • Use the front panel buttons to arm/disarm the system when you enter or exit your home and to determine which sensors are active and the system status. • Use the three fast action keys to communicate with the central monitoring station to report emergency (auxiliary), police, or fire alarms.
Control Description LCD display Provides a 2 x 16 character array that displays a variety of phrases and icons. Scroll up/scroll down arrows Press to scroll through lists of similar items. OK Press to select a particular menu item or commit to panel memory a menu item that has just been programmed. Doors+Windows Press to arm perimeter sensors. Motions Press to arm interior sensors. Disarm Press to turn off intrusion/burglary protection for your system.
• Doors+Windows and Motions The phrase “no delay” is appended to the arming level when no entry delay is active. Possible status icons include: • • • • • Chime (solid bell) Special chime (outlined bell) Light schedules (clock) Sensor lights (light bulb) Latchkey on (key) LEDs Every key on the front keypad has an LED behind it, except for the scroll arrow keys. There are four status LEDs behind the row of keys below the LCD display. These status LEDs indicate the arming level.
• Have the system notify you if your children do not arrive at home by a predetermined time. Home security The Simon XT allows you to control which sensors are active at any given time. Table 4 below describes the arming levels that you can set from the control panel. Table 4: Arming levels Leve Function l Description 0 Subdisarm If your system includes 24-hour protection sensors, you must subdisarm the panel before accessing these areas to avoid causing an alarm.
2. Enter your code when the display shows Enter Code. The panel displays and speaks Disarmed, the Disarm button lights up, and the panel beeps once. To arm doors and windows (level 2): 1. Ensure that all doors and windows are closed. 2. Press Doors+Windows. 3. Enter your code when the display shows Enter Code, if a code is required. The panel displays Doors + Windows, speaks Doors and Windows On, and the Doors+Windows button lights up.
Table 5: Entry and exit delay details Function Description Entry delay Some active sensors cause immediate alarms when tripped. Other sensors, if enrolled in a delayed response group, start an entry delay that lets you enter the premises and disarm the system. When you enter your home, you will hear beeps during the entry delay. If the system has not been disarmed by the end of the entry delay, an alarm occurs. The entry delay time is programmed by the installer.
Close all doors and windows. Press DOORS +WINDOWS twice. If a code is required for arming, enter your code after the first press of the DOORS +WINDOWS button, then press the button again. The panel displays Doors+ Windows - No Delay and speaks Doors and Windows On, No Entry Delay. The DOORS + WINDOWS light will blink and the exit delay will begin. To avoid causing an alarm, you must disarm the system with a wireless touchpad before entering your home.
4. Press Enter to bypass (deactivate) the sensor. 5. When a sensor is bypassed, the panel displays Bypassed on the second line. Unbypassing 1. Press BYPASS and enter the master code. 2. Scroll up/down to the sensor to be unbypassed. The sensor must be currently bypassed. 3. Press Enter to unbypass (reactivate) the sensor. 4. The panel removes the word Bypassed from the second line of the display. Alarms The system provides a series of alarms that indicate an unusual occurrence.
• • • • Be aware of the devices in your security system and learn how each one operates. If you have pets, ask your installer if you need pet lenses in your motion detectors. Check the location of your smoke detectors. Smoke detectors near bathrooms and kitchens can be tripped by steam and smoke from cooking. Make a note of the display, system beeps, and indicator lights that indicate the current system status.
Special chime Special chime allows you to install motion sensors in a patio or at the front door, and be notified when someone is approaching those areas. These motion sensors are not used for intrusion protection. The panel will chime three times, if the special chime mode is enabled. Note: If there are no special chime sensors in your system, the Special chime option will not appear in the System menu.
Using an offsite phone If enabled by the installer, you can control your Simon XT panel remotely from an offsite phone. The panel answers a phone call according to the dialing method programmed by your installer. After a certain combination of rings and pauses, the panel will answer the call with the voice prompt Enter your code. You must enter the correct code to gain access.
Remote handheld touchpad Interfacing with the system using a remote handheld touchpad is similar to using the panel. Figure 3: Remote handheld touchpad Keyfob If your installer programmed the keyfob with no entry delay, and you armed the system with the keyfob, you must disarm your system before entering the home to avoid causing an alarm. Caution: To avoid causing false alarms, check with you installer on how your touchpad options are programmed.
If your installer programmed your system for remote touchpad arming, you must enter your home to start the entry delay before you can use your keyfob to disarm the system. Note: Panic alarms need to be silenced from the panel, a remote handheld touchpad, or another keyfob. They cannot be silenced from the same keyfob that activated the alarm. Table 7: Key fob button operation Task Instructions Arm doors and windows. Press the Lock button once. Arm doors, windows, and motion sensors.
How your system communicates Your system responds to you through the use of display and voice messages, status beeps, alarms, and panel indicator lights. Status beeps The panel sounds status beeps to alert you to various system events and conditions.
Table 9: Siren sounds Function Fire Intrusion Emergency Interior and panel siren* Temporal 3 Steady Fast on/off Interior and panel siren* Temporal 3 Steady Fast on/off Interior and panel siren Temporal 3 Steady Fast on/off Exterior siren Temporal 3 Steady * This feature is not verified for use by UL. Note: Temporal 3 refers to a continuous pattern of three siren pulses, then off for 1.5 seconds, three siren pulses, then off for 1.5 seconds.
• Communication troubles with the central monitoring station When your security system detects one of the problems above, six rapid beeps sound every minute until the trouble condition is corrected. To stop the trouble beeps, press STATUS or arm/disarm the system while the trouble condition exists. Trouble beeps will resume four hours later unless the trouble condition is corrected.
sensors have a low battery. You may need to call your security system dealer to resolve this problem. Some sensor batteries can be replaced by the homeowner. Fail-to-communicate This condition occurs if your security system cannot communicate to the central monitoring station. Your system will try to report to the central monitoring station eight times before it tells you there is a fail-to-communicate problem. Trouble beeps will start and the STATUS button will light.
Programming Your Simon XT security system allows you to program certain user options. These options are accessed through a system menu. System menu To enter the system menu, press one of the scroll buttons or the OK button in the upper right of the panel. Press Status to exit a menu or option edit mode and navigate up one level. Pressing Status while in the top menu level exits the system menu.
navigating to an option selects that option for editing and flashes the current value. Pressing OK after navigating to a submenu enters that submenu, making a new list of options accessible. Pressing Status exits a menu and goes to the next higher level. When accessing the System Programming or System Tests menu, the panel prompts you to enter an access code. To continue, enter your master code, and then press OK. To program an option, first navigate to that option until it is displayed, and then press OK.
Top-level menus This section explains the top-level menus, with the exception of system programming, which makes up the bulk of the menus and can be found in its own section, System programming on page 31. Set clock If the panel loses both AC and battery power, then upon restoring power the system time will default to midnight and blink, indicating it has not been set correctly. Your installer can set your system time to display in either 12-hour or 24-hour format.
1. Scroll up/down until the display reads Light Schedules. 2. Press Enter. The current setting will flash. 3. Scroll up/down to toggle scheduled lights On/Off. 4. Press Enter. The setting will stop flashing. 5. Press STATUS to exit. A clock icon appears in the display when scheduled lights are enabled. Note: This feature is not verified for use by UL. This menu option will not appear if no light schedules are defined.
Special chime To enable or disable the Special chime feature: 1. Scroll up/down until the display shows Chime. 2. Press Enter. The current setting will flash. 3. Scroll up/down to toggle Special chime on/off. 4. Press Enter. The setting will stop flashing. 5. Press STATUS to exit. An outlined bell icon will appear in the display when Special chime is enabled. Note: This menu will not appear if Special chime sensors are not in your system.
• • • • • • • Access codes Security Phone #s Timers Siren options Light control System tests The sections below describe the options that you can program in the System programming menu. Access codes There are three types of access codes: master, user, and duress. Master code The master code is your most powerful code and can be used for all user operations including programming. To change the master code, do the following: 1. Enter the System programming menu. 2.
Duress code The duress code, when used in place of another user code, generates a silent duress alarm which is reported to the central monitoring station. To change the duress code: 1. Enter the System programming menu. 2. Scroll up/down to Access codes, then press Enter. 3. Scroll up/down to Duress code, then press Enter. 4. The current value of the code now flashes. 5. Enter a new code (use correct length), then press Enter. 6. Press Status repeatedly to exit. Initially, the duress code is blank.
5. Change each digit of the phone number by scrolling or entering a numerical value, then move to the next digit by pressing Enter. 6. When done, press Enter again to save the new phone number. 7. Press STATUS repeatedly to exit. The phone number can be deleted by pressing the DISARM button while changing a digit. Timers The Latchkey Time option is the only timer setting available to you.
To program Piezo beeps, do the following: 1. Enter the System programming menu. 2. Scroll up/down to Siren options, then press Enter. 3. Scroll up/down to Piezo beeps, then press Enter. 4. The current value of this option now flashes (On or Off). 5. Scroll up/down to the desired value, then press Enter. 6. Press STATUS repeatedly to exit. Panel voice Panel voice (spoken phrases on the speaker) and key press sounds from the speaker heard while controlling the system).
1. Enter the System programming menu. 2. Scroll up/down to Siren options, then press Enter. 3. Scroll up/down to Status beep vol, then press Enter. 4. The current value of this option now flashes (1 to 10). 5. Scroll up/down to the desired value, then press Enter. 6. Press STATUS repeatedly to exit. Speaker volume This option sets the sound volume of the panel speaker for key presses and alarm sounds. The numerical range is 1 to 8. The default value is 8. To program Speaker volume, do the following: 1.
7. Press STATUS repeatedly to exit. Sensor lights In this menu, each sensor can be tied to a unit number. For example, a light in a room can be set up to turn on when a motion sensor in that room is tripped. To set up Sensor lights, do the following: 1. Enter the System programming menu. 2. Scroll up/down to Light control, then press Enter. 3. Scroll up/down to Light schedules, then press Enter. 4. Scroll up/down to the desired light schedule (as defined by the unit number), then press Enter. 5.
2. Scroll up/down to Light control, then press Enter. 3. Scroll up/down to Housecode, then press Enter. 4. The current option value (A to O) now flashes. 5. Scroll up/down to the desired value, then press Enter. 6. Press STATUS repeatedly to exit. Sensor-activated light lockout time Each light (unit numbers 1 to 8) that has been tied to a sensor can be programmed not to turn on during a certain time of day. To program the Lock interval, do the following: 1. Enter the System programming menu. 2.
Testing This chapter provides a set of tests to ensure proper operation of your Simon XT self-contained security system. We recommended you test your system weekly. Testing sensors You can test sensors one at a time to make sure they are sending strong signals to the panel. You should test the security system at least once a week. To perform the Sensor Test: 1. Scroll to System Tests. 2. Press Enter. The display shows Enter Code. 3. Enter your master code with the numbered keys. 4.
Device To trip device Glassbreak sensor* Trip with appropriate glassbreak tester. Motion sensor Avoid the motion sensor’s view for 5 minutes, and then enter its view. Shock sensor* Tap the glass twice, away from the sensor. Wait at least 30 seconds before testing again. Smoke sensor Press and hold the test button until the system sounds transmission beeps. Wireless panic button* Press and hold the appropriate button for 3 seconds.
System download You can initiate a download call to program your system with the settings specified by your installer. To initiate a download, do the following: 1. Scroll up/down till the display shows System tests. 2. Press Enter. The display shows Enter code. 3. Enter your master code with numeric keys. 4. Press Enter. The display now shows Sensor test. 5. Scroll up/down till the display shows System download. 6. Press Enter. The display shows Download in progress. 7.
Appendix A: Reference information This appendix provides a list of system limitations, emergency planning, floorplan, and a quick reference command table. Alarm system limitations Not even the most advanced alarm system can guarantee protection against burglary, fire, or environmental problems. All alarm systems are subject to possible compromise or failure-to-warn for a variety of reasons.
• • • • • • • • • Know the normal state of doors and windows: open, closed, or locked. Escape fast! (Do not stop to pack.) Use a different escape route if closed doors feel hot to the touch. Crawl and hold your breath as much as possible to help reduce smoke inhalation during your escape. Meet at a designated outdoor location. Emphasize that no one should return to the premises if there is a fire. Notify the fire department from a neighbor’s phone.
Figure 5: Smoke detector locations Your floorplan Use the following guidelines when drawing your floorplan: • • • • Show all building levels. Show exits from each room (two exits per room are recommended). Show the location of all security system components. Show the location of any fire extinguishers Sensor and module locations Use Table 14 below and Table 15 on page 42 to list your sensor and module locations.
Sensor number Sensor name Sensor type Location 8. 9. 10. 11. 12. 13. 14. 15. 16. 17. 18. 19. 20. 21. 22. 23. 24. 25. 26. 27. 28. 29. 30. 31. 32. 33. 34. 35. 36. 37. 38. 39. 40.
Table 15: X10 module locations Unit # Location 1 2 3 4 5 6 7 8 9 10 11 12 13 14 15 16 Table 16: Access codes Code description Code Master code User code 1 User code 2 User code 3 User code 4 User code 5 User code 6 User code 7 User code 8 Duress code 42 Simon XT User Manual
Delays Use Table 17 below to record your delay times.
44 Simon XT User Manual