Concord 4 User Manual P/N 466-2183 • REV D • NOV12
Copyright © 2012 UTC Fire & Security Americas Corporation, Inc. Interlogix is part of UTC Climate Controls & Security, a unit of United Technologies Corporation. All rights reserved. This document may not be copied in whole or in part or otherwise reproduced without prior written consent from UTC Fire & Security, Inc., except where specifically permitted under US and international copyright law. Disclaimer The information in this document is subject to change without notice.
Content Introduction 3 Product overview 3 System communication 4 Basic commands 5 Beeps and LEDs 6 Basic operation 8 Alarm condition 8 Arming and disarming 11 Chime feature 14 No delay for instant alarm 14 Auto stay arming 16 Exit extension arming 16 Silent arming 16 Bypassing 16 Basic light control 18 Basic output control 18 Checking system status 19 Advanced operation 21 Panic alarms 21 Access codes 22 Assigning code attributes 25 Time and date 27 System sounds 27 Touchpad display brightness 28 Energy sa
System information 47 Event buffer 47 Touchtone phone 52 Programming 55 Programming menus 55 Programming shortcuts 58 Testing and troubleshooting 63 Testing 63 Troubleshooting 66 User sheets 70 System sensors 70 User codes 72 Alphanumeric and fixed display touchpads 73 Keychain touchpads 74 Accidental smoke and fire alarms 77 Resetting the smoke detector 77 Dialer abort 77 Doors and delay time settings 78 System features 78 No activity time 79 Paging 80 Lights 81 Outputs 82 Energy saver 82 Alarm sounds and
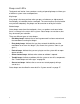
Introduction This section provides an overview of your Concord 4 including basic commands and system components. Product overview Your security system consists of different components. Each component plays a special role in system operation. Figure 1: System components Door/window sensor Motion sensor Smoke sensor Keycahin touchpad Touchpad Gateway module Panel Components include: • Panel.
Your system may include optional components that add capability to: • Control heating/air conditioning. • Report alarms by cellular phone link in case landlines are down or inoperative. • Control/monitor the system from on- or off-site using a touchtone phone or via the Internet. System communication Touchpads let you communicate with the system. System touchpads include: • Alphanumeric and fixed display touchpads.
Basic commands Table 1 below shows the basic commands. Table 1: Basic commands Command Instructions Disarm the system Press 1, code. Cancel an accidental alarm Press code or press 1, code. Arm to Level 2 (stay) Press 2, code. If the quick arm feature is on, an access code is not required. Arm to Level 3 (away) Press 3, code. If the quick arm feature is on, an access code is not required. Send a police alarm Press and hold both Police buttons for 2 seconds.
Beeps and LEDs Touchpads and interior sirens produce a variety of operating beeps to inform you of different system states and operations. Key beeps A key beep is the tone you hear when you press a button on an alphanumeric, fixed display, or handheld wireless touchpad. The sound confirms that the button was pressed adequately. Key beeps can be turned on or off by the installer.
LEDs Some touchpads have two LEDs that indicate the current system status at a glance. The red LED is labeled Armed; the green LED is labeled Ready. Table 2 below explains LED behavior.
Basic operation This section provides a description of basic operations. Alarm condition In an alarm condition, the following occurs: • Speakers and touchpads emit emergency tones. (Your system may or may not be monitored. If it is not monitored, no central station reports will be made.) • System lights flash (requires optional equipment and programming). • Panel notifies central monitoring station for help (monitored systems only). • Pagers are notified of the event (requires optional programming).
panic buttons on a system touchpad or activating a manual pull fire device, causing alarm sirens to sound. Note: While most alarms can be canceled or aborted to prevent reporting to a central monitoring station, fire alarms cannot be aborted and are always reported. Since many communities charge for dispatching the fire department in error, your dealer may give you specific instructions to follow in the event of an accidental fire alarm.
The system may go into alarm again after you clear the alarm and reset smoke detectors. This usually indicates that there is still smoke in the chamber inside the detector, even though you may not see any smoke near it. You may need to clear this condition by fanning the air near the detector for a few seconds, and then use the appropriate procedure again.
The dial abort feature is factory set to 30 seconds. Your installer can change this setting from 15 to 45 seconds. Note: Remember that fire alarms cannot be aborted/canceled. Disarming a fire alarm will only silence sirens, but the alarm is still reported. If an accidental fire alarm sounds, follow the procedures of your central monitoring station to prevent dispatching authorities. To cancel a police (intrusion) or auxiliary alarm: 1. Press 1. Touchpads display ENTER CODE. 2. Enter your access code.
Note: Entry beeps are silenced after the first keypress. They will restart after 5 seconds with no key presses. You must enter your access code to completely disarm the system. • Disarm the system before opening a door or window while the system is armed. To arm to Level 1 using a keychain touchpad, press the Unlock button. Level 2 (stay) Use Level 2 to arm perimeter doors and windows only.
Quick arm You must contact your installer if you want to use this feature. This feature lets you arm your system without using an access code. (Disarming the system still requires entering an access code.) • To quick arm to Level 2, from Level 1, press 2. • To quick arm to Level 3, from Level 1 or 2, press 3. Quick exit Your system may be set up to let you exit and reenter the premises within 2 minutes, without disarming and rearming the system.
Chime feature Turning on the chime feature is like having a doorbell on every protected door and window. When this feature is on, interior sirens and speakers sound two beeps whenever anyone opens a protected door or window. The chime feature works only in Level 1 (off). To turn the chime feature on or off: 1. While in Level 1, from any touchpad, press 7, 1. 2. While the chime feature is on, touchpads display CHIME IS ON or CHIME ON.
The system sounds two (Level 2) or three (Level 3) short beeps. 3. Immediately press 4. Touchpads display ARMED TO STAY NO DELAY or ARMED TO AWAY NO DELAY. Changing the arming level restores delay doors to their normal exit and entry delay times.
Auto stay arming The auto stay arming feature helps cut down on false alarms in the event that you arm the system to Level 3, but fail to leave during the exit delay time. With auto stay arming, the system detects that no one opened and closed a delay door within the delay time. It assumes that someone is still inside and arms to Level 2 to prevent a false alarm.
has a sensor installed on it, the system must be told to ignore (bypass) the sensor when it’s open. All other sensors remain active. Note: Smoke/heat sensor cannot be bypassed. There are two methods for bypassing a sensor: • Direct bypassing. Use this method if the system is armed and you would like to open a window without disarming. After arming the system, bypass door/window sensors before you open them.
To confirm whether or not a sensor was bypassed, press * (Status) on the touchpad. The touchpad displays a list of bypassed sensors or zones. To bypass sensors indirectly: 1. Leave open only those doors and windows that are to remain open and close all others. 2. Arm your system to the desired level (the sensor must be active before it can be bypassed). The touchpad emits protect beeps and displays PROTEST, because of the open sensors. 3. At any touchpad press # (Bypass).
Your installer may have configured your system so that you can control some outputs from your touchpad. Have the installer list and explain any outputs that are programmed for your control. To turn the output on or off, from any touchpad, press 7, 7, output number. If the output was already activated, it will shut off. If the output was off, it will activate. Checking system status Checking the system status means finding out the current condition of your system.
SYSTEM IS OKAY, or AC POWER IS OK. If the optional energy saver module or RF thermostat is installed, the system displays/announces its status (on/off) and the current temperature (if on).
Advanced operation This section provides advanced operation information. Panic alarms Panic alarms are easily activated from any touchpad to quickly alert the central monitoring stations to a fire, police, or auxiliary emergency so the correct personnel can be dispatched immediately. A panic alarm can be activated in any arming level. Each type of panic alarm sounds and reacts differently when activated. • Fire panic alarm. Repeating series of three beeps • Police panic alarm. Continuous tone.
To send an auxiliary panic alarm from a keychain touchpad, press and hold the Lights and Star buttons together for 2 seconds. If your system includes controlled lighting, all system lights turn on and remain on during an auxiliary panic alarm. Siren time-out If the system is not disarmed after an alarm, the sirens will continue to sound until the time-out period is reached (the alarm will still be in progress until the system is manually disarmed).
Access code integrity To preserve the integrity of your system, keep access codes confidential and delete extra codes as soon as they are no longer needed. Avoid using obvious code patterns such as 1234, 1111, 2222, etc. When you use the system master code to enter user programming, you can: • Change the system master code. • Change or delete the partition master code in the current partition. • Change or delete regular user codes in the current partition. The default system master code is 1 2 3 4.
4. Press *, 00, # to exit the programming menus.
To delete a user code: 1. Enter the programming menus by pressing 9, system or partition master code. 2. For Concord 4 systems, press 030 nnn 0, where nnn is the user number (000 to 229). For Concord Express V4 systems, press 030 nn 0, where nn is the user number (00 to 15). 3. Enter the system or partition master code, and then press #. 4. Press *, 00, # to exit the programming menus. When a code is deleted, it can no longer operate the system.
2. For Concord 4 systems, press 030 nnn 2, where nnn is the user number (000 to 229). For Concord Express V4 systems, press 030 nn 2, where nn is the user number (00 to 15). 3. To turn remote access on, press 2, #. To turn remote access off, press 1, #. 4. Press *, 00, # to exit the programming menus. System test attribute This attribute allows the user to perform sensor tests. If the user code does not have this attribute turned on, the code restricts the user from performing phone or sensor test.
undesired partition numbers by pressing the corresponding button. The numbers disappear from the display. 4. Press *, 00, # to exit the programming menus. Time and date Although the installer usually sets the time and date at the time of installation, you can change it if necessary. To set the system time: 1. Enter the programming menus by pressing 9, system or partition master code. 2. Press 020. 3. Enter the correct time in 24-hour format, then press #. For example, if the current time is 7:23 a.m.
3. Release the button when the desired pitch is heard. After about 15 seconds of no touchpad activity, the steady tone stops sounding. System voice volume If your system includes an optional voice module, you may want to adjust the volume at which system status messages are announced. To change the voice volume: 1. Enter the programming menus by pressing 9, system or partition master code. 2. Press 044. 3. Select a volume level 1 to 7 (7 being the loudest) and press #. 4.
Example: • At your touchpad, you set a high temperature point (to trigger the air conditioner) and a low temperature point (to trigger the furnace). • If you usually keep the temperature in your home at 68F, but no one will be there during the day, you can turn the energy saver feature on. If you’ve set the low temperature point to 55F, the furnace will keep the house heated to 55F. • You are about to return home and would like the house to be heated to its normal 68F when you arrive.
Pager notification Your system can notify up to five different pager phone numbers to report system events. The installer can program any numeric pager to receive pages for one or more of the following groups: • Opening and closing reports. • Latchkey reports. • Notify by exception reports. • High level reports.
Event code Description 999 System is in alarm condition. If a user arms the system to Level 3 (away), the pager will report that the system was armed to Level 3. However, if the system is armed from a hardwired touchpad and the user does not exit the premises, the arming level will revert to Level 2 (stay) without notifying the pager. The sensor or user number (Table 4 below) identifies who or what is causing the event.
• • • • • Light control Output control Arming Latchkey paging Notify by exception reports You can use a touchtone phone to create time schedules, but alphanumeric or fixed display touchpads work much better because of their extensive feedback. To define a time schedule: 1. Enter the programming menus by pressing 9, system or partition master code. 2. Press 05 nn 0, where nn is schedule 00 through 15. 3. Enter the start time in 24-hour format (00:00 to 23:59), then press #.
Table 5: One-day rollover examples Example 1 schedule Example 2 schedule Start 22:00 Start 22:00 Stop 05:00 Stop 05:00 Monday Off Monday On Tuesday On Tuesday On Wednesday Off Wednesday On Thursday Off Thursday On Friday Off Friday On Saturday Off Saturday Off Sunday Off Sunday Off Partition 1 Partition 1 Multiple-day rollover The simplest method for defining a window or time that spans multiple days is to use 99:00 to signify an open start or stop time.
Attaching time schedules For any schedule to be effective, it needs to be attached to a feature. One schedule can be attached to more than one feature event.
3. Press B until the touchpad displays the light number you would like to schedule. See “Lights” on page 81 to determine which light number is associated with which lamp. 4. Press #. The touchpad displays the first available time schedule. 5. Press 2, # to assign the time schedule (on) for this light, or press 1, # to make the time schedule inactive (off) for this light. 6. Press B to go to the next time schedule, or press *, 00, # to exit the programming menus.
The touchpad displays LIGHT n TO SN x or LT n SN x (where n is the light number and x is the sensor number). 3. Press A or B until the light number (1 to 9) you would like to deactivate appears. 4. Enter the sensor number as 0 (no sensor) and press #. 5. Press *, 00, # to exit the programming menus.
Scheduled arming The scheduled arming feature allows you to arm the panel to Level 3 (away) according to a schedule. When an active schedule start time is reached, the panel will exit User Programming, automatically bypass any open sensors, and arm to Level 3. The panel will not arm according to an active schedule if the start time is reached while: • The panel is already armed to Level 3. • The panel is performing a phone or sensor test. Note: Schedules cannot be used to disarm the system.
• Closing reports. The page reports the arming level as 222 (Level 2 – Stay) or 333 (Level 3 – Away), and the user that armed to that level. See “Pager notification” on page 30 for more information. Latchkey paging The latchkey paging feature allows programmed pager holders to be notified when the system is armed and/or disarmed during specific hours or under certain conditions.
2. Arm the system. 3. Disarming the system by a latchkey-designated user within the assigned time schedule, sends an opening page. To send a latchkey-opening page based on latchkey modifier 6 only: 1. Arm the system, then press 6, or press the Lock button on a keychain touchpad after arming to Level 3. 2. Disarming the system by a latchkey-designated user sends an opening page, regardless of assigned time schedule.
Or, to schedule latchkey closing, press B until the touchpad displays LATCHKEY CLOSING or LATCH CLOSE, and then press #. Note: If you want a page to be sent every time latchkey-designated user codes arm or disarms the system, apply the same time schedules under latchkey opening and latchkey closing. The touchpad displays the first available time schedule. 4. Press 2, # to assign the time schedule to the event, or press 1, # to make the time schedule inactive for the event. 5.
All user codes and keychain touchpads will send a page if used while this feature is in effect. Pages indicate: • Exception opening report. Reports the arming levels as 111 (Level 1 – Off) and the user that disarmed the system. • Exception closing report. Reports the arming level as 222 (Level 2 – Stay) or 333 (Level 3 – Away), and the user that armed to that level. See “Pager notification” on page 30. The most typical setup of this feature makes use of both exception opening and closing.
station. The central monitoring station will respond in accordance to the guidelines set forth in your monitoring agreement. See “No activity time” on page 79 to see if the no activity feature is currently available to you and the duration of the no activity setting. If the feature is not currently available and you wish to have it, contact your dealer. Panel download Downloading is done only by your dealer using software specifically designed for this system.
Partition-specific settings Partition-specific settings affect only one partition.
To jump partitions without using an access code: 1. From any hardwired touchpad, press 7, 4. Touchpads display ENTER PARTITION or ENTER CMD. 2. Press the desired partition number (1 to 6). The touchpad sounds one short beep if the jump was successful. One long beep means the jump was not successful. Alphanumeric touchpads display the text in the newly entered partition. 3. Proceed to arm, disarm, or program as needed. The partition assignment reverts if no touchpad buttons are pressed for 10 seconds.
The display shows ENTER CODE. 2. Enter your access code. The display shows all the partitions that will be armed. 3. Press # to arm all displayed partitions, or press the number of any partitions you don’t want armed (the partition numbers disappear from the display), and then press #. To disarm multiple partitions at the same time from a touchpad: 1. Press 1 on any touchpad assigned to one of the partitions you want to disarm. The display shows ENTER CODE. 2. Enter you access code.
• The partition touchpad you are using must arm/disarm that partition. You can also arm/disarm additional partitions. Keychain touchpad arming/disarming To arm multiple partitions at the same time from a keychain touchpad, press the Lock button. To disarm multiple partitions at the same time from a keychain touchpad, press the Unlock button.
• • • • Chime. Press once to turn chime on, press again to turn chime off. Stay. Press once to arm to Level 2 (stay). Exit. Press once to use the quick exit feature. Away. Press once to arm to Level 3 (away). Note: Macro keys should not be programmed to disarm the system. Your installer can also program these keys to perform a system command different from those described.
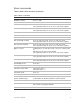
The system master code can view all events from any partition. The partition master code can only view global system events and events related to their respective partition. Regular user codes cannot view event history. Note: Fixed display touchpads cannot be used to view the event history. All partitions can view event history simultaneously, but only one touchpad at a time can view the history in each partition.
Source 1 User 2 AC POWER FAILURE X AC power restoral AC POWER RESTORAL X RCVR TAMPER X ARM LEVEL CHANGE X X X Auto force arm AUTO FORCE ARM X X X Auto phone test AUTO PHONE TEST X Auxiliary panic AUXILIARY PANIC X X Auxiliary panic cancelled AUXILIARY CANCELLED X X Bus cover tamper BUS TAMPER X X Bus failure BUS FAILURE X X Closing report CLOSING REPORT X CPU back in service BACK IN SERVICE X CPU battery restoral BATTERY RESTORED X CPU low battery CPU LOW BATTE
50 X No activity cancelled ACTIVITY CANCELLED X Opening report OPENING REPORT X Phone failure PHONE FAILURE X Phone line test failure PHONE LINE FAIL X Phone line test restoral PH LINE RESTORED X Phone test PHONE TEST Police panic User 2 ACTIVITY ALARM Source 1 No activity alarm Bus unit number MEMORY FAILURE Zone Memory failure Current arming level Display Partition Event X X X X X X X POLICE PANIC X X Police panic cancelled CANCELLED X X Receiver failure RECEI
X Zone tamper TAMPER X X Zone trouble TROUBLE X X Zone trouble restoral TROUBLE RESTORAL X X Zone unbypass UNBYPASSED X X User 2 X Source 1 SUPERVISORY Bus unit number Partition Zone supervisory Zone Display Current arming level Event X 1. Source information is shown only if the information was available when the event was buffered. 2. User information is shown only if the information was available when the event was buffered. 3.
Detail screen display Source S06 Auto stay arming S07 Automation module S08 Keyswitch arming zone S09 System S1xx (xx = zone number) Keychain touchpad S2xx (xx = zone number) Wireless touchpad S3xx (xx = bus unit number) Alphanumeric touchpad S6xx (xx = bus unit number) Fixed display touchpad Touchtone phone Your system may be equipped with an option that allows system operation from a touchtone phone, on or off the premises.
When you call the panel, it needs to recognize that it should answer the incoming call. This is accomplished by one of two methods: • Ring-hang-ring method. You can use this method if there is no chance that an answering machine or person will pick up the call on the first ring. • Twelve-ring method. You can use this method if there is no chance that an answering machine or person will pick up the call before the twelfth ring. To use the ring-hang-ring method: 1. Call the panel.
To operate your system using a touchtone phone: 1. Use a touchtone phone to access the system. Local phone access. Pick up the phone. Within 5 seconds of picking up the phone receiver, enter # (or *). Remote phone access. Use the ring-hang-ring or twelve-ring method to get the system, then enter # (or*), code. 2. Enter the system command as shown in Table 10 below. Table 10: System commands Command Entry Disarm the system Press #, 1, code. Arm to Level 2 Press #, 2, code.
Programming You can program the following items on your system: • • • • • • • • • • System time and date User codes Schedules Schedule events Downloading feature Brightness of touchpads Volume of speakers Chime features Energy saver options Attach lights to sensors There are two methods for programming your system: • Programming menus. Off visual text cues from your touchpad. • Programming shortcuts. Allow you to type in a sequence of numbers for a specific programming task.
Table 11: Programming menus Time and date Time Date User codes Options Regular user User 00 Direct bypassing on/off (default = off) Remote access on/off (default = off) System test on/off (default = off) Latchkey report on/off (default = off) Partition assign 1 to 6 Partition master Partition master code System master System master code Downloading on/off (default = on) Touchpad brightness 0 to 3 (default = 2) Volume 1 to 7 (default = 4) Voice chime on/off (default = on) Chime on close on/off (def
To change or assign a user access code: 1. Enter the programming menus by pressing 9, system or partition master code. 2. Press B until the touchpad displays USER CODES, and then press #. 3. Press B until the touchpad displays the type of code you wish to change (regular user codes, partition master codes, or system master code), and then press #. 4. Press B until the touchpad displays the user code you wish to change, and then press #. 5. Enter the new code and then press #. 6. Press B.
4. Press B until the touchpad displays the user code you wish to delete, and then press #. 5. Enter the system or partition master code you used in Step 1, and then press #. The deleted code appears as USER 04 **** or RG 01 ----, for example. 6. Press *, B to move to the next user code, or press *, 00, # to exit the programming menus. To change or delete the partition master code: 1. Enter the programming menus by pressing 9, system or partition master code. 2.
Remote phone access. Dial the phone number and then press #, code, #, 9 code. Touchpad. Press 9, code. 2. Enter a programming command sequence (see Table 12 below.) Table 12: Programming shortcuts command sequences Command Programming sequence Time *, 020, TTTT, # Date *, 021, DDMMYY, # Regular user codes Concord 4 (continues up to User 229): User 00: *, 03000000, nnnn, # User 01: *. 03000010. nnnn.
Command Programming sequence Voice chime *, 045, 1 (off) or 2 (on), # Note: Only available with PIVM or VOM installed.
Command Programming sequence Light 5 Attaching schedules for Light 5 operation. Schedule 0: *, 064400, 1 (off) or 2 (on), # Schedule 1: *, 064401, 1 (off) or 2 (on), # (continues through schedule 15) Light 6 Attaching schedules for Light 6 operation. Schedule 0: *, 064500, 1 (off) or 2 (on), # Schedule 1: *, 064501, 1 (off) or 2 (on), # (continues through schedule 15) Light 7 Attaching schedules for Light 7 operation.
Command Programming sequence Arm to Level 3 (away) Attaching schedules for arming to Level 3 (away) operation. Schedule 0: *, 066000, 1 (off) or 2 (on), # Schedule 1: *, 066001, 1 (off) or 2 (on), # (continues through schedule 15) Energy saver Setpoints (enter temperature value in Fahrenheit) Low: *, 070, nn, # High: *, 071, nn, # Factory code *, 010 System number *, 011 Software version *, 013 Attach lights to sensors Attaching lights to sensors.
Testing and troubleshooting This section provides information to help you test and troubleshoot problems. Testing The system contains a test mode that allows you to test sensors and panic signals without creating false alarms in monitored systems. Please follow the instructions in this section carefully. Your security system automatically monitors for problems like power failures, low batteries, sensors that aren’t working, and communication trouble with the central monitoring station.
If you need more time to complete testing, restart the timer by pressing 8, code, 3. Check to see that all sensors have been tested by pressing *. Touchpads display a list of untested sensors. You will know that you have finished testing when touchpads display SENSOR TEST OK or ZONES ALL TESTED. 4. Disarm to Level 1 to exit test mode.
Phone communication test The purpose of this test is to verify communication between the central monitoring station and your system. Most phone tests take only a few minutes, however, your system will try for up to 15 minutes to establish a connection if necessary. To perform a phone communication test: 1. Disarm the system. 2. Press 8, system or partition master code, 2. Touchpads display PHONE TEST or SYSTEM ARMED TO PHONE TEST.
Troubleshooting This section provides information to help you diagnose and solve problems that may arise while configuring or using your security system. Your security system uses a variety of different alarm sirens, status beeps, voice messages, and trouble beeps to communicate with you. This section describes sounds and what they mean. Try to familiarize yourself with the differences. You will hear sounds each time you tell your security system to do something, like arm or disarm.
Touchpad/voice feedback Trouble condition Low batt The emergency backup battery in the control panel is low and must be recharged or replaced. If AC power is out, the security system may shut down once the battery is below the operating level. When AC power is restored, the panel recharges the battery. If the trouble condition exists more than 24 hours after AC power is restored, call your security dealer for service.
Common questions What if someone calls while I’m using the phone to operate the panel? If the phone rings while you’re using it to operate the system, you’ll hear one long beep for each ring from interior speakers and phones. You can answer the call by simply hanging up on the system, and then answering the call as you normally would. You’ll have to initiate another session to resume system operation. Can I use the phone to control the system while I’m talking on the phone? No.
I can’t arm my system to Level 3 (away). If a delay door is open while you’re trying to arm the system to Level 3 or a delay door was not activated after the arming attempt, the system will arm to Level 2 instead. Close the delay door, arm the system to Level 3, and then exit through a delay door. How do I disable my system long enough to retrieve messages from work or to do banking over the phone? Solutions include: • Disengage the security system from local phone control by entering #, 7, 3.
User sheets This section provides specific information about the setup of your system. The User Sheets should be completed by the installer and the user. System sensors If you have more system sensors than will fit on this sheet, make copies of this sheet and keep all the information together. Record the sensor number and name in Table 15 below. Indicate the partition, whether it is a hardwired (HW) or wireless sensor (WL), or a touchpad (TP).
Number Sensor name Partition 1 to 6 HW / WL / TP (circle one) HW / WL / TP HW / WL / TP HW / WL / TP HW / WL / TP HW / WL / TP HW / WL / TP HW / WL / TP Concord 4 User Manual 71
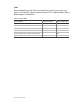
User codes Table 16 below provides a space for you to record user code information. If you have more user codes than will fit on this sheet, make copies of this sheet and keep all the information together. B User can bypass sensors RA User can access the system from a phone PTN Accessible partitions for each code S User can perform system tests L Latchkey user Defaults are indicated by an X.
Alphanumeric and fixed display touchpads Status beeps and key beeps are programmable by the installer. The silent arming feature is user-programmable. Note: Protest beeps will always sound when bypassing. Table 17 below shows touchpad information.
Keychain touchpads There are _______ keychain touchpads in use in the system. Keychain touchpad 1 Active for partition: 1 2 3 4 5 6 Latchkey user: Y N Press the Lock button to: Increase the arming level. Arm the system to Level 3 with no exit or entry delay. Press the Lock and Unlock buttons at the same time to: Create a panic alarm. ________________________________________________________ _____ Press the Light button to control all lights.
Press the Star button to trigger ____________________________________________. Press the Light and Star buttons at the same time to create an auxiliary panic alarm.
Keychain touchpad 3 Active for partition: 1 2 3 4 5 6 Latchkey user: Y N Press the Lock button to: Increase the arming level. Arm the system to Level 3 with no exit or entry delay. Press the Lock and Unlock buttons at the same time to: Create a panic alarm. ________________________________________________________ _____ Press the Light button to control all lights. Press the Star button to trigger ____________________________________________.
Accidental smoke and fire alarms To silence the alarms and reset the sensor: 1. Press code or 1, code, once to silence the alarm. 2. Press 1, code, again to reset the smoke alarm. Smoke and fire panic alarms cannot be cancelled and are always reported to the central station. If, after disarming the system once, the system still thinks a sensor is open, disarm the system again.
Doors and delay time settings When the system is armed, enter and exit the premises only through designated delay doors. • Entry delay time. The time allowed to enter the premises and disarm the system. • Exit delay time. The time allowed to leave the premises after arming the system. Table 18 below indicates the door and delay time settings.
Feature My system features Keyswitch arming Yes. I can use a key to arm the system. The switch is located: ____________________________________________ _____ No. System information Table 20 below shows system information. Table 20: System information System information Code Factory code System number System level Software version If the power goes out Your system has a backup battery that keeps your system operational during a power failure.
Partition No activity features 4 5 6 Yes. A report will be sent if there is no activity in my system for _____ hours (1 to 42). No. My system does not use this feature. Yes. A report will be sent if there is no activity in my system for _____ hours (1 to 42). No. My system does not use this feature. Yes. A report will be sent if there is no activity in my system for _____ hours (1 to 42). No. My system does not use this feature.
Lights Record the house codes for each partition and location of each light in Table 23 below.
Outputs Table 24: Output information Output Partition Location Name Low temperature setting in F High temperature setting in F 1 2 3 4 5 6 Energy saver Table 25: Energy saver information Partition 1 2 3 4 5 6 82 Concord 4 User Manual
Alarm sounds and status beeps Table 26: Alarm sounds Alarm type Alarm sound Fire Repeating series of three beeps Police Continuous tone Auxiliary Rapid beeps Table 27: Beep sounds Beep type Beep sound Exit delay Two or three beeps (arming level), followed by one beep every 4 seconds, followed by 10 seconds of quick beeps (end of exit delay), followed by two or three beeps (set arming level). Entry delay Two beeps every 2 seconds, followed by two beeps every second for the last 10 seconds.
Emergency planning Since an emergency is always unexpected, you should develop plans for a variety of emergencies. Periodically discuss and rehearse emergency plans that include the following: • Understand how to use your security system. • Know the normal state of doors and windows; open, closed, or locked. • Use a different escape route if closed doors feel hot to the touch. • Emphasize that everyone should escape as quickly as possible. Do not stop to gather any belongings.
• If intruders have the technical means of bypassing, jamming, or disconnecting any or all parts of the system. • If power to sensors is disconnected or inadequate. • If freeze, flood, or any environmental sensors are not located in areas where the specific condition can be detected. • If smoke does not reach a smoke sensor. For example, smoke sensors cannot detect smoke in chimneys, walls, roofs, or smoke blocked by a closed door.
86 Concord 4 User Manual