
User Manual User guide


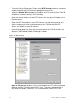


Table Of Contents
- Chapter 1 TVN 20 System Basics
- Chapter 2 TVN Advanced Topics
- HDD Configuration & Management
- Account Management (Users)
- Advanced Camera Settings
- Exception Parameters – System Health Monitoring
- Video Loss
- Remote Record & Video Download
- Additional Network Settings
- Remote Update
- Serial Port Settings – RS-232 & RS-485
- Log Files
- Appendix A Troubleshooting
- Appendix B TVN 20 Specifications
- Appendix C TVN 20 IP Camera Capacities
- Appendix D TVN 20 Supported IP Cameras
- Appendix E TVN 20 USB Archive Options
- Appendix F TruVision Device Finder
- Appendix GGlossary of Terms
- Appendix HWarranty and Support

22 TruVision NVR 20 User Manual
Configuring Cameras via the TVN 20 – On Screen Time/Date/Titling
Fully Configurable Cameras
Figure 13: Display settings for fully configurable cameras
• Select Channel No:
• Click Show Name if you want the camera title to be overlayed on the video.
• Enter the desired camera name.
• Click Show Date and select the time format 12/24 Hour, Date Format and
also select Display Week if you want the Day of the Week to be displayed.
• Select the type of OSD display – the default Non Transparent & Non Flashing
is recommended.
• OSD Position allows the User to independently position the Time/Date/Day
display distinctly from the Camera Title. Press OSD Position > Settings to
bring up the OSD window. Simply click on the time/date or camera title
elements, click and drag each of them using your mouse, to the desired
placement within the image.