
User Manual
10BChapter 11: Alarm settings
96 TruVision NVR 50 User Manual
The timeout setting lets you define how long a signal remains active after the
alarm has ended.
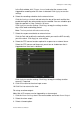
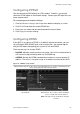
4. Select the arming schedules for the alarm output.
Click Rule and select the day of the week and the time periods during the day
when alarm outputs can be detected. You can schedule up to eight time
periods in a day. Default is 24 hours.
Click Apply to save the settings. Click Copy to copy the settings to other
days of the week and holiday period.
Note: The time periods defined cannot overlap.
5. Click OK to return to the alarm output screen.
6. Click Back to return to live view.
Triggering or clearing alarm outputs
manually
When an alarm is activated, the NVR can be set up so that the alarm must be
manually acknowledged in order to be silenced. See “Setting up external alarms”
on page 94 for information on setting up an alarm to be manually cleared.
All user levels (administrator, manager and operator) can manually acknowledge
an alarm.
To trigger or clear alarm outputs manually:
1. Click the Alarm settings icon in the menu toolbar and select Alarm Output.
2. Click the Manual Alarm tab.
3. Select the desired alarm output and click one of the following buttons:
• Clear: Clear to stop alarm output.
• Trigger All: Trigger all alarm outputs at once. This action could be done,
for example, when you need to test them.
• Trigger: Trigger the selected alarm output manually.
• Clear All: Stop all alarm outputs at once.
4. Click Back to return to live view. The alarm is silenced.
Setting up system notifications
Setting up system notifications instructs the NVR to alert you when irregular
events occur and how to alert you to the event.
You can quickly check the system status by looking at the status LEDs on the
front panel. When there is an irregular event with the system, an icon appears on