
User Manual


3BChapter 4: Operating instructions
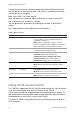
24 TruVision NVR 50 User Manual
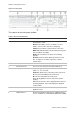
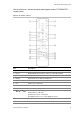
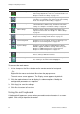
Icon Name Description
Camera management
Configures camera settings including motion detection,
video image adjustments, video loss, and camera title. See
Chapter 14 “Camera settings” on page 115.
Video schedule
Configures recording settings including recording
schedules, record quality, auto delete mode, and recording
mode. See Chapter 10 “Recording” on page 81.
Network settings
Configures standard network settings including IP address,
e-mail notifications, DDNS setup, and advanced network
settings. See Chapter 12 “Network settings” on page 99.
Alarm settings
Configures alarm settings including alarm input, relay
output, and remote alert. See Chapter 11 “Alarm settings”
on page 91.
PTZ settings
Configures PTZ settings including RS-485 settings. See
Chapter 6 “Controlling a PTZ camera” on page 41.
User
management Configures users, passwords, and access privileges. See
Chapter 16 “User management” on page 127.
System settings
Configures system settings including RS-232 settings,
firmware upgrade, hard drive settings, and boot log. See
Chapter 13 “HDD management” on page 109 and
Chapter 15 “NVR management” on page 121.
Help information
Provides reference information to the various toolbars,
menus, and keys within the interface.
Power manager
Provides access to logout, reboot and shutdown options.
See “Turning on and off the NVR” on page 11.
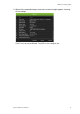
To access the main menu:
1. In live view press the Menu button on the remote control or front panel.
- Or -
Right-click the mouse and select Menu from the pop-up menu.
The main menu screen appears. The Display screen appears by default.
2. Click the required menu icon to display its submenu options. Modify the
configuration parameters as required.
3. Click Apply to save the settings.
4. Click Back to return to live view.
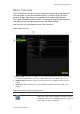
Using the soft keyboard
A keyboard will appear on-screen when you need to enter characters in a screen
option. Click a key to input that character.