Topaz Installation Sheet P/N 460924001E • ISS 08FEB12
Content Introduction ........................................................................................ 3 Recommended minimum requirements ............................................. 3 Setup for Internet Explorer: ................................................................ 4 Topaz installation ............................................................................. 10 Technical support.............................................................................
Introduction Topaz 1.5 has been updated to include support for Microsoft Windows Vista, Windows 7, and Internet Explorer 7/8. This installation also includes many fixes and enhancements to the product. The complete Topaz program is included on one installation CD. If workstations are to be used, a file named workstation.hta is created during the first Topaz software installation (server). That file must be available at the workstation computer during software installation.
• Serial RS232 Ports: 1 is recommended • Parallel port: 1 is recommended (to print alarms) • USB port: 1 minimum for Software Sentinel • TCP/IP must be installed as a network protocol Setup for Internet Explorer: The following section provides instructions for setting up Internet Explorer for use with Topaz. Some settings are different if you are running Windows 7 or Vista with Internet Explorer 7/8. 1.
Make sure that the Require server verification (https:) for all sites in this zone checkbox is unchecked, and then click Add. Click OK to save the changes and return to the Security tab. Web content zone: Click on the appropriate zone (the default is Internet, unless you added the server to another zone). For Explorer 7/8 with Windows 7 or Vista, uncheck the box next to Enable Protected Mode. The Java Virtual machine runs in the program space that is disabled by this setting.
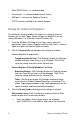
If proxy server is not required, under Proxy server, make sure the Use a proxy server for your LAN checkbox is NOT selected. Click OK to save the setting and return to the Connections tab. If proxy is required, make sure the Use a proxy server for your LAN checkbox is checked, and then click on the Advanced button to open the Proxy Settings window. In the Exceptions block, enter the address of the Topaz server, and then click OK to save the setting and return to the Local Area Network (LAN) Settings window.
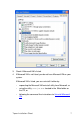
3. Check if Microsoft VM is listed. 4. If Microsoft VM is not listed, you do not have Microsoft VM on your system. If Microsoft VM is listed, you can uninstall it either by: • requesting the Microsoft VM uninstall utility from Microsoft, or • using the utility unmsjvm.exe located in the \Misc folder on the CD, or • following the command line instructions to Uninstall Microsoft VM.
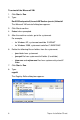
To uninstall the Microsoft VM: 1. Click Start > Run. 2. Type: RunDll32 advpack.dll,LaunchINFSection java.inf,UnInstall The Microsoft VM uninstall dialog box appears. 3. Click Yes to confirm. 4. Reboot when prompted. 5. After the machine restarts, go to the systemroot. For example, • for Windows XP, systemroot could be C:\WINNT • for Windows 2000, systemroot could be C:\WINDOWS 6. Delete the following files or folders from the systemroot: • java folder from systemroot • java.
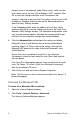
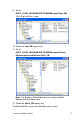
. Go to: HKEY_LOCAL_MACHINE\SOFTWARE\Microsoft\Java VM (Hint: Right click the + icon) 10. Delete the Java VM registry key. 11. Go to: HKEY_LOCAL_MACHINE\SOFTWARE\Microsoft\Internet Explorer\AdvancedOptions\JAVA_VM Note: The Registry Editor display on your system could be different than the above view. 12. Delete the JAVA_VM registry key. The Microsoft VM is now uninstalled from your system.
Topaz installation Before installing Topaz Some older versions of the Topaz installation require you to manually uninstall previous versions. The installation will inform you if this is a requirement. In any case, you should always backup the Topaz database before upgrading to a newer version. To backup the Topaz database: 1. From the Topaz interface, perform a backup/Don’t reset log from the Control/Backup-Restore page.
Starting your installation Important notes for Windows 7 and Vista installations • In a Windows 7 or Vista environment, the installation must be executed by running setup.exe using the Run as Administrator option (i.e., right-click setup.exe and under Properties, click the Run as Administrator check box). • In a Windows 7 or Vista environment, Topaz 1.5 cannot be installed on the C drive. Please make sure that you have created another partition on a different drive than C, before installing Topaz 1.5.
7. The version release notes (Read-me file) appears. If interested, review the release notes. Click Next. 8. The user information prompt appears. Enter the user’s Full Name and the name of the Organization. Leave the radio button selected to Anyone. Click Next. 9. The dialog displays the default location where the files are copied. You can change the installation location using the Browse button. Click Next.
alarms, events, reports and status). If the software is already on this PC, then skip this step. Otherwise, we recommend that you select ‘Install Java Runtime Environment’ from the CD menu, which will install the Sun Java interpreter. 13. Re-boot the PC, if requested by the installation procedure, to save changes to the PC’s configuration. 14. Insert the license dongle hardware into an available USB port. 15. The Topaz icon appears on the desktop. Double-click the icon to start the Topaz application.
Technical support For assistance with this product, refer to this document and any other documentation provided. If you still have questions, you may contact technical support during normal business hours (Monday through Friday, excluding holidays, between 8 a.m. and 7 p.m. Eastern Time).