
Owner's manual


Chapter 2: Installation
TruVision PTZ 36X Camera User Manual 9
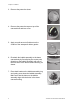
Caution: Do not press on the top of the bubble as
shown in the figure as it might damage the unit.
8. Secure the bubble assembly to the dome
camera housing with the supplied security
screw. Use the supplied security TORX wrench
to tighten the security screw.
9. Further secure the bubble assembly in place by
loosening (unscrewing) the two slotted screws
that are located on the bubble assembly so that
they are flush with the outside edge of the
dome camera housing.
10. Remove the plastic protective sheet from the
bubble.
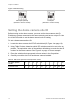
11. Set the DIP switches.
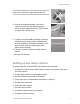
Setting up the dome camera
To quickly put the TruVision PTZ 36X Camera into operation:
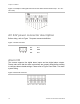
1. Configure the dome camera’s DIP switches, which are located on the top of
the dome camera.
2. Set the dome camera communication protocol.
3. Set the RS-485 communication DIP switch.
4. Verify and set the communication termination, if required.
5. Set the dome camera ID.
6. Mount the dome camera.
7. Wire the dome camera.
8. Connect the dome camera to a monitor.
9. Program the dome camera.