
User Manual


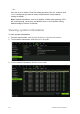
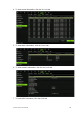

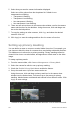
Table Of Contents
- Chapter 1 Product introduction
- Chapter 2 Installation
- Chapter 3 Getting started
- Chapter 4 Recording
- Chapter 5 Alarm settings
- Chapter 6 Network settings
- Configuring general network settings
- Configuring DDNS
- Configuring an NTP server
- Configuring email
- Configuring UPnP
- Configuring SNMP
- Configuring an FTP server to store snapshots
- Configuring a remote alarm host
- Configuring multicast
- Configuring the server and HTTP ports
- Configuring the RTSP service port
- Telnet setup
- Checking network status
- Exporting network packet data
- Chapter 7 HDD management
- Chapter 8 Operating instructions
- Chapter 9 Live view
- Chapter 10 Controlling a PTZ camera
- Chapter 11 Playing back a recording
- Chapter 12 Archiving recorded files
- Chapter 13 Recorder management
- Chapter 14 Camera settings
- Chapter 15 User management
- Chapter 16 Using the web browser
- Appendix A Specifications
- Appendix B PTZ protocols
- Appendix C Port forwarding information
- Appendix D KTD-405 keypad
- Appendix E Maximum pre-recording times
- Appendix F Supported PTZ commands
- Appendix G Default menu settings
- Index

TruVision DVR 12 User Manual 99
Function Description
2.
Refresh Refresh the search results if any parameters have been
modified.
3.
Name Files found on the backup device are listed.
4.
Delete Click to delete a selected file from the backup device.
5.
Play Click to play selected file.
6.
Free space Free space available on the backup device is displayed.
7.
Seal disc Select to prevent other files being recorded onto the disc.
8.
Include Player Select to automatically include the Player tool when archiving
files.
9.
New folder Create a new folder on the backup device. Files from the
recorder can be archived to a specific folder.
10.
Format Format the USB/eSATA drive.
11.
Archive Start downloading selected files onto the backup device.
12.
Cancel Cancel search and return to previous menu.
To export recorded files to a backup device:
1. Connect the backup device to the recorder.
If using a USB memory drive, insert the device into the USB port on the front
panel. If using a digital video disk (DVD) or eSATA drive, insert the disc into
the DVD drive. If both media are found in the recorder, the USB device takes
precedence over the DVD.
2. In live view mode press the Search button on the front panel or remote
control.
- Or -
Right-click the mouse and select Advanced Search.
The Advanced Search window appears.
3. Select the cameras and search parameters required.
4. Click Search. The list of results appears.
5. Select the files to export.
Note: You can click the Play button to verify that the selected files are the
files to export.
6. Click Archive. The Archive window appears.
7. Select the storage medium to export to from the drop-down list.
8. Click Archive to begin the backup process.