
User Manual


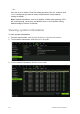

Table Of Contents
- Chapter 1 Product introduction
- Chapter 2 Installation
- Chapter 3 Getting started
- Chapter 4 Recording
- Chapter 5 Alarm settings
- Chapter 6 Network settings
- Configuring general network settings
- Configuring DDNS
- Configuring an NTP server
- Configuring email
- Configuring UPnP
- Configuring SNMP
- Configuring an FTP server to store snapshots
- Configuring a remote alarm host
- Configuring multicast
- Configuring the server and HTTP ports
- Configuring the RTSP service port
- Telnet setup
- Checking network status
- Exporting network packet data
- Chapter 7 HDD management
- Chapter 8 Operating instructions
- Chapter 9 Live view
- Chapter 10 Controlling a PTZ camera
- Chapter 11 Playing back a recording
- Chapter 12 Archiving recorded files
- Chapter 13 Recorder management
- Chapter 14 Camera settings
- Chapter 15 User management
- Chapter 16 Using the web browser
- Appendix A Specifications
- Appendix B PTZ protocols
- Appendix C Port forwarding information
- Appendix D KTD-405 keypad
- Appendix E Maximum pre-recording times
- Appendix F Supported PTZ commands
- Appendix G Default menu settings
- Index

100 TruVision DVR 12 User Manual
Creating and archiving video clips
You can save important scenes in a recorded file for later reference by creating
video clips of selected portions of the file during playback. When an intruder, for
example, crosses in front of several cameras you can save the video clip of the
intruder’s path across these cameras in a single file.
Up to 30 video clips can be made from a recording.
Note: This feature is only available using the mouse.
To export video clips during playback:
1. Connect the backup device to the recorder.
2. Search for the required files to play back. See “Searching recorded video” on
page 90.
3. Select the file or files to play back and click Play. Playback starts
immediately.
4. Click the playback timeline where you want the video clip to start and click the
Start Clipping button.
5. Click the playback timeline where you want the video clip to stop and click the
End Clipping button.
6. Repeat for additional clips.
7. Exit playback mode. A message appears asking if you want to save the video
clips.
8. Click Yes to archive the clips. The Archive window appears.
Click No to exit and return to the search results window. The clips are not
saved.
9. In the Archive window select from the drop-down list the backup device to be
used.
10. Click Archive. File downloading starts.
Note: You can create a new folder for the video clips. Press the New Folder
button and enter the folder name.
Archiving snapshots
You can save all the video snapshots recorded to a backup device.
To archive snapshots:
1. Connect the backup device to the recorder.
2. Search for the required snapshot files to play back. See “Slideshow of
snapshots” on page 93. The list of snapshots appears.
3. Select the snapshots to backup.