
User Manual


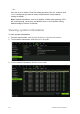

Table Of Contents
- Chapter 1 Product introduction
- Chapter 2 Installation
- Chapter 3 Getting started
- Chapter 4 Recording
- Chapter 5 Alarm settings
- Chapter 6 Network settings
- Configuring general network settings
- Configuring DDNS
- Configuring an NTP server
- Configuring email
- Configuring UPnP
- Configuring SNMP
- Configuring an FTP server to store snapshots
- Configuring a remote alarm host
- Configuring multicast
- Configuring the server and HTTP ports
- Configuring the RTSP service port
- Telnet setup
- Checking network status
- Exporting network packet data
- Chapter 7 HDD management
- Chapter 8 Operating instructions
- Chapter 9 Live view
- Chapter 10 Controlling a PTZ camera
- Chapter 11 Playing back a recording
- Chapter 12 Archiving recorded files
- Chapter 13 Recorder management
- Chapter 14 Camera settings
- Chapter 15 User management
- Chapter 16 Using the web browser
- Appendix A Specifications
- Appendix B PTZ protocols
- Appendix C Port forwarding information
- Appendix D KTD-405 keypad
- Appendix E Maximum pre-recording times
- Appendix F Supported PTZ commands
- Appendix G Default menu settings
- Index
TruVision DVR 12 User Manual 103
Technical support: Console mode.
Updating system firmware
The firmware on the recorder can be updated using four methods:
Via an USB device
Over the network via an FTP server
Via the recorder web browser
Using TruVision Navigator. For further information, refer to the TruVision
Navigator user manual.
The firmware upgrade file is labeled TVR12.dav.
To update the system firmware using a USB device:
1. Download on to a USB the latest firmware from our web site at:
www.interlogix.com
- Or -
www.utcfssecurityproductspages.eu/videoupgrades
2. Connect the USB device to the recorder.
3. Click the System Settings icon in the menu toolbar.
4. Select Upgrade > Local Upgrade. The list of files on the USB is displayed.
5. Select the file and click Upgrade. Click Yes to begin the upgrade process.
6. When the upgrade process is completed, the recorder will reboot
automatically.
To update the system firmware via a FTP server:
For engineering purposes only.
Restoring default settings
To restore the default factory settings of the recorder:
1. From the menu toolbar, click System Settings > Configuration.
2. Click the Default tab. Click OK to confirm you want to restore default settings.
Note: Network information such as IP address, subnet mask, gateway, MTU,
NIC working mode, server port, and default route are not restored to factory
default settings.
3. Click the Default button. Enter the Admin password, click OK, and then click
Yes to confirm that you want to restore all parameters to default.