
User Manual
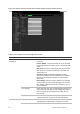
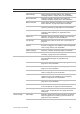

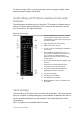
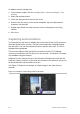
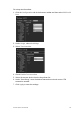
Table Of Contents
- Chapter 1 Product introduction
- Chapter 2 Installation
- Chapter 3 Getting started
- Chapter 4 Recording
- Chapter 5 Alarm settings
- Chapter 6 Network settings
- Configuring general network settings
- Configuring DDNS
- Configuring an NTP server
- Configuring email
- Configuring UPnP
- Configuring SNMP
- Configuring an FTP server to store snapshots
- Configuring a remote alarm host
- Configuring multicast
- Configuring the server and HTTP ports
- Configuring the RTSP service port
- Telnet setup
- Checking network status
- Exporting network packet data
- Chapter 7 HDD management
- Chapter 8 Operating instructions
- Chapter 9 Live view
- Chapter 10 Controlling a PTZ camera
- Chapter 11 Playing back a recording
- Chapter 12 Archiving recorded files
- Chapter 13 Recorder management
- Chapter 14 Camera settings
- Chapter 15 User management
- Chapter 16 Using the web browser
- Appendix A Specifications
- Appendix B PTZ protocols
- Appendix C Port forwarding information
- Appendix D KTD-405 keypad
- Appendix E Maximum pre-recording times
- Appendix F Supported PTZ commands
- Appendix G Default menu settings
- Index

TruVision DVR 12 User Manual 125
To search for logs, click Log on the menu bar, select a log type, specify a date
and time range, and then click Search.
Controlling a PTZ dome camera in the web
browser
The web browser interface lets you control the PTZ functions of a dome camera.
Click a PTZ dome camera and use the PTZ controls on the interface to control
the PTZ functions. See Figure 36 below.
Figure 36: PTZ controls
1. Directional pad/auto-scan buttons: Controls
the movements and directions of the PTZ.
Center button is used to start auto-pan by the
PTZ dome camera.
2. Adjust speed of PTZ dome camera.
3. Adjust zoom, focus, and iris.
4. Turn on or off the camera light (if available on
the camera).
5. Lens initialization: Initialize the lens of a
camera with a motorized lens, such as PTZ
or IP cameras. This function helps to
maintain lens focus accuracy over prolong
periods of time.
6. Start or stop camera wiper (if available on the
camera).
7. Auxiliary focus: Automatically focus the
camera lens for the sharpest picture.
8. Start selected preset/tour/shadow tour
(depending on function selected).
9. List presets available.
10. List preset tours available.
11. List shadow tours available.
12. Modify brightness, contrast, saturation, and
hue values.
Text overlay
You can add up to four lines of text on-screen via the browser. This option can be
used, for example, to display emergency contact details. By default these lines of
text are positioned along the top of the window. The strings follow each other
consecutively.
Note: This option is not available via the recorder.