
User Manual


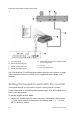


Table Of Contents
- Chapter 1 Product introduction
- Chapter 2 Installation
- Chapter 3 Getting started
- Chapter 4 Recording
- Chapter 5 Alarm settings
- Chapter 6 Network settings
- Configuring general network settings
- Configuring DDNS
- Configuring an NTP server
- Configuring email
- Configuring UPnP
- Configuring SNMP
- Configuring an FTP server to store snapshots
- Configuring a remote alarm host
- Configuring multicast
- Configuring the server and HTTP ports
- Configuring the RTSP service port
- Telnet setup
- Checking network status
- Exporting network packet data
- Chapter 7 HDD management
- Chapter 8 Operating instructions
- Chapter 9 Live view
- Chapter 10 Controlling a PTZ camera
- Chapter 11 Playing back a recording
- Chapter 12 Archiving recorded files
- Chapter 13 Recorder management
- Chapter 14 Camera settings
- Chapter 15 User management
- Chapter 16 Using the web browser
- Appendix A Specifications
- Appendix B PTZ protocols
- Appendix C Port forwarding information
- Appendix D KTD-405 keypad
- Appendix E Maximum pre-recording times
- Appendix F Supported PTZ commands
- Appendix G Default menu settings
- Index

TruVision DVR 12 User Manual 137
7. Press and hold esc and then press the arrow buttons to navigate the cursor
to activate OK button on the Login screen.
8. Press . The main menu appears.
Example 2: To modify a menu option using the keypad
1. In the main menu press and hold esc and then press the arrow buttons to
navigate to the desired menu icon (for example, Display Mode Settings).
2. Press esc and to go to Display Mode Settings menu.
3. Press Zoom + or Zoom - to scroll to the menu tab, More Settings.
4. When in the desired menu window, press and hold esc and then press the
arrow buttons to navigate the cursor to the option, Menu Timeout.
5. Press to activate the dropdown menu.
6. Press and hold esc and then press the up/down arrow buttons to navigate to
the desired option.
7. Press to select the option.
8. Press and hold esc and then press the up/down arrow buttons to navigate to
Apply. Press to select it. Then navigate to Back to return to live view.
Instead of the arrow buttons, you can also use the joystick on the keyboard.
TVR 12/TVR 12c mapping to the KTD-405 keypad
Table 22: Recorder mapping to the KTD-405 keypad
Task Keypad action Further information
Menu mode
Call up or exit menu In live view, press esc. To log out the menu: go to the
Power Manager menu and select
Logout.
Move through the menus Press and hold esc and
then press the arrow
buttons or use the joystick.
Down, Up, Left,
Right
Move between menu tabs Press seq to switch
between menu tabs.
Navigate to a menu option Press and hold esc and
then press the arrow
buttons or use the joystick.
Down, Up, Left,
Right
Select a character or menu
option
Press Enter ( ). Note. If you press esc before
pressing Enter, you quit the
menu without saving any
changes. It is the same as
Cancel.
Select the zone ID Press zone to connect the
keypad to the recorder.