
User Manual
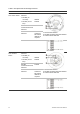
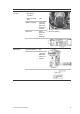
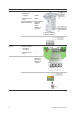
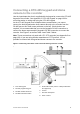

Table Of Contents
- Chapter 1 Product introduction
- Chapter 2 Installation
- Chapter 3 Getting started
- Chapter 4 Recording
- Chapter 5 Alarm settings
- Chapter 6 Network settings
- Configuring general network settings
- Configuring DDNS
- Configuring an NTP server
- Configuring email
- Configuring UPnP
- Configuring SNMP
- Configuring an FTP server to store snapshots
- Configuring a remote alarm host
- Configuring multicast
- Configuring the server and HTTP ports
- Configuring the RTSP service port
- Telnet setup
- Checking network status
- Exporting network packet data
- Chapter 7 HDD management
- Chapter 8 Operating instructions
- Chapter 9 Live view
- Chapter 10 Controlling a PTZ camera
- Chapter 11 Playing back a recording
- Chapter 12 Archiving recorded files
- Chapter 13 Recorder management
- Chapter 14 Camera settings
- Chapter 15 User management
- Chapter 16 Using the web browser
- Appendix A Specifications
- Appendix B PTZ protocols
- Appendix C Port forwarding information
- Appendix D KTD-405 keypad
- Appendix E Maximum pre-recording times
- Appendix F Supported PTZ commands
- Appendix G Default menu settings
- Index

16 TruVision DVR 12 User Manual
Table 3: UTC PTZ protocol settings
Dome: RS
-422 protocol TVR 12: Interlogix RS-485
See Table 5 below for the bus addresses to consider when connecting a both
keypad and dome camera to the recorder.
Table 4: Bus addresses
Recorder bus address
Recorder video inputs PTZ address range
1 1-32 00-31
2 1-32 32-63
3 1-32 64-95
4 1-32 96-127
5 1-32 128-159
6 1-32 160-191
7 1-32 192-223
8 1-32 224-255
Brackets
The recorder is easily rack-mountable. It has a 1.5U chassis.
See Figure 6 below.
Figure 5: Rack-mount installation
To install the racks:
1. Attach the two small front-rack mount ears (A) to the recorder (screws are
supplied).
2. Attach the recorder to the front rails (B) (screws are not supplied).