
User Manual
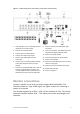

Table Of Contents
- Chapter 1 Product introduction
- Chapter 2 Installation
- Chapter 3 Getting started
- Chapter 4 Recording
- Chapter 5 Alarm settings
- Chapter 6 Network settings
- Configuring general network settings
- Configuring DDNS
- Configuring an NTP server
- Configuring email
- Configuring UPnP
- Configuring SNMP
- Configuring an FTP server to store snapshots
- Configuring a remote alarm host
- Configuring multicast
- Configuring the server and HTTP ports
- Configuring the RTSP service port
- Telnet setup
- Checking network status
- Exporting network packet data
- Chapter 7 HDD management
- Chapter 8 Operating instructions
- Chapter 9 Live view
- Chapter 10 Controlling a PTZ camera
- Chapter 11 Playing back a recording
- Chapter 12 Archiving recorded files
- Chapter 13 Recorder management
- Chapter 14 Camera settings
- Chapter 15 User management
- Chapter 16 Using the web browser
- Appendix A Specifications
- Appendix B PTZ protocols
- Appendix C Port forwarding information
- Appendix D KTD-405 keypad
- Appendix E Maximum pre-recording times
- Appendix F Supported PTZ commands
- Appendix G Default menu settings
- Index
TruVision DVR 12 User Manual 17
Chapter 3
Getting started
Turning on and off the recorder
Before starting the power up process, connect at least one monitor to the video
out or the VGA interface. Otherwise, you will not be able to see the user interface
and operate the device. Also connect at least one camera.
The recorder auto-detects the video mode (PAL or NTSC) on startup.
It comes equipped with a universal power supply that will auto-sense 110/240 V,
60/50 Hz.
Note: It is recommended that an uninterruptible power supply (UPS) is used in
conjunction with the device.
To turn on the recorder:
Turn on the recorder using the power switch on the back panel. Once it is
powered up, the status LEDs on the front panel will light up. All connected
cameras are displayed on-screen. The recorder automatically begins recording.
To turn off the recorder:
1. In live view mode, right-click the mouse and click Menu. The main menu
window appears.
2. Select the Power Manager icon.
3. In the Shutdown popup menu, select Shutdown. Click Yes to confirm
shutdown.
To reboot the recorder:
1. In live view mode, right-click the mouse and click Menu. The main menu
window appears.
2. Select the Power Manager icon.
3. In the Shutdown popup menu, select Reboot. Click Yes to confirm shutdown.