
User Manual
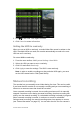

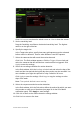
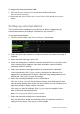
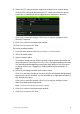
Table Of Contents
- Chapter 1 Product introduction
- Chapter 2 Installation
- Chapter 3 Getting started
- Chapter 4 Recording
- Chapter 5 Alarm settings
- Chapter 6 Network settings
- Configuring general network settings
- Configuring DDNS
- Configuring an NTP server
- Configuring email
- Configuring UPnP
- Configuring SNMP
- Configuring an FTP server to store snapshots
- Configuring a remote alarm host
- Configuring multicast
- Configuring the server and HTTP ports
- Configuring the RTSP service port
- Telnet setup
- Checking network status
- Exporting network packet data
- Chapter 7 HDD management
- Chapter 8 Operating instructions
- Chapter 9 Live view
- Chapter 10 Controlling a PTZ camera
- Chapter 11 Playing back a recording
- Chapter 12 Archiving recorded files
- Chapter 13 Recorder management
- Chapter 14 Camera settings
- Chapter 15 User management
- Chapter 16 Using the web browser
- Appendix A Specifications
- Appendix B PTZ protocols
- Appendix C Port forwarding information
- Appendix D KTD-405 keypad
- Appendix E Maximum pre-recording times
- Appendix F Supported PTZ commands
- Appendix G Default menu settings
- Index
30 TruVision DVR 12 User Manual
recording manually by checking the icon on the quick access toolbar. The icon is
red when manually recording. Default is off.
Manually recorded video is identified in the color-coded timeline shown in
playback (see “Searching recorded video” on page 90).
There are two ways to start and stop a manual recording:
• Use the quick access toolbar
You can start/stop manual recording for each camera individually. Position
the cursor over a camera image and left- click the mouse to display the quick
access toolbar. Click the manual record icon to start or stop manual
recording. The icon is red when recording.
• Use the configuration menu
This option lets you select more than one camera at a time. Go to Video
Schedule > Manual Record to access the manual recording menu and
check the boxes of the cameras to start or stop manual recording.
Capturing text insertions
The recorder supports Point-of-Sale (POS) and ATM text insertion via the UTC
ProBridge accessory connected to the RS-232 port on the recorder.
The feature is currently only available via the browser (see “Capturing text
insertions” on page 125).