
User Manual
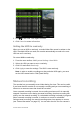

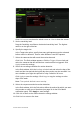
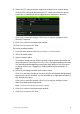
Table Of Contents
- Chapter 1 Product introduction
- Chapter 2 Installation
- Chapter 3 Getting started
- Chapter 4 Recording
- Chapter 5 Alarm settings
- Chapter 6 Network settings
- Configuring general network settings
- Configuring DDNS
- Configuring an NTP server
- Configuring email
- Configuring UPnP
- Configuring SNMP
- Configuring an FTP server to store snapshots
- Configuring a remote alarm host
- Configuring multicast
- Configuring the server and HTTP ports
- Configuring the RTSP service port
- Telnet setup
- Checking network status
- Exporting network packet data
- Chapter 7 HDD management
- Chapter 8 Operating instructions
- Chapter 9 Live view
- Chapter 10 Controlling a PTZ camera
- Chapter 11 Playing back a recording
- Chapter 12 Archiving recorded files
- Chapter 13 Recorder management
- Chapter 14 Camera settings
- Chapter 15 User management
- Chapter 16 Using the web browser
- Appendix A Specifications
- Appendix B PTZ protocols
- Appendix C Port forwarding information
- Appendix D KTD-405 keypad
- Appendix E Maximum pre-recording times
- Appendix F Supported PTZ commands
- Appendix G Default menu settings
- Index
32 TruVision DVR 12 User Manual
Modifying the warning buzzer
When an alarm is triggered by the system or a camera, the recorder can be set
up to respond with a warning buzzer. You can modify the time during which the
warning buzzer sounds for both system and camera alarm. Select Alarm >
Advanced Settings and select a buzzer time limit for the system and camera
alarms. Default is mute.
Setting up motion detection
Motion detection is one of the most important features of a recorder. With it there
is no need to manually search through hours of video recordings to find an event.
The recorder can be set up to trigger an alarm if it detects motion and to record it.
You can then search these recorded motion activities for specific incidents. If
enabled, motion detection recording can help increase the number of days your
recorder can record.
You can mask out any areas of motion on an analog camera display that you do
not want to trigger a recording such as a flag on a pole or a moving tree.
Select the level of sensitivity to motion as well the target size so that only objects
that could be of interest can trigger a motion recording. For example, recording is
triggered by the movement of a person but not that of a cat.
You can set up both the schedule and areas sensitive to motion detection for
each camera individually or easily copy the settings of one camera to other
cameras.
Motion detection set up
To set up motion detection:
1. From the menu toolbar, click Camera Management > Motion.
Areas covered by the red grid are sensitive to motion detection.
2. Select the analog camera to detect motion. Each camera must be set up
individually.
3. Check Enable Motion Detection.
4. Select the areas on-screen to be sensitive to motion.
Click and drag the mouse cursor across the window to deselect areas
sensitive to motion detection.