
User Manual
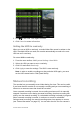

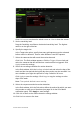
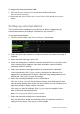
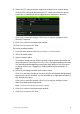
Table Of Contents
- Chapter 1 Product introduction
- Chapter 2 Installation
- Chapter 3 Getting started
- Chapter 4 Recording
- Chapter 5 Alarm settings
- Chapter 6 Network settings
- Configuring general network settings
- Configuring DDNS
- Configuring an NTP server
- Configuring email
- Configuring UPnP
- Configuring SNMP
- Configuring an FTP server to store snapshots
- Configuring a remote alarm host
- Configuring multicast
- Configuring the server and HTTP ports
- Configuring the RTSP service port
- Telnet setup
- Checking network status
- Exporting network packet data
- Chapter 7 HDD management
- Chapter 8 Operating instructions
- Chapter 9 Live view
- Chapter 10 Controlling a PTZ camera
- Chapter 11 Playing back a recording
- Chapter 12 Archiving recorded files
- Chapter 13 Recorder management
- Chapter 14 Camera settings
- Chapter 15 User management
- Chapter 16 Using the web browser
- Appendix A Specifications
- Appendix B PTZ protocols
- Appendix C Port forwarding information
- Appendix D KTD-405 keypad
- Appendix E Maximum pre-recording times
- Appendix F Supported PTZ commands
- Appendix G Default menu settings
- Index
TruVision DVR 12 User Manual 37
• Abnormal Record: Recording failed due to encoder or hard disk problems.
See “Description of alarm notification types” on page 31 for information on the
different alarm notification types available.
To set up system notifications:
1. From the menu toolbar, click Alarm Settings > Notification.
2. Select a notification type.
3. Check one or more response options: Audible warning, notify surveillance
center, send email, and trigger alarm output.
4. Repeat steps 2 and 3 for other notification types.
5. Click Apply to save the settings.
Detecting video loss
Video may be lost if the video cable or camera develop a fault or are damaged.
You can set up the recorder to detect video loss and trigger a system notification.
To setup video loss detection:
1. From the menu toolbar, click Camera Management > Video Loss.
2. Select a camera to configure for video loss detection.
3. Check the Enable Video Loss Alarm box to enable the feature.
4. Click Rules next to the Video Loss Detection box to enter the Rules window.
5. Click the Rule tab and select how you want the recorder to notify you of video
loss (see page 31 for the list of options). Click Apply to save the settings and
then clock OK to return to the previous window.
6. Click the Arming Schedule tab and select the schedule of when you want
video loss detection to be enabled. Schedule can be set for all week or any
day of the week with up to 8 time periods per day.
7. Click the Apply button to save settings.
8. Click Copy to copy these settings to other cameras.
9. Click Back to return to live view.