
User Manual

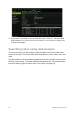
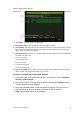
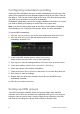

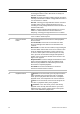
Table Of Contents
- Chapter 1 Product introduction
- Chapter 2 Installation
- Chapter 3 Getting started
- Chapter 4 Recording
- Chapter 5 Alarm settings
- Chapter 6 Network settings
- Configuring general network settings
- Configuring DDNS
- Configuring an NTP server
- Configuring email
- Configuring UPnP
- Configuring SNMP
- Configuring an FTP server to store snapshots
- Configuring a remote alarm host
- Configuring multicast
- Configuring the server and HTTP ports
- Configuring the RTSP service port
- Telnet setup
- Checking network status
- Exporting network packet data
- Chapter 7 HDD management
- Chapter 8 Operating instructions
- Chapter 9 Live view
- Chapter 10 Controlling a PTZ camera
- Chapter 11 Playing back a recording
- Chapter 12 Archiving recorded files
- Chapter 13 Recorder management
- Chapter 14 Camera settings
- Chapter 15 User management
- Chapter 16 Using the web browser
- Appendix A Specifications
- Appendix B PTZ protocols
- Appendix C Port forwarding information
- Appendix D KTD-405 keypad
- Appendix E Maximum pre-recording times
- Appendix F Supported PTZ commands
- Appendix G Default menu settings
- Index

52 TruVision DVR 12 User Manual
4. If you want to continue to use an HDD when the S.M.A.R.T. test has failed,
check the box Use when the disk has failed to self-evaluate. Click Apply
to save the settings.
Searching video using disk analysis
The recorder can run a disk analysis to get a broader sense of the video data
stored on the HDD. This video data can include alarms, events, video Loss, and
more.
The disk analysis screen provides a graphical view of the all video stored on the
HDD for each camera. The scale is determined dynamically. The timeline flows
from left (oldest) to right (newest) video. See Figure 9 on page 53.