
User Manual

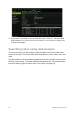
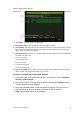
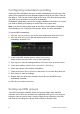
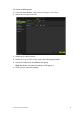

Table Of Contents
- Chapter 1 Product introduction
- Chapter 2 Installation
- Chapter 3 Getting started
- Chapter 4 Recording
- Chapter 5 Alarm settings
- Chapter 6 Network settings
- Configuring general network settings
- Configuring DDNS
- Configuring an NTP server
- Configuring email
- Configuring UPnP
- Configuring SNMP
- Configuring an FTP server to store snapshots
- Configuring a remote alarm host
- Configuring multicast
- Configuring the server and HTTP ports
- Configuring the RTSP service port
- Telnet setup
- Checking network status
- Exporting network packet data
- Chapter 7 HDD management
- Chapter 8 Operating instructions
- Chapter 9 Live view
- Chapter 10 Controlling a PTZ camera
- Chapter 11 Playing back a recording
- Chapter 12 Archiving recorded files
- Chapter 13 Recorder management
- Chapter 14 Camera settings
- Chapter 15 User management
- Chapter 16 Using the web browser
- Appendix A Specifications
- Appendix B PTZ protocols
- Appendix C Port forwarding information
- Appendix D KTD-405 keypad
- Appendix E Maximum pre-recording times
- Appendix F Supported PTZ commands
- Appendix G Default menu settings
- Index

54 TruVision DVR 12 User Manual
Configuring redundant recording
Setting up HDD redundancy lets your recorder redundantly record a copy of the
videos onto multiple drives as a safeguard against losing all your files in case of
disk failures. This process is also known as mirroring. You must have more than
one HDD in your recorder to set up HDD redundancy.
Redundancy significantly reduces the storage capability of the HDDs. As a result
you need to double your capacity to record video over a given time.
Note: You must set the storage mode of the HDD to Group before configuring
the redundancy. See “Setting up HDD groups” below for more information.
To set up HDD redundancy:
1. Click the System Settings icon in the menu toolbar and select Hard Disk.
2. Click the HDD Information tab and select the HDD to be used for
redundancy and click Edit.
3. In the Local HDD Settings screen, select Redundancy.
Verify at least one other HDD is set to R/W (read/write).
4. Click Apply to save the settings and then OK return to the previous screen.
5. In the menu toolbar, click the Video Schedule > Encoding.
6. Select the camera to be used for redundancy.
7. Check Redundant Record/Capture and select Yes from the drop-down list.
8. Click Apply to save the settings.
9. Repeat steps 6 to 8 for other cameras whose files you would like to be
redundantly recorded.
10. Click Back to return to live view.
Setting up HDD groups
Your NVR can organize multiple HDDs into groups. Videos from specified
channels can be set to be recorded onto a particular HDD group. You could, for
example, save the records from a couple of high priority cameras to one HDD,
and save the recordings from all the other cameras to another HDD.