
User Manual


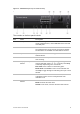
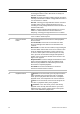
Table Of Contents
- Chapter 1 Product introduction
- Chapter 2 Installation
- Chapter 3 Getting started
- Chapter 4 Recording
- Chapter 5 Alarm settings
- Chapter 6 Network settings
- Configuring general network settings
- Configuring DDNS
- Configuring an NTP server
- Configuring email
- Configuring UPnP
- Configuring SNMP
- Configuring an FTP server to store snapshots
- Configuring a remote alarm host
- Configuring multicast
- Configuring the server and HTTP ports
- Configuring the RTSP service port
- Telnet setup
- Checking network status
- Exporting network packet data
- Chapter 7 HDD management
- Chapter 8 Operating instructions
- Chapter 9 Live view
- Chapter 10 Controlling a PTZ camera
- Chapter 11 Playing back a recording
- Chapter 12 Archiving recorded files
- Chapter 13 Recorder management
- Chapter 14 Camera settings
- Chapter 15 User management
- Chapter 16 Using the web browser
- Appendix A Specifications
- Appendix B PTZ protocols
- Appendix C Port forwarding information
- Appendix D KTD-405 keypad
- Appendix E Maximum pre-recording times
- Appendix F Supported PTZ commands
- Appendix G Default menu settings
- Index

58 TruVision DVR 12 User Manual
Item
Name Description
8
. Status LEDs HDD: A steady green light indicates that the recorder is
accessing the HDD in read or write mode. A steady red
indicates an HDD failure.
Network: A steady green light indicates
that the recorder is
currently connected to a network. No light indicates
that it is
not connected to a network.
Internal: A steady green light indicates that the recorder is
recording video or audio. No light means that it is not
recording. A steady red light means that there has been an
internal health failure.
Alarm: A steady red light indicates that there is a sensor
Alarm In or other alarm such as motion detection or
tampering. A steady green light means there is no alarm.
9
. Alarm button Use to manually acknowledge an alarm. In live view mode,
use it to call the alarm recipient.
10
. Enter and arrows
button
Use to select options in a menu and to control playback.
Press for Enter.
Live view mode: Press Enter to enter/exit PTZ mode.
Press the left/right arrow buttons to scroll between the
cameras.
Menu mode:
To enter the menu toolbar, keep pressing the
left arrow button until the first menu icon is selected. Then
press the left/right arrow buttons to select a menu icon.
To select a menu option in the submenu panel or setup
menu, press the arrow buttons left/right and up/down to
position cursor in the menu window. Press for Enter. See
Figure 12 on page 62.
Playback mode: Press the left/right arrow buttons to slow
down or speed up playback. Press the up/down arrow
buttons to jump forwards or backwards by 30 seconds.
Press Enter to stop/start playback.
PTZ mode: Press the arrow buttons to control the
movement of the PTZ dome camera.
11
. IR receiver Receiver for IR remote.
12
. Playback buttons
Reverse: In live view mode, press to jump back to the
oldest available video and start play back. In playback
mode, press to play back video in reverse. In snapshot
playback mode, view snapshots in the reverse direction..
Pause: In live view mode, freeze the last image of the
live video. In playback mode, pause playback.
Forward: In live view mode, press to start all-day
playback of the currently selected camera. If you are in
multiview format, only the camera shown in the top-left
corner of the multiview is played back.