
User Manual


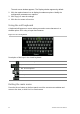


Table Of Contents
- Chapter 1 Product introduction
- Chapter 2 Installation
- Chapter 3 Getting started
- Chapter 4 Recording
- Chapter 5 Alarm settings
- Chapter 6 Network settings
- Configuring general network settings
- Configuring DDNS
- Configuring an NTP server
- Configuring email
- Configuring UPnP
- Configuring SNMP
- Configuring an FTP server to store snapshots
- Configuring a remote alarm host
- Configuring multicast
- Configuring the server and HTTP ports
- Configuring the RTSP service port
- Telnet setup
- Checking network status
- Exporting network packet data
- Chapter 7 HDD management
- Chapter 8 Operating instructions
- Chapter 9 Live view
- Chapter 10 Controlling a PTZ camera
- Chapter 11 Playing back a recording
- Chapter 12 Archiving recorded files
- Chapter 13 Recorder management
- Chapter 14 Camera settings
- Chapter 15 User management
- Chapter 16 Using the web browser
- Appendix A Specifications
- Appendix B PTZ protocols
- Appendix C Port forwarding information
- Appendix D KTD-405 keypad
- Appendix E Maximum pre-recording times
- Appendix F Supported PTZ commands
- Appendix G Default menu settings
- Index

62 TruVision DVR 12 User Manual
• Check the battery polarity.
• Check the remaining charge in the batteries.
• Check that the IR remote control sensor is not masked.
If the problem still exists, please contact your administrator.
Menu overview
The recorder has an icon-driven menu structure that allows you to configure the
unit’s parameters. Each command icon displays a window that lets you edit a
group of settings. Most menus are available only to system administrators.
The window is divided into three sections. The currently selected command icon
and submenu item are highlighted in green. See Figure 12 below.
You must be in live view mode to access the main menu.
Figure 12: Menu structure
1. Menu toolbar: Setup options available for the selected menu function. Move the mouse over
a command icon and click to select it. See Table 7 below for a description of the icons.
2. Submenu panel: Submenus for the selected menu function are displayed. Click an item to
select it.
3. Setup menu: All the details for the selected submenu are displayed. Click a field to make
changes.
Note: See Figure 9 on page 57 for the description on how to access the menu
options using the front panel.