
User Manual


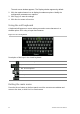


Table Of Contents
- Chapter 1 Product introduction
- Chapter 2 Installation
- Chapter 3 Getting started
- Chapter 4 Recording
- Chapter 5 Alarm settings
- Chapter 6 Network settings
- Configuring general network settings
- Configuring DDNS
- Configuring an NTP server
- Configuring email
- Configuring UPnP
- Configuring SNMP
- Configuring an FTP server to store snapshots
- Configuring a remote alarm host
- Configuring multicast
- Configuring the server and HTTP ports
- Configuring the RTSP service port
- Telnet setup
- Checking network status
- Exporting network packet data
- Chapter 7 HDD management
- Chapter 8 Operating instructions
- Chapter 9 Live view
- Chapter 10 Controlling a PTZ camera
- Chapter 11 Playing back a recording
- Chapter 12 Archiving recorded files
- Chapter 13 Recorder management
- Chapter 14 Camera settings
- Chapter 15 User management
- Chapter 16 Using the web browser
- Appendix A Specifications
- Appendix B PTZ protocols
- Appendix C Port forwarding information
- Appendix D KTD-405 keypad
- Appendix E Maximum pre-recording times
- Appendix F Supported PTZ commands
- Appendix G Default menu settings
- Index

64 TruVision DVR 12 User Manual
The main menu window appears. The Display window appears by default.
2. Click the required menu icon to display its submenu options. Modify the
configuration parameters as required.
3. Click Apply to save the settings.
4. Click Back to return to live view.
Using the soft keyboard
A keyboard will appear on-screen when you need to enter characters in a
window option. Click a key to input that character.
Figure 13: The soft keyboard
Description of the keys in the virtual keyboard:
Switch to lowercase/up
percase
Space
Exit the soft keyboard
Alphanumeric characters
Backspace
Confirm selection
Exiting the main menu
Press the Menu button on the front panel to exit the current menu window and
return to live view, or click Back in a main menu.