
User Manual

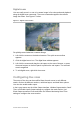

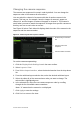

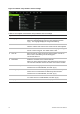

Table Of Contents
- Chapter 1 Product introduction
- Chapter 2 Installation
- Chapter 3 Getting started
- Chapter 4 Recording
- Chapter 5 Alarm settings
- Chapter 6 Network settings
- Configuring general network settings
- Configuring DDNS
- Configuring an NTP server
- Configuring email
- Configuring UPnP
- Configuring SNMP
- Configuring an FTP server to store snapshots
- Configuring a remote alarm host
- Configuring multicast
- Configuring the server and HTTP ports
- Configuring the RTSP service port
- Telnet setup
- Checking network status
- Exporting network packet data
- Chapter 7 HDD management
- Chapter 8 Operating instructions
- Chapter 9 Live view
- Chapter 10 Controlling a PTZ camera
- Chapter 11 Playing back a recording
- Chapter 12 Archiving recorded files
- Chapter 13 Recorder management
- Chapter 14 Camera settings
- Chapter 15 User management
- Chapter 16 Using the web browser
- Appendix A Specifications
- Appendix B PTZ protocols
- Appendix C Port forwarding information
- Appendix D KTD-405 keypad
- Appendix E Maximum pre-recording times
- Appendix F Supported PTZ commands
- Appendix G Default menu settings
- Index

70 TruVision DVR 12 User Manual
Figure 16: Quick access toolbar
Table 10: Description of the quick access toolbar icons
Icon Description
Freeze: Freeze the live image of the selected camera. Although the image
pauses, time and date information does not. The system clock continues to run.
Manual Recording: Start/stop manual recording.
The icon is red when manual recording is enabled. See “Manual recording” on
page 29 for information on setting up this function.
Instant playback: Playback the recorded video from the last five minutes. If no
recording is found, then there was no recording made in the last five minutes.
Click the icon and select the desired camera. Click OK.
See “Instant playback” on page 88 for more information.
Audio: Enable/Disable audio output. The audio option must already have been
setup in the Display menu.
Quick snapshot: Capture a snapshot of a video image. The image is saved on
the unit. See “Slideshow of snapshots” on page 93 for more information.
PTZ control: Enter PTZ control mode.
See “Configuring PTZ settings” on page 79 for more information.
Digital zoom: Enter digital zoom. See “Digital zoom” on page 71 for further
information.
Image settings: Enter the image settings menu to modify the image lighting
levels. There are two options:
Preset Mode: These are preconfigured image lighting levels. Select one of the
four options depending on current lighting conditions:
- Standard: Use in standard lighting situations.
- Indoor: Use indoors.
- Dim Light: Use when the light level is low.
- Outdoor: Use when outdoors. The contrast and saturation values are
high.
Customize: Modify brightness, contrast, saturation, and hue values. Click
Restore to restore image settings to previous values.
Click Restore to restore image settings to previous values. Click Default to
return to default values.
These settings can also be modified from the Camera>Image menu (see page
“Adjusting video image settings” on page 109.
Show text: Display inserted text on screen. The color of the text can be
changed: Black, white, or pink.
Close toolbar: Close the shortcut toolbar.