
User Manual


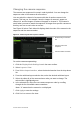

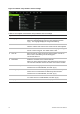
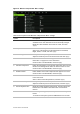

Table Of Contents
- Chapter 1 Product introduction
- Chapter 2 Installation
- Chapter 3 Getting started
- Chapter 4 Recording
- Chapter 5 Alarm settings
- Chapter 6 Network settings
- Configuring general network settings
- Configuring DDNS
- Configuring an NTP server
- Configuring email
- Configuring UPnP
- Configuring SNMP
- Configuring an FTP server to store snapshots
- Configuring a remote alarm host
- Configuring multicast
- Configuring the server and HTTP ports
- Configuring the RTSP service port
- Telnet setup
- Checking network status
- Exporting network packet data
- Chapter 7 HDD management
- Chapter 8 Operating instructions
- Chapter 9 Live view
- Chapter 10 Controlling a PTZ camera
- Chapter 11 Playing back a recording
- Chapter 12 Archiving recorded files
- Chapter 13 Recorder management
- Chapter 14 Camera settings
- Chapter 15 User management
- Chapter 16 Using the web browser
- Appendix A Specifications
- Appendix B PTZ protocols
- Appendix C Port forwarding information
- Appendix D KTD-405 keypad
- Appendix E Maximum pre-recording times
- Appendix F Supported PTZ commands
- Appendix G Default menu settings
- Index

76 TruVision DVR 12 User Manual
Figure 21: Monitor setup window: General settings
Table 13: Description of the Monitor setup window: General settings
Option Description
1.
Language
Define the language of the system.
Select the desired language from the drop-down list and click
Apply. The language displayed changes immediately.
2.
Device Name
Define the recorder name. The default name is TVR 12.
Click the edit box and enter the new name from the soft keyboard.
3.
Device Address
The device number to use for the recorder
when programming the
remote control or keypad. The default value is 255.
4.
Zone ID
Each recorder in a daisy chain must have a unique zone ID so
that it can be controlled by a KTD-405 keypad.
The default value is 1.
5.
Resolution
Define the resolution of the selected monitor.
Select one of the options from the drop-down list and click Apply.
The selected resolution must be the same as that of the monitor.
6.
Password Required
Define whether a login password is required.
Check the box to enable/disable, and click Apply.
7.
Scaling Output Video
Enable/disable the monitor display of the main and auxiliary
monitor size to accommodate for differently sized monitors.
Check the box to enable/disable, and click Apply.
8.
Enable Wizard
Define whether the wizard tool starts when the recorder is turned
on. Check the box to enable/disable, and click Apply.
9.
Display Status Icons
Define whether the status icons are displayed.