
User Manual


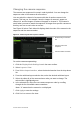

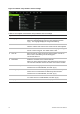
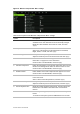

Table Of Contents
- Chapter 1 Product introduction
- Chapter 2 Installation
- Chapter 3 Getting started
- Chapter 4 Recording
- Chapter 5 Alarm settings
- Chapter 6 Network settings
- Configuring general network settings
- Configuring DDNS
- Configuring an NTP server
- Configuring email
- Configuring UPnP
- Configuring SNMP
- Configuring an FTP server to store snapshots
- Configuring a remote alarm host
- Configuring multicast
- Configuring the server and HTTP ports
- Configuring the RTSP service port
- Telnet setup
- Checking network status
- Exporting network packet data
- Chapter 7 HDD management
- Chapter 8 Operating instructions
- Chapter 9 Live view
- Chapter 10 Controlling a PTZ camera
- Chapter 11 Playing back a recording
- Chapter 12 Archiving recorded files
- Chapter 13 Recorder management
- Chapter 14 Camera settings
- Chapter 15 User management
- Chapter 16 Using the web browser
- Appendix A Specifications
- Appendix B PTZ protocols
- Appendix C Port forwarding information
- Appendix D KTD-405 keypad
- Appendix E Maximum pre-recording times
- Appendix F Supported PTZ commands
- Appendix G Default menu settings
- Index

TruVision DVR 12 User Manual 77
Figure 22: Monitor setup window: More settings
Table 14: Description of the Monitor setup window: More settings
Option Description
1.
Monitor
Standard The recorder can support NTSC or PAL video output. The video
standard used is auto detected but can be manually changed.
Modify the video standard used to PAL or NTSC, and click
Apply.
2.
Output Mode
Define the desired output mode.
Select one of the options from the drop-down list: Standard,
Bright, Gentle, or Vivid, and click Apply.
3.
Monitor Brightness
Modify the video output brightness.
Adjust the scroll bar point to the desired level and click Apply.
4.
Event Hint
Define whether the status icons appear on screen. See “Status
information” on page 65 for more information.
Check the box to enable/disable, and click Apply.
5.
Timebar Transparent
Define the transparency of the monitor output time bar on screen
relative to the background to make the time bar easier to read.
Check the box to enable/disable, and click Apply.
6.
Enable Timebar
Define whether the monitor output time bar appears on screen.
Check the box to enable/disable, and click Apply.
7.
Menu Timeout
Define the time in minutes after which the menu window reverts
to live view mode.
Select a time from the drop-down list, and click Apply.
8.
Mouse Pointer Speed
Modify the speed of the mouse pointer.
Adjust the scroll bar point to the desired level, and click Apply.
9.
Instant Playback Time
Modify the instant playback replay period. The time options are
between five to 30 minutes from actual time. Default is five
minutes
10.
Enable Front Panel Lock
When the system logs out, the front panel is automatically
locked.
To unlock the front panel, press the Live button for 5 seconds.