
User Manual
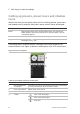
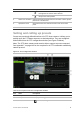


Table Of Contents
- Chapter 1 Product introduction
- Chapter 2 Installation
- Chapter 3 Getting started
- Chapter 4 Recording
- Chapter 5 Alarm settings
- Chapter 6 Network settings
- Configuring general network settings
- Configuring DDNS
- Configuring an NTP server
- Configuring email
- Configuring UPnP
- Configuring SNMP
- Configuring an FTP server to store snapshots
- Configuring a remote alarm host
- Configuring multicast
- Configuring the server and HTTP ports
- Configuring the RTSP service port
- Telnet setup
- Checking network status
- Exporting network packet data
- Chapter 7 HDD management
- Chapter 8 Operating instructions
- Chapter 9 Live view
- Chapter 10 Controlling a PTZ camera
- Chapter 11 Playing back a recording
- Chapter 12 Archiving recorded files
- Chapter 13 Recorder management
- Chapter 14 Camera settings
- Chapter 15 User management
- Chapter 16 Using the web browser
- Appendix A Specifications
- Appendix B PTZ protocols
- Appendix C Port forwarding information
- Appendix D KTD-405 keypad
- Appendix E Maximum pre-recording times
- Appendix F Supported PTZ commands
- Appendix G Default menu settings
- Index

82 TruVision DVR 12 User Manual
Item
Name Description
Saves the shadow tour.
Starts the selected shadow tour.
Stops the selected shadow tour.
4
. Preset tour toolbar
Adds a step to a selected preset tour.
Starts the selected preset tour.
Stops the selected preset tour.
Deletes all the preset tour steps.
Scroll up the list.
Scroll down the list.
To set up a preset:
1. From the menu toolbar, click PTZ Settings > More Settings.
2. Use the directional, zoom, focus and iris buttons to position the camera in the
desired preset location.
3. Check Save Preset and enter a preset number. The preset is enabled and
stored in the camera.
If the desired preset number is larger than the 17 numbers listed, click […].
The Preset window appears. Select a preset number from the dropdown list
and click the OK button to save changes.
Note: Presets can be overwritten.
4. Click Back to return to live view.
To call up a preset:
• PTZ control panel:
1. In live view left-click the mouse and select the PTZ control icon in the quick
access toolbar. The PTZ control panel appears. Select the desired camera
from the toolbar.
– Or –
On the front panel, select the desired camera and press Enter to call up the
quick access toolbar. The PTZ control panel appears.
2. Scroll the toolbar to Preset and double-click the desired preset from the list.
The camera immediately jumps to the preset position.
• Menu toolbar:
1. From the menu toolbar, click PTZ Settings > More Settings.
2. Check Call Preset and enter the preset number to call up. The camera
immediately moves to that preset position.
3. Click Back to return to live view.