
User Manual
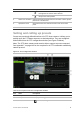


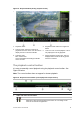

Table Of Contents
- Chapter 1 Product introduction
- Chapter 2 Installation
- Chapter 3 Getting started
- Chapter 4 Recording
- Chapter 5 Alarm settings
- Chapter 6 Network settings
- Configuring general network settings
- Configuring DDNS
- Configuring an NTP server
- Configuring email
- Configuring UPnP
- Configuring SNMP
- Configuring an FTP server to store snapshots
- Configuring a remote alarm host
- Configuring multicast
- Configuring the server and HTTP ports
- Configuring the RTSP service port
- Telnet setup
- Checking network status
- Exporting network packet data
- Chapter 7 HDD management
- Chapter 8 Operating instructions
- Chapter 9 Live view
- Chapter 10 Controlling a PTZ camera
- Chapter 11 Playing back a recording
- Chapter 12 Archiving recorded files
- Chapter 13 Recorder management
- Chapter 14 Camera settings
- Chapter 15 User management
- Chapter 16 Using the web browser
- Appendix A Specifications
- Appendix B PTZ protocols
- Appendix C Port forwarding information
- Appendix D KTD-405 keypad
- Appendix E Maximum pre-recording times
- Appendix F Supported PTZ commands
- Appendix G Default menu settings
- Index
86 TruVision DVR 12 User Manual
Chapter 11
Playing back a recording
The recorder lets you to quickly locate and play back recorded video. There are
four ways to play back video:
Instant playback of the most recently recorded video
All-day playback of the day’s recorded video
Search the video archives by specific time, date, snapshot, or event
Search the system log
The recorder continues to record the live view from a camera while
simultaneously playing back video on that camera display. You must have the
access privilege to play back recordings (see “Customizing a user’s access
privileges” on page 112 for more information).
Cameras in multiview mode play back simultaneously. This means, for example,
that it is easy to follow the path of an intruder who has passed in front of several
cameras.
You must be in live view to play back video.
Overview of the playback window
It is easy to manage playback from the playback window.
The camera can be setup to display a time/date stamp during recording. The
playback video can be set up to display a time/date stamp for evidentiary
purposes (see Configuring the OSD settings on page 107).