
User Manual
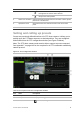


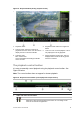

Table Of Contents
- Chapter 1 Product introduction
- Chapter 2 Installation
- Chapter 3 Getting started
- Chapter 4 Recording
- Chapter 5 Alarm settings
- Chapter 6 Network settings
- Configuring general network settings
- Configuring DDNS
- Configuring an NTP server
- Configuring email
- Configuring UPnP
- Configuring SNMP
- Configuring an FTP server to store snapshots
- Configuring a remote alarm host
- Configuring multicast
- Configuring the server and HTTP ports
- Configuring the RTSP service port
- Telnet setup
- Checking network status
- Exporting network packet data
- Chapter 7 HDD management
- Chapter 8 Operating instructions
- Chapter 9 Live view
- Chapter 10 Controlling a PTZ camera
- Chapter 11 Playing back a recording
- Chapter 12 Archiving recorded files
- Chapter 13 Recorder management
- Chapter 14 Camera settings
- Chapter 15 User management
- Chapter 16 Using the web browser
- Appendix A Specifications
- Appendix B PTZ protocols
- Appendix C Port forwarding information
- Appendix D KTD-405 keypad
- Appendix E Maximum pre-recording times
- Appendix F Supported PTZ commands
- Appendix G Default menu settings
- Index

88 TruVision DVR 12 User Manual
Description
Archive files
2
. Playback control toolbar:
Reverse play the recording. Click again to pause.
Stop playback. Timeline jumps back to 00:00 time (midnight).
Play recording. Click again to pause.
Forward skip by 30 seconds.
Reverse skip by 30 seconds.
Decrease playback speed: Options available are: single frame, 1/8 speed,
1/4 speed, 1/2 speed, normal, X2 speed, X4 speed, X8 speed, maximum
speed.
Increase playback speed. Options available are:
single frame, 1/8 speed, ¼
speed, ½ speed, normal, X2 speed, X4 speed, X8 speed, maximum speed.
3
. Recording type: Description of the color coding of recording types that appear in the
playback progress bar. Green indicates continuous recording. Red indicates alarm
recording. Yellow indicates motion recording.
4
. Video search: This icon is only displayed when you playback the result of a search or for
all-day playback. It does not appear for all-day playback. Click it to return to the Search
window and reselect the search criteria.
5
. Hide toolbar: Hide the playback control toolbar.
6
. Quit playback:
For all-day playback mode, quit playback and return to live view.
For playback from search mode, quit playback and return to the search results window.
7
. Playback progress bar: This bar displays how far playback of the recording has
progressed. It also indicates the type of recording using color.
8
. Timeline: Allows you to jump forwards or backwards in time. The timeline moves left
(oldest video) to right (newest video). Click a location on it for where you want playback to
start.
In all-day playback the cursor shows the actual time. In search playback, the cursor is a
ball.
Time bar: Time of actual playback. This is only displayed in all-day playback.
Instant playback
Use the quick access toolbar to quickly replay recorded video from a
programmed period (the default period is five minutes). This can be useful to
review an event that has just happened. Only one camera at a time can be
selected. You can change the programmed period from the Display Settings >
Monitor > More Settings page.