
Configuration Manual User guide

1BChapter 2: Camera operation
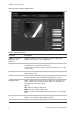
14 TruVision IP Camera Configuration Manual
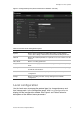
To define the SNMP parameters:
Note: Before setting the SNMP, please download the SNMP software and
manage to receive the camera information via SNMP port. By setting the Trap
Address, the camera can send the alarm event and exception messages to the
surveillance center. The SNMP version you select should be the same as that of
the SNMP software.
1. In the Network folder, click the SNMP subfolder to open its window.
2. Select the corresponding version of SNMP: v1, v2c or v3.
3. Configure the SNMP settings. The configuration of the SNMP software should
be the same as the settings you configure here.
4. Click Save to save changes.
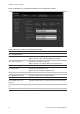
To define the 802.1x parameters:
Note: The switch or router to which the camera is connected must also support
the IEEE 802.1X standard, and a server must be configured. Please apply and
register a user name and password for 802.1X in the server.
1. In the Network folder, click the 802.1X subfolder to open its window.
2. Check Enable IEEE 802.1X to enable the feature.
3. Configure the 802.1X settings, including EAPOL version, user name, and
password. The EAPOL version must be identical with that of the router or the
switch.
4. Click Save to save changes.
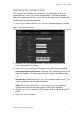
To define the QoS parameters:
1. In the Network folder, click the QoS subfolder to open its window.
2. Configure the QoS settings, including Video / Audio DSCP, Event / Alarm
DSCP and Management DSCP. The valid value range of the DSCP is 0-63.
The bigger the DSCP value is the higher the priority is.
3. Click Save to save changes.
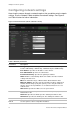
To define the FTP parameters:
1. In the Network folder click the FTP subfolder to open its window.
2. Configure the FTP settings, including server address, port, user name,
password, directory, and upload type.
Directory: In the Directory Structure field, you can select the root directory,
parent directory and child directory. When the parent directory is selected,
you have the option to use the Device Name, Device Number or Device IP for
the name of the directory; and when the Child Directory is selected, you can
use the Camera Name or Camera No. as the name of the directory.
Upload type: To enable uploading the snapshots to the FTP server.
3. Click Save to save changes.