
User Manual Owner manual


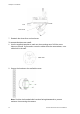


Table Of Contents
- Chapter 1 Introduction
- Chapter 2 Installation
- Installation environment
- Package contents
- Cable requirements
- Camera descriptions
- Setting up the camera
- Connecting the devices
- Accessing the SDHC card
- Mounting the dome cameras on a ceiling
- Mounting the bullet camera
- Using the camera with TVR 60/ TVN 20/ TVN 40/ LNVR and other systems
- Using the camera with TruVision Navigator
- Chapter 3 Network and streaming configuration
- Chapter 4 Camera configuration
- Chapter 5 Camera management
- Chapter 6 Camera operation
- Appendix A Specifications
- Appendix B Pin definitions
- Index

1BChapter 2: Installation
TruVision Outdoor IP Camera User Manual 9
4. Insert the dome module into the housing and pull the camera’s cables through
the threaded knockout on the base of the housing.
Note: The cables can also be passed through the threaded side knockout of
the housing. Use a waterproof conduit for the cables and seal all joints to
ensure so that no moisture can leak into the mounting surface.
Side knockout
5. Connect the network and power cables.
6. While viewing the video on the monitor, adjust horizontally and vertically the
camera pan and tilt. Adjust the lens focus to get optimal video effect.