
User Manual Owner manual


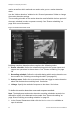


Table Of Contents
- Chapter 1 Introduction
- Chapter 2 Installation
- Installation environment
- Package contents
- Cable requirements
- Camera descriptions
- Setting up the camera
- Connecting the devices
- Accessing the SDHC card
- Mounting the dome cameras on a ceiling
- Mounting the bullet camera
- Using the camera with TVR 60/ TVN 20/ TVN 40/ LNVR and other systems
- Using the camera with TruVision Navigator
- Chapter 3 Network and streaming configuration
- Chapter 4 Camera configuration
- Chapter 5 Camera management
- Chapter 6 Camera operation
- Appendix A Specifications
- Appendix B Pin definitions
- Index

3BChapter 4: Configuring the camera
TruVision Outdoor IP Camera User Manual 27
6. Select a display mode for the camera from the OSD Status list box. Display
modes include:
• Transparent & unflickering. The image appears through the text.
• Transparent & flickering. The image appears through the text. The text
flashes on and off.
• Non-transparent & unflickering. The image is behind the text. This is
default.
• Non-transparent & flickering. The image is behind the text. The text
flashes on and off.
7. Click Save to save changes.
Defining the system time
NTP (Network Time Protocol) is a protocol for synchronizing the clocks of
network devices, such as IP cameras and computers. Connecting network
devices to a dedicated NTP time server ensures that they are all synchronized.
To define the system time and date:
1. In the “Channel Parameters” folder click the Time & Date subfolder to open
its window.
2. Check one of the options for setting the time and date:
Synchronize with an NTP server: Check the enable box and enter the
server NTP address.
- Or -
Set manually: Enter the current date and time values.
3. Select your time zone.
4. Click Save to save changes.