
Manual

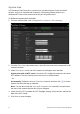
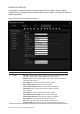

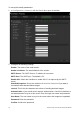
Table Of Contents
- Introduction
- Default settings to access the camera
- Network access
- Camera configuration
- Configuration menu overview
- Local configuration
- System time
- Network settings
- Recording parameters
- Video image
- OSD (On Screen Display)
- Text overlay
- Privacy masks
- Picture overlay
- Motion detection alarms
- Tamper-proof alarms
- Exception alarms
- Alarm inputs and outputs
- Face detection
- Audio exception detection
- Cross line detection
- Intrusion detection
- Defocus detection
- Scene change detection
- Region entrance detection
- Region exiting detection
- Unattended baggage detection
- Object removal detection
- Snapshot parameters
- NAS settings
- Storage devices
- Recording schedule
- RS-485 settings
- Object counting
- Camera management
- Camera operation

TruVision Series 4 IP Camera Configuration Manual 15
Menu tabs Description
9.
UPnP
The UPnP (Universal Plug and Play) protocol allows devices to connect
seamlessly and to simplify the implementation of networks in the home
and corporate environments. With the function enabled, you do not need
to configure the port mapping for each port, and the camera is connected
to the Wide Area Network (WAN) via the router.
Enable and set the friendly name detected.
See page 17 for setup information.
10.
Email
Enter the email address to which messages are sent when an alarm
occurs. See page 18 for setup information.
11.
NAT
A NAT (Network Address Translation) is used for network connection.
Select the port mapping mode: auto or manual. See page 19 for setup
information.
12.
HTTPS
Specifies authentication of the web site and its associated web server,
which protects against Man-in-the-middle attacks.
To define the TCP/IP parameters:
1. From the menu toolbar, click Configuration > Network > TCP/IP.
2. Configure the NIC settings, including the NIC Type, IPv4 settings, IPv6 settings,
MTU settings, and Multicast Address.
3. If a DHCP server is available, check DHCP.
4. If the DNS server settings are required for some applications (e.g., sending email),
you should configure the Preferred DNS Server or Alternate DNS Server.
5. Click Save to save changes.
To define the port parameters:
1. In Configuration > Network, click the Port tab to open its window.
2. Set the HTTP port, RTSP port, HTTPS port and Server port of the camera.
HTTP Port: The default port number is 80, and it can be changed to any port No.
which is not occupied.
RTSP Port: The default port number is 554. It can be changed to any port number
in the range from 1 to 65535.
HTTPS Port: The default port number is 443. It can be changed to any port number
that is not occupied.
Server Port: The default server port number is 8000. It can be changed to any port
number in the range from 2000 to 65535.
3. Enter the IP address and port if you want to upload the alarm information to the
remote alarm host. Also check the Notify Alarm Recipient option in the normal
Linkage of each event page.
4. Click Save to save changes.