TVM-1700 / TVM-1900 / TVM2200 Monitors User Manual P/N 1079200A-EN • REV 1.
Copyright European Union directive © 2012 UTC Fire & Security. All rights reserved 2004/108/EC (EMC directive): Hereby, UTC Fire & Security declares that this device is in compliance with the essential requirements and other relevant provisions of Directive 2004/108/EC. Trademarks and patents Interlogix, TruVision brands and logos are trademarks of UTC Fire & Security.
Content Important safeguards 2 Introduction 2 Features 2 Assembling the monitor 3 Assembling the monitor 3 Connections 3 Front panel controls 4 Control panel (TVM-1700/TVM-1900 model) 4 Control panel (TVM-2200 model) 4 Changing a monitor parameter 5 Hot keys 5 Adjustment procedure 5 OSD function 5 VGA menu (HDMI) 5 CAM menu 7 Self-diagnosis 8 Removing the monitor stand 8 Attaching the monitor stand 9 Troubleshooting 9 Specifications 11 TVM-1700/TVM-1900 models 11 TVM-2200 models 12 Factory preset timings 1
Important safeguards circumstances if the monitor will not be used for a long period of time, if the power supply cable or plug/connector is damaged or if the monitor housing is damaged or broken. 1. Installation cautions: • Do not block any ventilation openings. • Always ensure that the monitor is located in a well-ventilated area to prevent the unit from overheating. • Only use accessories specified by the manufacturer or those sold with the product.
Press the Menu button and activate the SelfDiagnosis menu to determine whether your monitor is functioning normally, not receiving a signal or is receiving a signal that is out of scanning range. Activate the higher refresh rates of the monitor to stabilize the screen and eliminate the annoying flicker that contributes to eye-strain and headaches. The monitor supports the optimal display performance with 1280 x 1024 @ 75 Hz (TVM1700/TVM-1900 Model) and 1680 x 1050 @ 60 Hz (TVM-2200 Model).
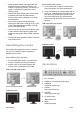
Press the UP or DOWN arrow to scroll through the available sources, and press LEFT or RIGHT arrow to confirm selection. 9. VGA RGB signal input. Front panel controls (*) = Hot key Control panel (TVM-2200 model) Control panel (TVM-1700/TVM-1900 models) 1 POWER Indicator Shows both normal operation and power management status with power LED. 1. POWER Indicator Shows both normal operation and power management status with power LED. POWER Button Switches the monitor on and off.
Secondary Function: Allows for vertical scrolling in the OSD menu, and to INCREASE the value of the selected menu function. 8 Adjustment procedure Button ( * ) Allows for Vertical scrolling in the OSD Menu, and to DECREASE the value of the selected submenu function. Changing a monitor parameter 1. Press the MENU button on the front panel to obtain the OSD menu screen. 2. Use Left-Right buttons to select the menu. 3. Use Down button to select the submenus. 4.
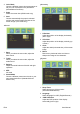
3. Color Mode Choose a different preset color temperatures or set your own customized color parameters. (Normal/Warm/Cool/User) Geometry 4. Scale Select the screen size (HDMI mode only) 5. Auto Choose automatically the proper horizontal position and vertical position and size of the screen image. (VGA mode only) Sound 1. H-Position Adjust the position of the display horizontally (left or right). 2. V-Position Adjust the position of the display vertically (up or down). 3.
4. OSD V-Position Adjust the OSD position of the Display vertically (up or down). 5. OSD Timeout Adjust the display of the OSD menu (5 to 60 seconds). 8. Screen Format (Full/Zoom1/Zoom2/Subtitle/4:3/panorama) Sound 6. OSD Transparency Adjust the OSD. Transparency 7. Information Shows the status of the current Display settings. 8. Memory Recall Reset the screen to the factory preset display settings. CAM menu Picture 1. Bass When you select the user mode, adjust the bass sound. 2.
2. MADi Select advanced color engine for automatic picture enhancement (2D/3D). 3. H-Size Adjust the width (horizontal size) of the screen image. 4. V-Size Adjust the height (vertical size) of the screen image. 5. H-position Adjust the position of the display horizontally (left or right). Self-diagnosis If there is no image, the Self-Diagnosis screen will be displayed. The self-diagnosis function checks if the status of the monitor screen is No Signal, Out of Range or None Supported.
The monitor’s installation surface is compatible with other types of VESA standard stands. TVM-1700/TVM-1900 models Hole spacing: 100 x 100 mm Screw length: 8 to12 mm Troubleshooting Symptom Check Picture is jittery Adjust Clock to set the screen position and adjust Clock value carefully until a noise is no longer displayed. No picture Check if the power switch and computer power switch are in the On position TVM-2200 model Check if the signal cable is correctly connected to the video card.
Symptom Check Low sound Adjust the volume on the OSD menu. Adjust the volume of the sound card in the computer. VIDEO screen cannot be seen Check if PICTURE mode has been set. Check if the video terminal is properly connected. No video Check if the video cable is correctly connected to the computer and set to Functions on the OSD picture menu. Poor color in the video Adjust the Color or Tint values on the OSD Picture menu. Grainy picture in the video Adjust the Sharpness on the OSD Picture menu.
Specifications TVM-1700/TVM-1900 models Items Panel Audio Interface Power TVM-1700 model TVM-1900 model Screen size 17 in. (43.2 cm) 19 in. (48.3 cm) Pixel pitch 0.264 x 0.264 mm 0.294 x 0.
TVM-2200 models Items Panel Audio Interface TVM-2200 model Screen size 22 in. (55.9 cm) Pixel pitch 0.282 x 0.
Factory preset timings TVM-1700/TVM-1900 models VESA modes Mode Resolution (dots X line) H freq. (kHz) V freq. (Hz) Remark VGA VGA 640 x 480 @ 60 Hz 640 x 480 @ 72 Hz 31.5 37.9 60 72 Non-interlaced Non-interlaced Non-interlaced VGA 640 x 480 @ 75 Hz 37.5 75 SVGA 800 x 600 @ 56 Hz 35.2 56 Non-interlaced SVGA 800 x 600 @ 60 Hz 37.9 60 Non-interlaced SVGA 800 x 600 @ 72 Hz 48.1 72 Non-interlaced SVGA XGA 800 x 600 @ 75 Hz 46.9 75 Non-interlaced 1024 x 768 @ 60 Hz 48.
TVM-2200 models VESA modes Resolution (dots Xlines) H freq. (KHz) V freq. (Hz) Remark 640 x 480 @ 60 Hz 31.5 60 Non-interlaced 640 x 480 @ 72 Hz 37.9 72 Non-interlaced 640 x 480 @ 75 Hz 37.5 75 Non-interlaced 800 x 600 @ 56 Hz 35.2 56 Non-interlaced 800 x 600 @ 60 Hz 37.9 60 Non-interlaced 800 x 600 @ 72 Hz 800 x 600 @ 75 Hz 48.1 46.9 72 75 Non-interlaced Non-interlaced 1024 x 768 @ 60 Hz 48.4 60 Non-interlaced 1024 x 768 @ 70 Hz 56.