
User Manual
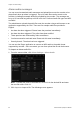
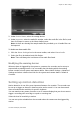


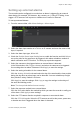
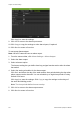
Table Of Contents
- Chapter 1 Product overview
- Chapter 2 Installation
- Chapter 3 Getting started
- Chapter 4 Operating instructions
- Chapter 5 Live view
- Chapter 6 Controlling a PTZ camera
- Chapter 7 Playing back a recording
- Overview of the playback window
- Playback pop-up menu
- Instant playback
- All-day playback
- Playback skip time
- Searching recorded video
- Playing back recordings by time and video type
- Playing back recordings by event
- Creating and playing back bookmarked recordings
- Slideshow of snapshots
- Playing back recordings from the system log
- Playing back frame-by-frame
- Digital zoom in playback
- Chapter 8 Archiving recorded files
- Chapter 9 Using the web browser
- Windows 7 and 8 users
- Accessing the web browser
- Web browser overview
- Using the web browser to configure the device
- Searching and playing back recorded video
- Searching for event logs
- Recording from the browser
- Dual stream recording
- Controlling a PTZ dome camera in the web browser
- Capturing text insertions
- Text overlay
- Using a network storage system
- Chapter 10 Recording
- Chapter 11 Alarm settings
- Chapter 12 Network settings
- Configuring general network settings
- Configuring an NTP server
- Configuring e-mail
- Configuring SNMP
- Configuring UPnP
- Configuring an FTP server to store snapshots
- Configuring a remote alarm host
- Configuring multicast
- Configuring the server and HTTP ports
- Configuring the RTSP service port
- Telnet set up
- Checking network status
- Exporting network packet data
- Port forwarding
- Chapter 13 Storage management
- Chapter 14 Camera settings
- Chapter 15 Recorder management
- Chapter 16 User management
- Appendix A Specifications
- Appendix B PTZ protocols
- Appendix C Port forwarding information
- Appendix D KTD-405 keypad
- Appendix E Maximum pre-recording times
- Appendix F Supported PTZ commands
- Appendix G Default menu settings
- Index

Chapter 11: Alarm settings
TruVision NVR 21(S/P) User Manual 99
7. Select the recording schedules for motion detection.
Click the Arming Schedule tab and select the day of the week and the time periods
during the day when motion can be detected. You can schedule up to eight time
periods in a day. Default is 24 hours.
Click Apply to save the settings. Click Copy to copy the settings to other days of
the week.
Note: Time periods defined cannot overlap.
8. Select the response method to motion detection.
Click the Rule tab to define the method by which you want the recorder to notify you
of the alarm. Click Apply to save settings.
9. Click OK to return to the motion detection settings screen.
10. Click Back to return to live view.