
User Manual
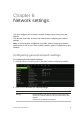

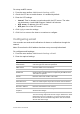
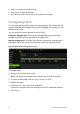
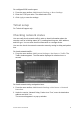
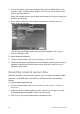
Table Of Contents
- Chapter 1 Product introduction
- Chapter 2 Installation
- Chapter 3 Getting started
- Chapter 4 Recording
- Chapter 5 Alarm settings
- Chapter 6 Network settings
- Configuring general network settings
- Configuring DDNS
- Configuring an NTP server
- Configuring email
- Configuring UPnP
- Configuring SNMP
- Configuring an FTP server to store snapshots
- Configuring a remote alarm host
- Configuring multicast
- Configuring the server and HTTP ports
- Configuring the RTSP service port
- Telnet setup
- Checking network status
- Exporting network packet data
- Chapter 7 HDD management
- Chapter 8 Operating instructions
- Chapter 9 Live view
- Chapter 10 Controlling a PTZ camera
- Chapter 11 Playing back a recording
- Chapter 12 Archiving recorded files
- Chapter 13 Recorder management
- Chapter 14 Camera settings
- Chapter 15 User management
- Chapter 16 Using the web browser
- Appendix A Specifications
- Appendix B PTZ protocols
- Appendix C Port forwarding information
- Appendix D KTD-405 keypad
- Appendix E Maximum pre-recording times
- Appendix F Supported PTZ commands
- Appendix G Default menu settings
- Index

TruVision DVR 12 User Manual 39
Chapter 6
Network settings
You must configure your recorder’s network settings before using it over the
network.
The recorder must have access to the internet when configuring the network
settings.
Note: As every network configuration may differ, please contact your Network
Administrator or ISP to see if your recorder requires specific IP addresses or port
numbers.
Configuring general network settings
To configure general network settings:
1. Click the Network Settings icon in the menu toolbar to display its window.
2. Click General and enter the required settings:
Option
Description
NIC type
Network interface card (NIC) is a device used to connect the
recorder to a network. Select the NIC type used from the drop-
down list.
Default value is 10/100M self-adaptive.