
User Manual
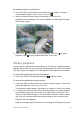
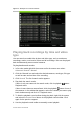
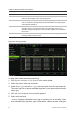
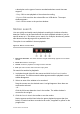
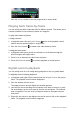
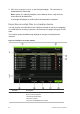
Table Of Contents
- Chapter 1 Product introduction
- Chapter 2 Installation
- Chapter 3 Getting started
- Chapter 4 Recording
- Chapter 5 Alarm settings
- Chapter 6 Network settings
- Configuring general network settings
- Configuring DDNS
- Configuring an NTP server
- Configuring email
- Configuring UPnP
- Configuring SNMP
- Configuring an FTP server to store snapshots
- Configuring a remote alarm host
- Configuring multicast
- Configuring the server and HTTP ports
- Configuring the RTSP service port
- Telnet setup
- Checking network status
- Exporting network packet data
- Chapter 7 HDD management
- Chapter 8 Operating instructions
- Chapter 9 Live view
- Chapter 10 Controlling a PTZ camera
- Chapter 11 Playing back a recording
- Chapter 12 Archiving recorded files
- Chapter 13 Recorder management
- Chapter 14 Camera settings
- Chapter 15 User management
- Chapter 16 Using the web browser
- Appendix A Specifications
- Appendix B PTZ protocols
- Appendix C Port forwarding information
- Appendix D KTD-405 keypad
- Appendix E Maximum pre-recording times
- Appendix F Supported PTZ commands
- Appendix G Default menu settings
- Index
TruVision DVR 12 User Manual 97
Chapter 12
Archiving recorded files
Archive recorded files on an external device such as a USB flash drives, USB
HDDs or a DVD writer. You must be in live view to archive video. Access to
archive commands may require a password.
Before starting to archive files, ensure that you have the backup device
connected to the recorder. It can be detected automatically by the recorder.
Note: The recorder supports USB DVD and USB HD on the front and back USB
ports.
Archiving files
There are two ways to archive files:
Quick Archive button: Quick archive lets you archive recorded files quickly by
using the Archive button on the front panel. The recorder then downloads all the
recorded files on the unit to fill the available memory space on the media. This
option is not available via the mouse.
Advanced Search window: Use the Export command in the Advanced Search
window to specify archiving settings such as a specific time and date period as
well as cameras.
Using Quick Archive
To archive recorded video using Quick Archive:
1. Insert the backup device into the recorder.
If using a USB memory drive, insert the device into the USB port on the front
panel. If using a digital video disk (DVD), insert the disc into the DVD drive. If
more than one media type is found, the USB device takes precedence over
the others.
2. Press Archive on the front panel or remote control to open the quick archive
window.