Instruction Manual 50 memories time switch
page ! Safety Precautions.........................................................4 OK Symbols, Keys ..............................................................5 1. Initial Start - Up ...........................................................6 Prog. Program Structure ..........................................................7 reset Setting 24h or AM/PM clock, Time and Weekday.......................11 Change for Daylight Savings time........................................
! 4 Safety precautions · The connection and installation of electrical devices may only be carried out by a qualified electrician. · Interventions in and changes to the device result in the voiding of the warranty claim. · Observe your national regulations and the respective safety provisions. · Switch-off commands have priority over switch-on commands.
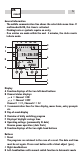
OK 5 reset General information · The middle communication line shows the selectable menu item. If confirmed with OK, this item is activated. · Flashing texts or symbols require an entry. · If no entries are made within the next 2 minutes, the clock reverts to Auto mode. 1 6 12 18 24 D C 15:26:38 B A MENU 1 OVR E F C1 Res.
OK 6 reset Function displays of the two left-hand buttons: scroll up in menu scroll down in menu Select/rejectsuggestion Select/accept suggestion + Press briefly = +1 Press and hold (approx. 2 sec) = +5 Press briefly = -1 Press and hold (approx. 2 sec) = -5 Function displays of the two right-hand buttons: MENU Exits the Automatic mode and enters the Programming mode ESC Press briefly = one step back Press and hold (approx.
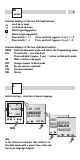
Prog. 7 1 6 12 18 24 C1 15:26:38 MENU 1 OVR Res. DATETIME PROGRAM DAYLIGHT ESC OK MENU REVIEW NEW OK DELETE ESC OK New program Info The time switch has 50 memory spaces. REVIEW NEW only with 2-channel version OK DELETE ESC OK FREE 50 CHANNEL SELECT CHANNEL OK I SELECT OK I ESC OK ESC OK Example ON command for channel 1 at 3 pm. OFF command at 6 pm. · Select NEW program and confirm with OK. · The free memory spaces are briefly displayed. · Select channel and confirm with OK.
Prog. SELECT DAY OK CHL 8 ON ESC OK HOURS 00 CHL ON ESC OK MINUTES 15:00 CHL ON ESC OK · Select day block or individual day (block formation as desired) and confirm withOK. · Enter hour for ON command (+/-) and confirm with OK. · Enter minute for ON command (+/-) and confirm with OK. HOURS 00 OK CHL OFF ESC OK MINUTES 18:00 CHL OFF ESC OK · · · · SAVED P01 P02 Enter hour for OFF command (+/-) and confirm with OK. Enter minute for OFF command (+/-) and confirm with OK. Program is saved.
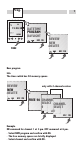
Prog. 9 View, edit program DELETE REVIEW OK NEW ESC OK ON OK P01 15:00 HH:MMOFF P02 18:00 HH:MM EDT OK OK EDT OK Info · The program steps can be scrolled through with . · The respective program can be edited by pressing EDT. The procedure is the same as when creating a new program. Delete all programs NEW DELETE OK REVIEW ESC OK DELETE ALL OK YES NO CONFIRM OK NO Y E S Info · It is possible to delete all programs with YES · By pressing NO, individual programs can be deleted.
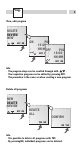
Prog. 10 Delete individual programs DELETE ALL ON OK YES NO OK P01 15:00 HH:MM CONFIRM DEL OK OK NO Y E S Info When deleting individual programs, the corresponding program steps are deleted (e.g. P01 ON and P02 OFF).
Setting 24h or AM/PM Clock, Time and Weekday LANGUAGE DATETIME OK PROGRAM ESC OK Info The date and time are preset at the factory.
Switchover for daylight savings time PROGRAM DAYLIGHT OK 12H 24H ESC OK Info The following settings are possible: AUTO Factory presetting of the published calendar dates. This is automatically recalculated for each year. CALIBRAT AUTO OK NO ESC OK NO No switchover CALIBRAT Programming for the start and ending date of daylight savings time must be entered for this purpose. The factory presetting is overwritten. The programmed daylight savings time is automatically recalculated for each year.
OVR Operating mode 1 6 12 18 24 C1 15:26:38 MENU 1 OVR Res.
Warranty If within one (1) year from the date of purchase, this product fails due to a defect in material or workmanship, Intermatic Incorporated will repair or replace it, at its sole option, free of charge. This warranty is extended to the original household purchaser only and is not transferable.
80.10.1212.