
User Guide

MODEL G8000 Series Mechanical Defrost Timer
Installation Instructions
• Turnallpoweroffbeforeservicingthisswitchortheequipmentit
controls.
• Followlocalelectricalandsafetycodes,NationalElectricCode(NEC)and
OccupationalSafetyandHealthActCodes(OSHA).
• GroundenclosureorbracketinaccordancewithNationalElectrical
Code,CanadianElectricalCode,andlocalrequirements.
• Makesurethereisnowireinsulationundertheterminalplateontime
switchconnector.Firmlytightenterminalscrews.
• Use75degreeCminimumcopperconductorsonly.
• ReinstallSafetyGuardafterwiring.
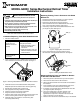
Figure 2. Snapping tabs off mechanism.
Insulator
tab
Figure 3. Installing the G8000 Defrost Timer.
Tabs (4)
Figure 1. Removing G8000 Defrost Timer from Intermatic enclosure.
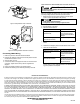
Installation/Replacing Timer With G8000 Enclosure
1. Take one of these actions.
If you are... Then...
Switching out the G8000
Defrost Timer in a
different enclosure or
bracket,
Perform the applicable G8000
changeout procedure:
• Replacing Existing Timer in
Enclosure with G8000
mechanism
• Replacing Existing Timer with
G8000 on Bracket or Bracket
inside Enclosure
Mounting G8000
enclosure with the
mechanism,
Follow steps 2 through 9.
2. Insert screwdriver into slot on G8000 Defrost Timer and re-
move mechanism from Intermatic enclosure. See Figure 1.
3. Install the enclosure in the desired location that provides
adequate space for the enclosure door to swing open fully.
4. Drill the holes and then clean out each hole.
5. Use appropriate mounting hardware as needed.
6. Insert the screw into the top hole and tighten.
7. Hang the enclosure over the top screw.
8. Insert the other screws through the holes in the enclosure and
into the remaining holes in the wall. Tighten the screws.
9. Install the timer in the enclosure. Connect wiring. See
Connecting G8000 Wiring.
1. Disconnect power to the mechanism you want to replace.
2. Disconnect the wires from the old mechanism.
3. Remove the old mechanism from the enclosure.
4. Insert screwdriver into slot on G8000 Defrost Timer and re-
move it from Intermatic enclosure. See Figure 1.
5. If necessary, snap the tabs off the G8000 Defrost Timer with
your ngers or pliers. See Figure 2.
6. Tuck in the insulator tab on the timer and then snap
the mechanism in the applicable enclosure. See Figure 3.
1. Disconnect power to old mechanism you want to replace.
2. Disconnect the wires from the old mechanism
3. Remove the old mechanism from the bracket or the bracket in
the enclosure.
4. Insert screwdriver into slot on G8000 Defrost Timer and re-
move it from the Intermatic enclosure. See Figure 1.
5. If necessary, snap the tabs off the G8000 Defrost Timer with
your ngers or pliers. See Figure 2.
6. Tuck in the insulator tab on the timer and then snap
the timer on the bracket as shown in Figure 3, or if
applicable, the snap timer on bracket in the enclosure as
shown in Figures 4 and 5 on the back.
7. Make sure the mechanism is fastened securely on the bracket.
Replacing Existing Timer with G8000 On Bracket
or Bracket Inside Enclosure
READ AND SAVE INSTALLATION INSTRUCTIONS
Replacing Existing Timer in Enclosure with G8000
Mechanism
WARNING
Risk of Electric Shock or Fire