
User Guide

LIMITED TWO YEAR WARRANTY
If within the warranty period specified, this product fails due to a defect in material or workmanship, Intermatic Incorporated will repair or replace it, at its
sole option, free of charge. This warranty is extended to the original purchaser only and is not transferable. This warranty does not apply to: (a) damage
to units caused by accident, dropping or abuse in handling, acts of God or any negligent use; (b) units which have been subject to unauthorized repair,
opened, taken apart or otherwise modified; (c) units not used in accordance with instructions; (d) damages exceeding the cost of the product; (e) sealed
lamps and/or lamp bulbs, LED’s and batteries; (f) the finish on any portion of the product, such as surface and/or weathering, as this is considered normal
wear and tear; (g) transit damage, initial installation costs, removal costs, or reinstallation costs.
INTERMATIC INCORPORATED WILL NOT BE LIABLE FOR INCIDENTAL OR CONSEQUENTIAL DAMAGES. SOME STATES DO NOT ALLOW THE
EXCLUSION OR LIMITATION OF INCIDENTAL OR CONSEQUENTIAL DAMAGES, SO THE ABOVE LIMITATION OR EXCLUSION MAY NOT APPLY
TO YOU. THIS WARRANTY IS IN LIEU OF ALL OTHER EXPRESS OR IMPLIED WARRANTIES. ALL IMPLIED WARRANTIES, INCLUDING THE
WARRANTY OF MERCHANTABILITY AND THE WARRANTY OF FITNESS FOR A PARTICULAR PURPOSE, ARE HEREBY MODIFIED TO EXIST
ONLY AS CONTAINED IN THIS LIMITED WARRANTY, AND SHALL BE OF THE SAME DURATION AS THE WARRANTY PERIOD STATED ABOVE.
SOME STATES DO NOT ALLOW LIMITATIONS ON THE DURATION OF AN IMPLIED WARRANTY, SO THE ABOVE LIMITATION MAY NOT APPLY
TO YOU.
This warranty service is available by either (a) returning the product to the dealer from whom the unit was purchased, or (b) completing a warranty claim
on line at www.intermatic.com. This warranty is made by: Intermatic Incorporated, Customer Service 7777 Winn Rd. Spring Grove, Illinois 60081-9698.
For warranty service go to: http://www.intermatic.com or call 815-675-7000.
INTERMATIC INCORPORATED
SPRING GROVE, ILLINOIS 60081-9698
www.intermatic.com
158--01359
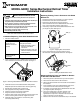
1. Make sure power is disconnected to the G8000.
2. Remove the retaining screw that secures the plastic insulator.
Set aside the screw for re-use.
3. Strip the wires 1/2 inch.
4. Connect the wires to the proper terminals on the time switch
connector. Tighten screws rmly. See the supplied wire
diagram.
5. Return the plastic insulator to its original position.
6. Reinstall the retaining screw that was previously removed.
Connecting G8000 Wiring
Slot lines up
with Bracket
Figure 4. Snap Defrost Timer on bracket.
Figure 5. Installing G8000 in bracket in enclosure
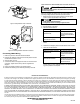
After you complete the G8000 wiring, be sure to perform the
Checking Voltage Solenoid Terminals procedure below.
1. Rotate the timer knob counter-clockwise until the tripper
screw is in-line with the time of day pointer.
2. Connect a voltmeter across solenoid terminals X and 3.
3. Activate power to the timer.
4. Take one of these actions.
If... Then...
Voltage is present at the sole-
noid terminals,
Turn off power and check
wiring and other system
components for feedback
voltages.
There is no voltage present at
the solenoid terminals
Proceed to step 5.
5. Rotate timer knob until timer transfers power into Defrost
Mode.
6. Determine if voltage is present at solenoid terminals X and 3.
7. Take one of these actions.
If... Then...
Voltage is present at the sole-
noid terminals,
Turn off power and check
wiring and other system
components for feedback
voltages.
There is no voltage present at
the solenoid terminals
Turn off power to the
defrost timer and discon-
nect the volt meter from the
solenoid terminals.
NOTE: After you have veried that there is no feedback volt-
age, the procedure is complete.
FOR UNITS WITH SOLENOIDS (G8145-00 and G8145-20)
Thedefrostterminatingsolenoidonthisdefrostcontrolisnotintendedfor
continuousdutyoperation.
WARNING
Risk of Electric Shock or Fire
Risk of Damage to Timer
• DoNOTrotoatethetimerknobclockwise.
• Turningtheknobclockwisecandamagethegearsinthetimer.
NOTICE