Thank you for purchasing Intermatic’s Home Settings devices. With these products you can reliably and remotely control lighting and appliances. The outstanding features of the Home Settings program include: Feedback that will allow you to see whether your device has received the ON/OFF/DIM signal. Ease of installation Manual override RF signal reliability – each Home Settings product has a special repeater feature that virtually guarantees that RF signals are received.
The HA07 Controller also includes the following features: 12 Channels - each channel can control up to 16 devices to create scenes or timed events. Astronomic Feature – this option allows your time settings to match the daily changes in sunrise and/or sunset. Set it once and never have to set it again for these types of time changes. Wall mountable or place on a tabletop. Daylight Saving Time – this option automatically adjusts your timer for daylight saving time.
________________Table of Contents INCLUDE Modules to ALL ON/ALL OFF Feature……...…..... 20 EXCLUDE Modules to ALL ON/ALL OFF Feature…..………. 22 Programming the Controller…………………………………………23 Automatic, Automatic Random, and Manual Mode……………… 27 Additional Features………………………………………………….. 28 Controller Replication…………………………………...………. 28 Replicating the Network and Channel Settings….…………... 28 Replicating the Network only…………...……………….……… 30 Resetting the Controller……………………………………………..
Master Remote Controller _ Glossary of Terms Astronomic Function – Allows a device to follow sunrise and sunset times. The unit will automatically adjust as daylight time increases or decreases without the need to be reprogrammed. Channel – A channel will control up to 16 modules, allowing them to be programmed to turn on/off with the same time settings. HA07 has 12 channels. Device – Any item that is connected to a module (for example, lamps). Fig 1. LCD display and button configuration.
Event - A program in the controller that will instruct the controller to control various modules at a set day and time. The HA07 can accommodate up to 28 events. Module – Any Intermatic Home Settings product that is controlled with a remote controller. Network – All Intermatic Home Settings devices controlled by the Master Controller and duplicate remote controls operating on the same system. Each network has its own unique identification code so that no one else can control the system.
Battery Installation 1. Open the battery compartment door located on the back of the remote control by pressing down on the battery compartment tab and pulling the door outward. 2. Insert 4 size “AA” alkaline batteries (not included), placing the batteries as shown in the battery compartment. (See Fig 2) 3. Replace the battery compartment door by first inserting the 2 tabs at the bottom of the door, then pressing the door in until the door clicks shut. Page 6 of 35 Fig 2.
Module Installation and Set-Up Recommendations 1. Modules should be plugged-in or hardwired into the location where they will be used. 2. For best results, do not move or relocate modules after they have been included into the network. If you wish to re-locate or move a module from a particular location, first delete it from the network, then include it back to the network after you have re-located it. 3. Devices should be plugged into modules before adding modules to the network.
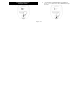
____________Programming Instructions______________ _______________Setting the CLOCK_________________ 1. (See Fig 3a) Press MODE until CLK mode is shown. Fig 3a 2. (See Fig 3b) Press ENTER and the hour will flash. Press + or - to set the hour. Press ENTER to accept the hour.
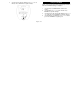
3. (See Fig 3c) The minutes will flash. Press + or - to set minutes. Press ENTER to accept the minutes. ______________Setting the CALENDAR______________ NOTE: The day of the week will be automatically calculated when the CALENDAR setting is completed. 1. 2. 3. 4. Fig 3c Page 9 of 35 (See Fig 4a) Press MODE until the CAL mode is shown. (See Fig 4b) Press + or - to set the month. Press ENTER to accept the changes. (See Fig 4c) The day of the month will flash. Press + or - to set the day.
___________Setting the CALENDAR (continued)_______ Fig 4a – CAL mode Fig 4c – Set Day Fig 4b – Set Month Page 10 of 35 Fig 4d – Set Year
Setting Daylight Saving Time (dST) and Zone 1. 2. 3. 4. (See Fig 5a) Press MODE until the SETUP mode is shown. The controller is programmed to automatically adjust for daylight saving time (dST). If you want to keep this setting, press ENTER to go to ZONE. Skip to step 4. If you do not want dST, press + or - . The display will read OFF. (See Fig 5b) (Pressing the + or – button a second time will toggle the dST selection back to “AUTO”.) Press ENTER to go to ZONE. (See Fig 5c) ZONE CENTER will flash.
Setting Daylight Saving Time (dST) and Zone (cont’d) Fig 5d – Zone Map Fig 5c – Press ENTER to accept zone setting.
Setting Astronomic Function NOTE: If you do not want to use the Astronomic function, you can bypass SETUP mode by pressing the MODE button until program (PGM) mode is displayed. (See Fig. 6) 1. 2. 3. 4. The default SUNUP times for this zone will be flashing. Press ENTER to accept. If the time is not correct, or if you would like to customize the SUNUP time, press + or - to enter the desired time and press ENTER. (See Fig 7) SUNSET times for this zone will be flashing. Press ENTER to accept.
Setting Astronomic Function (continued) Fig 7 – SUNSET default time may be different than shown above. Press ENTER to accept the default time. Page 14 of 35 Creating a Network NOTE: Creating a network refers to assigning modules to the master controller. All modules must be assigned to the master controller before any programming or remote control functions can be accomplished. NOTE: Devices should be plugged into modules before adding modules to the network.
INCLUDE Modules to a Network (continued) 2. (See Fig 8b) Press and release the PROGRAM button on the module. If successful, the INCL icon will stop flashing and the word SUCCESSFUL will show for 2 seconds. If NOT SUCCESSFUL appears on the screen, it will be necessary to repeat this step until SUCCESSFUL appears. Repeat steps 1 and 2 for each module you wish to add to the network.
Associating Modules to Channels 1. 2. 3. (See Fig 9a) On the remote controller, simultaneously press and hold the channel ON and OFF buttons of the desired channel. LEARN will be displayed. (Note: Learning mode will time out after 10 seconds. If this happens, ON and OFF buttons have to be pressed again). Release the ON and OFF buttons after “LEARN” appears in the display. (See Fig 9b) Press and hold the INCLUDE button. INCL will appear on the screen. (See Fig 9c) CONTINUTE TO HOLD THE INCLUDE BUTTON.
Associating Modules to Channels (continued) Fig 9a – Press and hold the channel ON and OFF buttons. Release buttons when “LEARN” is shown in the display. Fig 9b – Press and hold the INCLUDE button. Fig 9c – Set the desired light level by pressing the PROGRAM button on the module. Release the INCLUDE button on the controller when the light level is set.
EXCLUDE from the Network (See Fig 10a and 10b) Follow the same procedure as Creating a Network (see page 14) except press the DELETE button instead of the INCLUDE button. Fig 10a – Press and release the DELETE button Fig 10b – Press the PROGRAM button Page 18 of 35 EXCLUDE from a Channel (See Fig 11a – 11c) Follow the same procedure as Associating Modules to Channels (see page 16) except press the DELETE button instead of the INCLUDE button.
EXCLUDE from a Channel (continued) Remote ON, OFF, DIM Operation ON - Press and release the ON button for the assigned channel. OFF - Press and release the OFF button for the assigned channel. DIM UP - press and hold the ON button. DIM DOWN - press and hold the OFF button.
Adding Modules to ALL ON/ALL OFF Feature __INCLUDE Modules to the ALL ON/ALL OFF feature:__ The HA07 Master Controller includes an ALL ON/ALL OFF feature that allows all lighting modules in the network to be turned ON or OFF at the same time.
__INCLUDE Modules to the ALL ON/ALL OFF feature:__ Fig 13a – Press and hold the ALL ON and ALL OFF buttons Fig 13c – Press the PROGRAM button Fig 13b – Press and hold the INCLUDE button until ALLSET appears.
EXCLUDE Modules from the ALL ON/ALL OFF Feature 1. (See Fig 13d) Follow the same steps as above, except in step 2, hold the DELETE button.
Programming the Controller To set a programmed event, you will need to set a “day group” and the event execution time. A “day group” can represent all 7 days of the week (SUN through MON), weekdays (MON through FRI), weekends (SAT and SUN), or individual days of the week. Set the DAY GROUP and the event execution time: 1. (See Fig 14a on page 24) Press the MODE button until PGM is displayed. 2. (See Fig 14b on page 24) Press the + button and the days of the week will flash.
Programming the Controller (continued) Fig 14a – Press the MODE button Fig 14b – Press the + button Page 24 of 35 Fig 14c – Select the hour Fig 14d – Select the minutes
Programming the Controller (continued) 6. After setting the day group and execution time, you will need to choose which channels you want to control, and what you want those channels to execute. The master controller can send commands to modules to turn ON to full brightness, turn OFF, turn ON to a preprogrammed brightness level (other than full ON), or turn a SCENE ON. Setting the Channels to Control, and Setting the Lighting Effect 5. (The Channel numbers and Dimmer Bars should already be flashing.
Programming the Controller (continued) Fig 14e – Press and hold ALL OFF or ALL ON to set the desired light level Fig 14f – Press and release ALL ON to use SCENES (preset light levels) Fig 14g – Press ENTER to accept settings and step to the next event CONGRATULATIONS! You have completed the programming of your HA07 Master Controller.
__________________OPERATING MODES___________________ ___AUTOMATIC, AUTOMATIC RANDOM, AND MANUAL MODE__ (See Fig 15) When you have completed your PROGRAM settings, press MODE. AUTOMATIC – the programs that you have set will automatically run, as you have set them. The display indicator will show “AUTO”. AUTOMATIC RANDOM - the program events that you have set will execute ±15 minutes from your programmed EVENT times. This is a security feature that gives your house a more “lived-in” look.
Additional Features Replicating the Network and Channel Settings The HA07 Master Controller allows you to create two different types of copies of the primary remote controller: - Replicating both Network and Channel settings will copy all network information and scene information for each channel. - Replicating the network only will copy network information only. This gives you ability to customize the secondary controller by associating different modules to each channel.
Replicating the Network and Channel Settings (cont’d) (Note: If the secondary controller is Home Settings Model HA09 Handy Remote Controller, follow the same procedure as the HA07 Master Remote. Instead of seeing the word “COPY”, the 2 LEDs on the HA09 will flash simultaneously.) The controllers will automatically synchronize with each other and the word “SUCCESSFUL” will flash for 2 seconds on the display (for HA09 Handy Controller, success is indicated with a solid green LED for 2 seconds).
Replicating the Network and Channel Settings (cont’d) Fig 16c – Press and hold the INCLUDE button on the Secondary Controller. “Copy” will be shown in the LCD display. Release the INCLUDE button. Fig 16d – Press and release the Channel 1 OFF/DIM button on the Secondary Controller. “RA” which stands for “Receive ALL data” will be shown next to “Copy”.
Resetting the Controller Resetting CHANNELS only If needed, you can reset the NETWORK and CHANNEL SETTINGS individually or both together. NOTE: When resetting a controller, for best results, each module within the system should be individually reset also. Resetting the NETWORK only 1. 2. Follow the same procedure as Resetting the Network, except press Channel 2 ON/DIM and OFF/DIM buttons in step 2. The display will read, “CHAN CLEAR”.
Troubleshooting Problem: • Every time I try to INCLUDE or DELETE modules to my network, I keep getting errors (red LED flashes) • After I perform a controller replication, neither controller controls anything at all. Page 32 of 35 Solution: • The controller might be a Secondary Controller. Only a Primary Controller may be used to INCLUDE or DELETE modules into or from a network. Use the Primary Controller to INCLUDE or DELETE. • The module might be part of a different network.
Troubleshooting Problem: • I am trying to turn on a module associated to channel 1, but it will not turn on. • My programmed events will not automatically execute. Page 33 of 35 Solution: • Check to be sure there is power supplied to the module. • Check to be sure that the lightbulb is not bad. • The module might be associated as a ‘FULL OFF’ lightlevel. Re-associate the module (see page 16) as a ‘FULL ON’ or as a dimmed light level.
___Federal Communications Commission Statement___ This device complies with part 15 of the FCC rules. Operation of this device is subject to the following two conditions: (1) This device may not cause harmful interference, and (2) This device must accept any interference, including interference that may cause undesired operation. NOTE: This equipment has been tested and found to comply with the limits for a Class B digital device, pursuant to Part 15 of the FCC Rules.
LIMITED 6 YEAR WARRANTY If within six (6) years from the date of purchase, this product fails due to a defect in material or workmanship, Intermatic Incorporated will repair or replace it, as its sole option, free of charge. This warranty is extended to the original household purchaser only and is not transferable.