
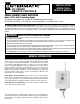
Instructions / Assembly

OPERATION
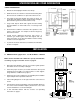
Linking RC939 Transmitter Button with the RC613 Receiver
1. To clear any existing codes, press and hold the blue code set button on the receiver for 15 seconds then release.
2. Now insert a paper clip in the hole on the bottom right side of remote and get the red light on the bottom to light up.
(NOTE: Illuminated LED may be difcult to see in direct sunlight.)
3. To link the reciever and transmitter, go back to the receiver and press & release the blue code set button.
4. Now choose the button on the remote you want it on and SLOWLY ”press & release”.
5. After the 7th time, you should hear the relay in the receiver click.
6. Continue to SLOWLY press the remote button (relay should click every 4th time now).
7. Repeat until you hear the relay click 3 or 4 times.
8. Press one of the other 2 buttons on the remote to save the code.
Linking Multiple transmitters with a Receiver
Up to three different transmitters can control a receiver. Follow steps 1 through 4 of Linking each RC939 transmitter with
the RC613 receiver.
3
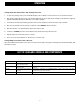
LIST OF AVAILABLE MODELS AND COMPONENTS
Model Description Specifications
RC613 Single Channel Receiver
3-way switching module
15 A Resistive, 10 A (1200 W) Tungsten, 1 HP (16 A FLA)
RC613L Single Channel Receiver
with 36 in. Lead
15 A Resistive, 10 A (1200 W) Tungsten, 1 HP (16 A FLA), Single Pole Single Throw
Contacts
RC613R Heavy-Duty Receiver and Relay
Assembly
30 A Resistive - 120/240 V, 12.5 A (1500 W) Tungsten - 120 V, 1.5 HP - 120 V, 3 HP - 240
V, Double Pole Single Throw Contacts
RC939 3 Channel Transmitter Operates on 9 V Battery