CK61 User’s Manual Mobile Computer With Windows Mobile
Intermec Technologies Corporation Worldwide Headquarters 6001 36th Ave.W. Everett, WA 98203 U.S.A. www.intermec.com The information contained herein is provided solely for the purpose of allowing customers to operate and service Intermec-manufactured equipment and is not to be released, reproduced, or used for any other purpose without written permission of Intermec Technologies Corporation.
Document Change Record This page records changes to this document. The document was originally released as 935-000-001. Version Number Date Description of Change 004 1/2009 Changed part number to 935-000-004 and added alphanumeric and numeric key presses. 001 12/2006 Replaced Audio Devices applet information with Bluetooth Audio applet information. Updated 802.11 information to include “A” functionality. Added information about Microsoft WordPad and Media Player.
iv CK61 Mobile Computer User’s Manual With Windows Mobile
Contents Contents Before You Begin. . . . . . . . . . . . . . . . . . . . . . . . . . . . . . . . . . . . . . . . . . . . . . . . . . . . . . . . . . . . . . . . viii Safety Information . . . . . . . . . . . . . . . . . . . . . . . . . . . . . . . . . . . . . . . . . . . . . . . . . . . . . . viii Global Services and Support . . . . . . . . . . . . . . . . . . . . . . . . . . . . . . . . . . . . . . . . . . . . . viii Warranty Information. . . . . . . . . . . . . . . . . . . . . . . . . . . . . . . . . . .
Contents Improving the Performance of the Area Imager . . . . . . . . . . . . . . . . . . . . . . . . . . . . . 19 Using the Secure Digital Card . . . . . . . . . . . . . . . . . . . . . . . . . . . . . . . . . . . . . . . . . . . . . . . . . . . . . 19 2 Connecting and Configuring the CK61 . . . . . . . . . . . . . . . . . . . . . . . . . . . . . . . 21 Connecting to the CK61 . . . . . . . . . . . . . . . . . . . . . . . . . . . . . . . . . . . . . . . . . . . . . . . . . . . . . . . . . .
Contents Installing Applications on the Computer. . . . . . . . . . . . . . . . . . . . . . . . . . . . . . . . . . . . . . . . . . . 66 Installing Applications Using SmartSystems Foundation. . . . . . . . . . . . . . . . . . . . 68 Installing Applications Using Microsoft ActiveSync . . . . . . . . . . . . . . . . . . . . . . . . . 68 Installing Applications Using a Storage Card . . . . . . . . . . . . . . . . . . . . . . . . . . . . . . . 69 Installing Applications Using the FTP Server . . . . . . . . . .
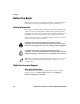
Contents Before You Begin This section provides you with safety information, technical support information, and sources for additional product information. Safety Information Your safety is extremely important. Read and follow all warnings and cautions in this document before handling and operating Intermec equipment. You can be seriously injured, and equipment and data can be damaged if you do not follow the safety warnings and cautions.
Before You Begin Disclaimer of warranties: The sample code included in this document is presented for reference only. The code does not necessarily represent complete, tested programs. The code is provided “as is with all faults.” All warranties are expressly disclaimed, including the implied warranties of merchantability and fitness for a particular purpose. Web Support Visit the Intermec web site at www.intermec.com to download our current manuals (in PDF).
Before You Begin IN Information System PTD LTD 6th Floor Daegu Venture Center Bldg 95 Shinchun 3 Dong Donggu, Daegu City, Korea E-mail: jmyou@idif.co.kr or korlim@gw.idif.co.kr Who Should Read This Manual This CK61 Mobile Computer User’s Manual is for the person who is responsible for installing, configuring, and maintaining the CK61. This manual provides you with information about the features of the CK61, and how to install, configure, operate, maintain, and troubleshoot it.
Before You Begin The Intermec web site at www.intermec.com contains our documents (as PDF files) that you can download for free. To download documents 1 Visit the Intermec web site at www.intermec.com. 2 Click Support > Manuals. 3 In the Select a Product field, choose the product whose documentation you want to download. To order printed versions of the Intermec manuals, contact your local Intermec representative or distributor.
Before You Begin xii CK61 Mobile Computer User’s Manual With Windows Mobile
1 Using the CK61 Mobile Computer This chapter introduces the CK61 Mobile Computer with Microsoft Windows® Mobile 5.0 and contains these topics:.
Chapter 1 — Using the CK61 Mobile Computer Introducing the CK61 Mobile Computer The Intermec CK61 Mobile Computer is an ergonomically designed mobile computer built on the Microsoft Windows Mobile operating system. The CK61 is a rugged, easy-to-use, reliable computer, and runs most software developed for the Windows CE platform, including standalone, client-server, and browser-based applications. CK61 Mobile Computer The CK61 with an IEEE 802.
Chapter 1 — Using the CK61 Mobile Computer The CK61 is available with the following: • Ethernet • 802.11a/b/g radio • Bluetooth® • Disk on Chip (128MB) • Memory options: • • 64 MB RAM • 128 MB RAM • 64 MB Flash Memory Imaging options: • EA11 2D Area Imager • EL10 Scanner • EV10 • EX25 Near-Far Range Area Imager Use this manual to understand how to use the features and options available on the CK61.
Chapter 1 — Using the CK61 Mobile Computer Finding the Software Build Versions You can easily check to see what version of the operating system and the SmartSystems Platform Bundle (SSPB) are loaded on your CK61. To find your operating system version 1 Tap Start > Internet Explorer. 2 Tap the Intermec logo. The Intermec page appears and displays the software build information. Using the Battery The CK61 uses a 17.3 Watt-hour, 7.2 V, replaceable Lithium-Ion (Li-ion) battery.
Chapter 1 — Using the CK61 Mobile Computer Note: If the CK61 is not on external power and you remove the battery pack, it goes into Suspend mode. Dispose of used batteries promptly. Keep away from children. Contact your Intermec representative for replacement batteries. Several factors determine the life of your battery such as extreme temperatures, input devices, and your usage.
Chapter 1 — Using the CK61 Mobile Computer To remove and install the battery 1 Press and hold the Power button for about 2 seconds until the CK61 turns off. 2 Press the battery release tab down and pull the battery out of the CK61. 3 Install a new battery by inserting it into the CK61 as shown in the illustration below.
Chapter 1 — Using the CK61 Mobile Computer Maximizing Battery Life Batteries are chemical devices. If the batteries are left sitting on a shelf for long periods of time outside the CK61, the batteries slowly discharge, eventually to zero if left uncharged. The battery chemistry resists normal degradation if you store the battery in a charger as opposed to leaving the battery in a discharged state. See the following table for tips you can do to maximize the life of your battery.
Chapter 1 — Using the CK61 Mobile Computer Good Read LED and Ready-to-Work Indicator Battery LED Function LED For more information on the Good Read LED or Ready-to-Work Indicator, see “Understanding the Status LEDs” on page 17. Understanding the Battery Status LED Battery Status Descriptions Steady green Battery is more than 95% charged and computer is on a charger. Blinking red Battery is low. Steady red Main battery is on charge.
Chapter 1 — Using the CK61 Mobile Computer Using the Keypad The CK61 can have a 32-key large numeric keypad, or a 58-key full alphanumeric keypad. Esc 7 8 9 4 5 1 2 6 3 0 Enter . CK61 Numeric 32-key Large Numeric Keypad and 58-key full Alphanumeric Keypad The full alphabetic keypad is for applications that require primary input of alphabetic data. This keypad also provides special characters, numbers, symbols, and functions by pressing color-coded key sequences.
Chapter 1 — Using the CK61 Mobile Computer The large numeric keypad is for applications that require mainly numeric data. This keypad also lets you enter special characters, including the alphabet, by pressing color-coded key sequences. Using the Color-Coded Keys Each keypad available for the CK61 provides color-coded keys to let you access additional characters, symbols, and functions printed on the keypad overlay.
Chapter 1 — Using the CK61 Mobile Computer Using the Power Button When you press the Power button, you put the CK61 into a lower power mode. In this lower power mode, the CK61 continues to supply power to all memory, but turns off power to most hardware such as the display. This power-saving feature is designed to prolong battery life. Configuring the Backlight Settings By default, the CK61 goes into Screen Off mode when there is no activity on the computer.
Chapter 1 — Using the CK61 Mobile Computer Understanding the Audio Features There are several audio features available on the CK61. There are two speakers, a microphone, and multiple software tools for configuring the volume of the sounds. Changing the Volume Ways to Adjust Volume Tap the Volume ( the navigation bar. Procedure ) icon in Use the stylus to move the volume slider up or down for the computer. You can also turn the volume on or off and choose to use Vibrate mode.
Chapter 1 — Using the CK61 Mobile Computer Note: The Volume icon in the Navigation bar changes to look like a vibrating CK61 ( ) when the computer is in vibrate mode. Using the Push To Talk (PTT) Feature You can use the PTT feature to: • record audio on your CK61. • use your CK61 as a two-way radio. Recording Audio on Your CK61 You can use the PTT key located on the left side of the CK61 to automatically record audio on your CK61.
Chapter 1 — Using the CK61 Mobile Computer • Press and hold the PTT key for more than 2 seconds to turn on the CK61, start the Note application in audio note mode, and start recording. You can record using the internal microphone. To stop recording, release the PTT key. Using Your CK61 as a Two-Way Radio You can also use the PTT feature with audio applications, such as iTalkie™ or 4Talk to communicate between two or more CK61s over the 802.11b/g radio network.
Chapter 1 — Using the CK61 Mobile Computer Using the Stylus Your computer has a stylus for selecting items and entering information on the touch screen. Functions You Can Perform With the Stylus Action Description Tap Touch the screen once with the stylus to select options, open or close applications, or launch menus from the Task bar. Drag Hold the stylus on the screen and drag across the screen to select text and images.
Chapter 1 — Using the CK61 Mobile Computer Computer Screen Icons (continued) Icon Description The 802.11a/b/g radio is connected to the wireless network. The computer is connected through the USB port to your desktop PC.. The iConnect application icon. Tap it to set up Ethernet or Wireless settings.. Aligning the Touch Screen If the touch screen does not respond when you tap it with the styulus, you may need to calibrate the screen.
Chapter 1 — Using the CK61 Mobile Computer Understanding the Status LEDs Use this section to understand the status LEDs. Good Read LED and Ready-to-Work Indicator Battery LED Function LED For more information on the Battery Status LED, see “Checking the Battery Status” on page 7. Understanding the LEDs and Icons LED Color Description Good Read Green The CK61 has successfully decoded a bar code. Notification Yellow The CK61 is notifying you of a pending alarm or message.
Chapter 1 — Using the CK61 Mobile Computer The Read-to-Work indicator (blue light) is for the SmartSystems Foundation application that is part of a wireless network using all Intermec devices. For more information, see “Configuring the CK61 Using SmartSystems Foundation” on page 24 or contact your Intermec representative. Selected application software programs may also use the blue light, either steady or flashing, for other purposes.
Chapter 1 — Using the CK61 Mobile Computer Improving the Performance of the Area Imager If you experience problems scanning a bar code with the 2D imager, try following some of these tips to improve the performance of your imager. • Keep your hand as steady as possible while scanning a label. • Position the imager as close to the bar code as possible while still being able to capture the entire bar code. • Enable only the bar codes that you need to use every day.
Chapter 1 — Using the CK61 Mobile Computer You can corrupt your SD card if you do not follow these installation and removal procedures exactly. Before installing a SD card, inspect the gasket on the door for any damage or wear, and contact your Intermec representative if you find any damage or wear. To insert the SD card 1 Press the Power button to turn off the CK61. 2 Remove the two screws that secure the stylus holder to the CK61.
2 Connecting and Configuring the CK61 Use this chapter to understand how to configure the CK61 to communicate in your network.
Chapter 2 — Connecting and Configuring the CK61 Connecting to the CK61 Use Microsoft ActiveSync to synchronize the information on your desktop with the information on the computer. Synchronization compares the data on the computer with your desktop PC and updates both computers with the most recent information. Note: By default, ActiveSync does not automatically synchronize all types of information. Use ActiveSync options to turn synchronization on or off for specific information types.
Chapter 2 — Connecting and Configuring the CK61 Once you have set up ActiveSync and completed the first synchronization process, you can initiate synchronization from your computer. To open ActiveSync on your computer • Tap Start > Programs > ActiveSync. ActiveSync opens and shows you the synchronization status. For more information about ActiveSync on your computer, open ActiveSync and tap Start > Help.
Chapter 2 — Connecting and Configuring the CK61 For detailed information on most of the commands available in Intermec Settings, see the Intermec Computer Command Reference Manual (P/N 073529) on the Intermec web site. Navigating in Intermec Settings To Do This Function: Do This: Select a command. Tap the command or press Expand a command. Tap the command or press or or . . Select text in a text box. Tap in the text box and drag the stylus over the text. Save your settings.
Chapter 2 — Connecting and Configuring the CK61 The default reference time server is the USNO (tock.usno.navy.mil). To synchronize the time on your computer with this time server, you must have a valid connection to the Internet. You can also synchronize the computer system time with a corporate network server within your firewall that is SNTP-capable. To use an internal corporate network server, you need to set the command name in the registry.
Chapter 2 — Connecting and Configuring the CK61 2 Tap Turn on Bluetooth. 3 (Optional) Tap Make this device visible to other devices if you want your computer to be discoverable by other Bluetooth devices. Once Bluetooth is enabled, it stays enabled through a warm or cold boot and maintains virtual COM ports (such as printing) registration. However, you must reactivate connections because they are not done automatically.
Chapter 2 — Connecting and Configuring the CK61 Bluetooth Settings (continued) Setting Description IBT Displays the Intermec Bluetooth Library version. Radio Displays the Bluetooth Radio Hardware version. Device Address Device Address Displays the Bluetooth address of your computer. Configuring to Communicate With a Wireless Scanner This section explains how to configure the computer to communicate with Bluetooth wireless scanners.
Chapter 2 — Connecting and Configuring the CK61 2 The CK61 prompts you to enter the passcode for your scanner. The default password for Intermec bluetooth scanners is 0000. To connect to a wireless scanner using the Wireless Scanner Wizard 1 Select Start > Settings > the System tab > Wireless Scanner Wizard. 2 Tap Add Device. The wizard advances to the next screen. 3 Select how you would like to set your scanner (the default is Search) and then click Next. The computer starts discovering scanners.
Chapter 2 — Connecting and Configuring the CK61 6 In the Passcode text box, enter the passcode for your scanner. The default passcode for Intermec Bluetooth scanners is 0000. 7 Tap Next. The computer connects to the scanner and displays the remote device information. 8 Tap Finish. 9 Refresh Intermec Settings to see the Bluetooth Scanner under Data Collection. You can now view and modify any symbology settings.
Chapter 2 — Connecting and Configuring the CK61 The Wireless Printing application uses the concept of a “current wireless printer.” The computer connects to the current wireless printer when your application opens the wireless printing COM port on your computer. If there is no current wireless printer selected on your computer, there is no wireless printing COM port registered on your computer. You must select a current wireless printer as described in the next section.
Chapter 2 — Connecting and Configuring the CK61 2 Tap Search to initiate printer discovery. All Bluetooth printers discovered within range appear in the devices list. 3 Select the printer you want to connect to and then tap OK. 4 If your preferred printer does not appear, make sure the printer is turned on and discovery is enabled, and then repeat this procedure. 5 Tap Print Test Page. The printer prints out the test page.
Chapter 2 — Connecting and Configuring the CK61 3 Type the address of the printer in the Enter Device Address text box and then tap OK. The keyword -unknown- appears in the Device Name field in the Current Wireless Printer box. The name of the printer is not sent to the computer when you manually enter the printer address. 4 Tap Print Test Page. The printer prints out the test page.
Chapter 2 — Connecting and Configuring the CK61 2 Tap Search for Devices. The CK61 searches for audio devices. 3 When searching for a device, select Yes when you are prompted to add a device to your list. 4 Enter the passcode provided by your Bluetooth audio device and then tap Next. The passcode is provided by the manufacturer of your Bluetooth audio device. You can usually find your passcode in the user’s manual that comes with your audio device.
Chapter 2 — Connecting and Configuring the CK61 Configuring Local Area Networks Your CK61 is a versatile computer that easily adds to your wired or wireless data collection network. You can connect your computer to a network using: • USB communications • Ethernet communications • 802.
Chapter 2 — Connecting and Configuring the CK61 2 Select Enable > Ethernet. 3 (Optional) Configure the IP Settings for the Ethernet Adapter if you are not using DHCP. DHCP is the default setting. 4 (Optional) If required for your network, you may also need to set these parameters on each computer: • Primary and secondary DNS servers • Primary and secondary WINS servers 5 Make sure that your computer is talking to the network and that the network can see your computer. Configuring 802.
Chapter 2 — Connecting and Configuring the CK61 To use wireless communications in a TCP/IP network 1 TapStart > Settings > the Systems tab > Intermec Settings. 2 Configure these network parameters on each CK61 in the network: • Network name (SSID) • IP settings (if not using DHCP) 3 Make sure the CK61 is talking to the network and that the network can see the CK61. 4 Configure security. For help “Configuring Security On the CK61” on page 46.
Chapter 2 — Connecting and Configuring the CK61 Checking the Status of Your Wireless Connection After you configure your wireless settings, you can use iConnect to check the status of your connection. To check the status of your wireless connection 1 Tap the iConnect icon ( menu appears. ) in the taskbar. The iConnect pop-up 2 From the menu, select Status > Wireless. The Wireless Status screen appears and checks your connection.
Chapter 2 — Connecting and Configuring the CK61 3 Double-tap ISpyWiFi. To add an ISpyWiFi shortcut to the CK61 Programs folder 1 Press and hold your stylus on the ISpyWiFi executable until the pop-up menu appears. 2 Select Copy from the pop-up menu. 3 On the Desktop screen, press and hold the stylus in an empty area until the pop-up menu appears. 4 Tap and hold on the application until the Pop-Up menu appears and select Copy.
Chapter 2 — Connecting and Configuring the CK61 6 Close Windows Explorer. 7 Select the Windows icon > Programs to locate the shortcut to ISpyWiFi. 8 Tap Shortcut to ISpyWiFi to open the utility. To view the ISpyWiFi tab • Open ISpyWiFi and tap the ISpyWiFi tab. The ISpyWiFi tab contains network interface, configuration, access point, and radio frequency information. The ISpyWiFi Tab Use the following table to understand the ISpyWifi information.
Chapter 2 — Connecting and Configuring the CK61 Understanding the ISpyWiFi Tab (continued) Setting Description BSSID The MAC address of the access point that the client radio is communicating with. Association Shows the type of association: Open, WPA, WPA-PSK, WPA2, or Network EAP. Encrypt Shows the potential encryption for the association. Power CAM (Constant Awake Mode) or FAST PSP (Power Save Poll) Antenna Diversity (multiple antennas), Primary (one antenna).
Chapter 2 — Connecting and Configuring the CK61 The Supplicant Tab To use the Supplicant tab • Click Configure Profile to launch the Profile Wizard and configure 802.11 options. • Click Reconnect to disassociate the radio, momentarily dropping its connection. The radio the reassociates and reauthenticates, but does not do anything with the driver. • Click Clear Events to remove the information shown in the Supplicant Event box.
Chapter 2 — Connecting and Configuring the CK61 The Ping Tab To ping a host 1 From the Host drop-down list, select an IP address for the host you want to ping. Enter a new IP address using the input panel or the keypad. Select Clear List to remove all the IP addresses from the drop-down list. 2 From the Repetitions drop-down list, select the number of times to ping the selected host. These repetitions are done once per second. 3 Tap Ping to initiate contact with the selected host.
Chapter 2 — Connecting and Configuring the CK61 Tap the Help icon at any time to view additional information for the wizard or the settings. To connect to an Internet service provider 1 Tap Start > Settings > the Connections tab. 2 Double-tap Connections.The Connection screen appears. 3 Under MyISP, tap Add a new modem connection and enter a name for the connection. 4 If using an external modem connected to your CK61 with a cable, select Hayes Compatible on COM1 from the Select a modem drop-down list.
Chapter 2 — Connecting and Configuring the CK61 6 Enter the access phone number and then tap Next. Enter the User name, Password, and Domain (if provided by the ISP or your network administrator). 7 Tap Finish. 8 Tap the Advanced tab from the Connections screen and then tap Dialing Rules. Connecting to a Network with a VPN Server A VPN connection helps you to securely connect to servers, such as a corporate network, through the Internet.
Chapter 2 — Connecting and Configuring the CK61 3 Select Add a new VPN server connection. 4 Type in your connection name, VPN server name or IP address, and select your VPN connection type. When you are finished, tap Next. 5 Select a way for the CK61 to authenticate the connection. If you select A pre-shared key, enter the key providedf by your network administrator. When you are finished tap Next. 6 Enter the User name, Password, and Domain (if provided by an ISP or your network administrator).
Chapter 2 — Connecting and Configuring the CK61 Configuring Security On the CK61 This section explains how to configure wireless security on your CK61. If you choose not to use security, see “Disabling Security” on page 63. Configuring Security on the Wireless Network Your wireless adapter (network interface card) connects to wireless networks of two types: infrastructure networks and adhoc networks. • Infrastructure networks connect you to your corporate network and the internet.
Chapter 2 — Connecting and Configuring the CK61 Encryption Terminology Acronym Description CKIP Cisco Key Integrity Protocol. This protocol is Cisco’s version of the TKIP protocol, compatible with Cisco Aironet products. TKIP Temporal Key Integrity Protocol. This protocol is part of the IEEE 802.11i encryption standard for wireless LANs, which provides per-packet key mixing, a message integrity check and a re-keying mechanism, thus overcoming most of the weak points of WEP.
Chapter 2 — Connecting and Configuring the CK61 Authentication Terminology 48 Acronym Description EAP Extensible Authentication Protocol. 802.11b/g uses this protocol to perform authentication. This is not necessarily an authentication mechanism, but is a common framework for transporting actual authentication protocols. Intermec provides a number of EAP protocols for you to choose the best for your network. EAP-FAST Flexible Authentication via Secure Tunneling. A publicly accessible IEEE 802.
Chapter 2 — Connecting and Configuring the CK61 Authentication Terminology (continued) Acronym Description EAP-TTLS Tunneled Transport Layer Security. This protocol provides authentication like EAP-TLS but does not require certificates for every user. Instead, authentication servers are issued certificates. User authentication is done using a password or other credentials that are transported in a securely encrypted “tunnel” established using server certificates.
Chapter 2 — Connecting and Configuring the CK61 If you want to use the default Funk security, you need to select a profile. For help, see one of the following sections, “Configuring Funk Security Using Intermec Settings” on this page or “Configuring Funk Security Using the Profile Wizard” on page 54. If you want to use Microsoft security, you need to select it as your security choice. For help, see “Configuring Microsoft Security” on page 60.
Chapter 2 — Connecting and Configuring the CK61 3 Open Intermec Settings. 4 Choose Communications > 802.11 Radio > Funk Security > Profile. 5 For Association, choose WPA or WPA2 and tap OK. Encryption automatically defaults to TKIP if you are using WPA. Encryption automatically defaults to AES if you are using WPA2. 6 For 802.1x, choose TTLS, PEAP, EAP-FAST, or TLS and press Enter. If you choose TTLS or PEAP: a For Prompt for Credentials, choose Enter credentials now.
Chapter 2 — Connecting and Configuring the CK61 2 Make sure you have selected Funk as your security choice. 3 Open Intermec Settings. 4 Choose Communications > 802.11 Radio > Funk Security > Profile. 5 For Association, choose WPA or WPA2 and tap OK. 6 For 8021.x, choose None. 7 For Pre-Shared Key, enter the pre-shared key or the passphrase. The pre-shared key must be a value of 32 hex pairs preceded by 0x for a total of 66 characters. The value must match the key value on the access point.
Chapter 2 — Connecting and Configuring the CK61 c Select User Password and type a user password. d For Validate Server Certificate, choose Enabled. If you choose TLS: a Load a user and root certificate on your CK61. b For Validate Server Certificate, choose Yes. c You must enter a User Name and Subject Name. You can also enter a Server Common Name if you want to increase your level of security. d Save and exit Intermec Settings.
Chapter 2 — Connecting and Configuring the CK61 5 For Association, choose Open. 6 For Encryption, choose WEP. 7 For 802.1x, choose None. 8 Define a value for the keys you want to use. You can define up to four keys (Key 1 through Key 4). Enter an ASCII key or a hex key that is either 5 bytes or 13 bytes long depending on the capability of the radio. Set a 5-byte value for 64-bit WEP or a 13-byte value for 128-bit WEP. Hex keys must be preceded by 0x and contain 5 or 13 hex pairs.
Chapter 2 — Connecting and Configuring the CK61 6 Enter the SSID (Network Name) if different than the profile name. 7 Click OK. Configuring WEP Security With Profile Wizard 1 In the Profile Wizard, select the Security page. 2 For 802.1x Security, choose None. 3 For Association, choose Open or Shared to match the settings on your access point. 4 For Encryption, choose WEP. 5 From the Data TX Key list, select the key you want to use for transmitting data. 6 Define a value for the keys you want to use.
Chapter 2 — Connecting and Configuring the CK61 5 For Pre-Shared Key field, enter the passphrase as ASCII (12345). 6 Tap OK. Configuring PEAP Security With Profile Wizard Protected EAP (PEAP) performs secure authentication against Windows domains and directory services. It is comparable to EAPTTLS, though not as flexible. To configure PEAP security 1 In the Profile Wizard, select the Security page. 2 For 802.1x Security, choose PEAP. 3 For Association, choose Open, WPA, WPA2, or Network EAP.
Chapter 2 — Connecting and Configuring the CK61 Configuring TLS Security With Profile Wizard EAP-TLS is a protocol based on the Transport Layer Security (TLS) protocol widely used to secure web sites. This protocol requires both the user and authentication server to have certificates for mutual authentication. To configure TLS security 1 In the Profile Wizard, select the Security page. 2 For 802.1x Security, choose TLS. 3 For Association, choose Open, WPA, WPA2, or Network EAP.
Chapter 2 — Connecting and Configuring the CK61 5 For Username, type a unique username for this protocol. 6 In the Password field, type a unique password for this protocol. 7 Select Prompt for password to have the user enter this password each time to access the protocol, or select Use following password to use the protocol without entering a password each time you use the CK61. 8 (Optional) Tap Get Certificates to obtain or import server certificates.
Chapter 2 — Connecting and Configuring the CK61 6 In the Password field, type a unique password for this protocol. 7 Select Prompt for password to have the user enter this password each time to access the protocol, or select Use following password to use the protocol without entering a password each time you use the CK61. 8 Tap OK. Configuring EAP-FAST with Profile Wizard The EAP-FAST protocol is a client-server security architecture that encrypts EAP transactions with a TLS tunnel.
Chapter 2 — Connecting and Configuring the CK61 • Prompt before acquiring a new PAC for notification of any incoming PACs. • Prompt before replacing a PAC for notification whether to replace a current PAC with an incoming PAC. 12 For Anonymous EAP-FAST Name, type the outer identity assigned for public usage. 13 Tap OK.
Chapter 2 — Connecting and Configuring the CK61 You can add a wireless network when the network is detected or manually by entering settings information. To determine if authentication information is needed, see your network administrator. To configure Microsoft security 1 Select Start > Settings > the Connections tab > WiFi > Add New. 2 Enter a Network name. If the network was detected, the network name is entered and cannot be changed.
Chapter 2 — Connecting and Configuring the CK61 Follow these steps to enable WPA authentication using a preshared key: a Set Authentication to WPA-PSK. b Set Data Encryption to either WEP or TKIP. c Enter the new Network key. Follow these steps to enable WPA2 authentication: a Set Authentication to WPA2. b Set Data Encryption to AES or TKIP. c Enter the new Network key. Follow these steps to enable WPA2 authentication using a preshared key: a Set Authentication to WPA2-PSK.
Chapter 2 — Connecting and Configuring the CK61 To import a root certificate 1 Tap the <<< button next to the Import Root Certificate field to select the root certificate (DER-encoded .cer file) to import. 2 Click Import Root Cert to install the selected certificate. To import a user certificate 1 Tap the <<< button next to the Certificate Path field to select the user certificate (DER-encoded .cer file without the private key) to import.
Chapter 2 — Connecting and Configuring the CK61 64 CK61 Handheld Computer User’s Manual With Windows Mobile
3 Developing and Installing Applications Use this chapter to understand the guidelines for developing applications for use on the CK61.
Chapter 3 — Developing and Installing Applications Developing Applications for the Computer The CK61 runs applications that are programmed in Microsoft eMbedded Visual C++ 4.0 to program applications. Use this section to understand the hardware and software you need to develop a new application for the computer. Use the Intermec resource kits to develop new applications to run on the CK61. The Intermec resource kits are a library of C++ and .
Chapter 3 — Developing and Installing Applications • You can copy a directory structure that contains the application, supporting files, DLLs, images, and data files. Intermec recommends using .cab files to install your applications. The CK61 uses standard Windows .cab files and will install thirdparty .cab files. You can have your .cab files place your application in any of these memory locations on the CK61: • The Object Store or the Flash File Store.
Chapter 3 — Developing and Installing Applications • Wavelink Avalanche The following sections explain how to use each one of these processes to install your application on the computer. Installing Applications Using SmartSystems Foundation You can use the SmartSystems console to drag-and-drop Intermec applications onto your mobile computers. The computer ships with the SmartSystems client, which means it is SmartSystems-enabled.
Chapter 3 — Developing and Installing Applications computer. If necessary, select File > Get Connected to initiate a connection. 3 Click Explore to open the Mobile Device window that shows the files and folders on the CK61. 4 On your desktop PC, locate the .cab file you want to download to the mobile computer and copy it. 5 From the Mobile Device window, open the CabFiles folder and navigate to the folder where you want to paste the .cab file. 6 Paste the .cab file into the desired folder.
Chapter 3 — Developing and Installing Applications 2 Insert the SD card into an SD card adapter and then place it in the storage card reader connected to your PC. 3 Copy your application file to the SD card. 4 Remove the SD card from the adapter and insert it into the CK61. 5 On your CK61, navigate to the storage card folder and run your application. Installing Applications Using the FTP Server The CK61 has a built-in FTP Server that connects to a network through Ethernet, 802.
Chapter 3 — Developing and Installing Applications 2 Make sure that Avalanche Enabler is selected. 3 Tap Apply. You CK61 clean boots and Avalanche Enabler is installed. Each time the Avalanche Enabler is activated (typically on a reset), the CK61 attempts to connect to the Avalanche Agent. When the CK61 connects to the agent, the agent determines whether an update is available and immediately starts the software upgrade, file transfer, or configuration update.
Chapter 3 — Developing and Installing Applications To free up virtual memory, you select items from the InstallSelect list that you do not want to install. When you perform a clean boot, the items you selected are not installed. However, you can reinstall any of these SSPB components at any time with InstallSelect. Be sure to back up any releated files that you want before you use the InstallSelect application. The InstallSelect application is part of the SSPB and is installed at the factory.
Chapter 3 — Developing and Installing Applications Understanding the InstallSelect Software Components Component Name Deescription Data Collection & Intermec Settings Data collection and Intermec Settings. Also includes on-unit SDK libraries. If you disable this CAB file, you cannot scan or collect data on the device and you cannot use Intermec Settings.
Chapter 3 — Developing and Installing Applications To create and install the AutoRun.dat file on your computer 1 Create a folder called System on your CK61. 2 Open the Notepad application on your PC. 3 Write commands for AutoRun.dat using the supported AutoRun script commands. 4 Save the Notepad file as AutoRun.dat. 5 Copy the AutoRun.dat file to the System folder on the CK61. During every boot, the system scans for AutoRun.dat in the System folder.
Chapter 3 — Developing and Installing Applications • You can upgrade your computer using an storage card. For help, see the next section, “Upgrading the CK61 Using an SD Card” on page 75 • You can upgrade your computer using the SmartSystems Console. For help, see “Upgrading the CK61 Using SmartSystems Foundation” on page 76. You need to download the latest upgrade files from the Intermec web site to your desktop PC.
Chapter 3 — Developing and Installing Applications To upgrade the SSPB using an SD card 1 Insert an SD card into a SD adapter card and then place it in the storage card reader connected to your PC. 2 Copy all required SSPB upgrade files to the SD card. 3 Remove the SD card from the adapter card and insert it into the CK61. 4 Press and hold the Power button as you insert the battery back into the CK61. 5 Continue to hold the Power button until a Warning message appears on the display.
Chapter 3 — Developing and Installing Applications 2 Make sure the SmartSystems console and the computers are on the same subnet. 3 Make sure your computers are either in a communications dock or charging dock or that power management is disabled. 4 Download the device upgrade .exe file to your desktop PC. 5 Double-click the .exe file on your desktop PC. An InstallShield application starts and walks you through the process of extracting the upgrade files in the default location.
Chapter 3 — Developing and Installing Applications 78 CK61 Mobile Computer User’s Manual With Windows Mobile
4 Troubleshooting and Maintaining the CK61 If you encounter any problems while using the mobile computer, look in this chapter to find a possible solution. You will also find information on routine maintenance.
Chapter 4 — Troubleshooting and Maintaining the CK61 Calling Product Support If you cannot find the answer to your problem in the “Troubleshooting the Computer” section, you can visit the Intermec technical knowledge base (Knowledge Central) at intermec.custhelp.com to review technical information or to request technical support. If you still need help after visiting Knowledge Central, you may need to call Product Support.
Chapter 4 — Troubleshooting and Maintaining the CK61 To find your operating system version 1 Tap the Windows icon > Internet Explorer. 2 Tap the Intermec logo. The Intermec page appears and displays the software build information. Troubleshooting Your CK61 If you send the CK61 in for service, it is your responsibility to save the computer data and configuration. Intermec is responsible only for ensuring that the hardware matches the original configuration when repairing or replacing the computer.
Chapter 4 — Troubleshooting and Maintaining the CK61 Problems While Operating the CK61 (continued) Problem Solution The Battery status LED is on. The battery status LED indicates the following states: • If the battery status LED is a steady green, the battery is more than 95% charged and computer is on a charger. • If the battery status LED is blinking red, then the battery is low. Replace or charge the battery. • If the battery status LED is a steady red, the main battery is on charge.
Chapter 4 — Troubleshooting and Maintaining the CK61 Problems With Wireless Connectivity (continued) Problem Solution The CK61 appears to be connected to the network, but the host computer is not receiving any information from the CK61. In a UDP Plus network, there may be a problem with the connection between the Intermec Application Server and the host computer. Check with network administrator or see the user’s manual for the Intermec Application Server.
Chapter 4 — Troubleshooting and Maintaining the CK61 Problems While Configuring 802.1x Security (continued) Problem Solution The CK61 indicates it is not authenticated. Make sure that: • the User Name and Password parameters on the CK61 must match the user name and password on authentication server. You may need to reenter the password on both the CK61, authentication server. • on your authentication server, the user and group are allowed and the group policy is allowed to log into the server.
Chapter 4 — Troubleshooting and Maintaining the CK61 Problems While Scanning Bar Codes (continued) Problem Solution When you release a Scan button or The Good Read light will remain on if you configure the handle trigger, the Good Read computer to use continuous/edge triggering. If you light does not turn off. configure the computer for level triggering and the Good Read light remains on, there may be a problem. Press one of the Scan buttons or pull the trigger again without scanning a bar code label.
Chapter 4 — Troubleshooting and Maintaining the CK61 • Warm booting the CK61 • Cold booting the CK61 • Clean booting the CK61 Warm Booting the CK61 You may need to perform a warm boot to correct conditions where an application stops responding to the system. To warm boot the computer • Press and hold the Power button for 10 seconds. The computer systematically shuts down, restarts, and goes through the initialization process.
Chapter 4 — Troubleshooting and Maintaining the CK61 Clean Booting the Computer When you clean boot the CK61, it loads only those files and programs that are absolutely required by the operating system. Use the clean boot to troubleshoot the CK61 by getting it up and running so that you can perform diagnostic tests to determine which elements of the normal boot process are causing problems.
Chapter 4 — Troubleshooting and Maintaining the CK61 Cleaning the CK61 To keep the CK61 in good working order, you may need to clean the imager window, color camera window, and the touch screen. Clean the windows and the touch screen as often as needed for the environment in which you are using the CK61. To clean the CK61, use a solution of ammonia and water. There are no user-serviceable parts inside the CK61. Opening the CK61 will void the warranty and may cause damage to the internal components.
A Specifications 89
Appendix A — Specifications Physical and Environmental Specifications Physical Dimensions Length: Width: Height: Weight: 22.2 cm (8.7 in) 9.0 cm (3.5 in) 5.3 cm (2.1 in) 704 g (24.8 oz) Hardware Microprocessor: Memory: Persistent storage: Removable storage: Keypad: Intel XScale PXA272 520 MHz 64 MB or 128 MB RAM 128 MB, provides onboard non-volatile storage SD card slot, user-accessible Numeric and alphanumeric keypads Operating System Windows Mobile 5.
Appendix A — Specifications Wireless LAN Standards compliant: IEEE 802.11g (2.4 GHz, OFDM) IEEE 802.11b (2.4 GHz, DSSS) IEEE 802.11a (5.0 GHz, OFDM) Data rates: Up to 54 Mbps for 802.11g Up to 11 Mbps for 802.11b Up to 54 Mbps for 802.11a Radio power output: 50 mW Security: WEP, WPA, 802.11i, 802.1x (EAPTLS, TTLS, LEAP, PEAP) Certifications: Wi-Fi, WPA, WPA2, Cisco Compatible Extensions Screen Specifications Transflective TFT; QVGA Color with touch panel, 240 x 320 pixels, 9.7 cm (3.
Appendix A — Specifications EA11 2D Area Imager Reading Distances Typical reading distances are done in an office environment using office lights (4 lux). Minimum distances are measured in the dark (0 lux). When correctly mounted, and exit window reduces reading distances by about 4% for all scan engines. Both reading distances are provided in respective scan engine integration guides. Contact your local Intermec representative for more information.
Appendix A — Specifications 0" 4" 8" 12" 16" in 10" 25 8" 20 Data Matrix 7.5 mils 6" 15 PDF417 6.6 mils 4" 10 2" 5 0" 0 2" 5 4" 10 0.125mm / 5mils 6" 15 0.25 mm / 10 mils 20 8" 100% contrast UPC EAN 10" 25 0.
Appendix A — Specifications EL10 Scan Engine Reading Distancess Typical reading distances are done in an office environment (200 lux). Minimum reading distances are measured in the dark (0 lux). When correctly mounted, and exit window reduces reading distances by about 4% for all scan engines. Both reading distances are provided in respective scan engine integration guides. Contact your local Intermec representative for more information.
Appendix A — Specifications 0" 4" 8" 12" 16" 20" 24" 28" in 20" 50 100% contrast UPC/ EAN 16" 40 PDF417 6.6 mils 12" 30 8" 20 4" 10 0" 0 4" 10 8" 20 0.125 mm / 5 mils 30 12" 0.25 mm / 10 mils 16" 40 0.
Appendix A — Specifications EV10 Scan Engine Reading Distances Typical reading distances are done in an office environment (200 lux). Minimum reading distances are measured in the dark (0 lux). When correctly mounted, and exit window reduces reading distances by about 4% for all scan engines. Both reading distances are provided in respective scan engine integration guides. Contact your local Intermec representative for more information.
Appendix A — Specifications in 0" 2" 4" 6" 8" 10" 12" 14" 16" 18" 20" 10" 25 8" 20 100% contrast UPC/EAN 6" 15 4" 10 2" 5 0" 0 2" 5 4" 10 0.125 mm/ 5 mil 0.25 mm/10 mil 6" 15 0.
Appendix A — Specifications EX25 Near-Far Range Area Imager Reading Distances Typical reading distances are done in an office environment (200 lux). Minimum reading distances are measured in the dark (0 lux). When correctly mounted, and exit window reduces reading distances by about 4% for all scan engines. Both reading distances are provided in respective scan engine integration guides. Contact your local Intermec representative for more information.
Appendix A — Specifications 0" 16" 32" 48" 64" 80" 96 " 112" 128" 144" 160" 174" in 80 " 200 64" 160 48" 120 100% EAN contrast UPC 32" 100 cm 39.4" 80 16" 40 0" 0 16 " 40 0.25 mm 10 mils 32 " 48" 80 69 cm 27.2" 0.5 mm / 20 mils 110 cm 43.3" 120 220 cm 86.6" 1 mm / 40 mils 64" 160 430 cm 169.3" 2.
Appendix A — Specifications Accessories You can use the following accessories with the CK61. To order these accessories, contact your local Intermec representative. AC4 Quad Battery Charger Use the quad battery charger to charge up to four CK61 battery packs, and provides power and Ethernet connections to each CK61. AD3 Ethernet Multidock Use the AD3 Ethernet Multidock to hold up to four CK61s with a batteries installed.
B Keypads and Keystrokes 101
Appendix B — Keypads and Keystrokes Standard Characters Use the following tables to learn how to enter standard characters with the CK61 keypads.
Appendix B — Keypads and Keystrokes Standard Key Characters (continued) Character Alphanumeric Keypad Shift [Shift] Esc [Esc] Space [Space] Enter [Enter] A [Shift] [A] B [Shift] [B] C [Shift] [C] D [Shift] [D] E [Shift] [E] F [Shift] [F] G [Shift] [G] H [Shift] [H] I [Shift] [I] J [Shift] [J] K [Shift] [K] L [Shift] [L] M [Shift] [M] N [Shift] [N] O [Shift] [O] P [Shift] [P] Q [Shift] [Q] R [Shift] [R] S [Shift] [S] T [Shift] [T] U [Shift] [U] V [Shift] [V
Appendix B — Keypads and Keystrokes Standard Key Characters (continued) Character Alphanumeric Keypad ) [Shift] [0] ! [Shift] [1] @ [Shift] [2] # [Shift] [3] $ [Shift] [4] % [Shift] [5] ^ [Shift] [6] & [Shift] [7] * [Shift] [8] ( [Shift] [9] F1 [F1] F2 [F2] F3 [F3] F4 [F4] F5 B B B B B B B B B B B B B B B B B F6 F7 F8 F9 F10 F11 F12 F13 F14 F15 F16 F17 F18 F19 F20 F21 104 [F1] [F2] [F3] [F4] [A] [B] [C] [D] [E] [F] [G] [H] [I] [J] [K] [L] [M] CK61 Mobile Computer User’s Manu
Appendix B — Keypads and Keystrokes Standard Key Characters (continued) Character Alphanumeric Keypad F22 F23 F24 , < > / \ ] + | _ = ‘ Ins Home [ Del .
Appendix B — Keypads and Keystrokes 106 CK61 Mobile Computer User’s Manual With Windows Mobile
I Index 107
Index Numerics 1D bar code description 18 performance, improving 19 2D bar code description 18 performance, improving 19 32-key numeric keypad 9 58-key alphanumeric keypad, using 9 802.
Index BCMCFI, ISpyWiFi description 39 beeps three low, troubleshooting 81 blue LED 17 Bluetooth association label 27 audio device, connecting to CK61 32 communications, configuring on the CK61 27 description 25 Radio Hardware version 27 scanner Blutooth Scanner Wizard, connect using 28 selecting wireless printer 30 settings, description 26 class of device 26 connectable 26 device address 27 discoverable 26 IBT 27 Power 26 radio 27 wireless printing, configuring 29 wireless scanner, configuring communication
Index D debug log, creating Funk security 60 Device address, Bluetooth setting 27 diagnostic tests, running to troubleshoot 87 disable caps lock 10 discover printer 30 Discoverable, Bluetooth setting 26 DiskOnChip, storing applications 67 display information 14 drop specification 90 E EA11 reading distances, illustration 93 EA11, reading distances 92 EAP, definition 48 EAP-FAST configuring with Profile Wizard 59 definition 48 EAP-PEAP, definition 48 EAP-TLS configuring with Profile Wizard 57 definition 48 E
Index Intermec Settings navigating 24 Intermec Settings, configuring 23 Internet Explorer, using to find OS version 81 introducing, CK61 2 IP (DHCP), ISpyWiFi description 39 IP (Static), ISpyWiFi description 39 ISP (Internet Service Provider) connecting to CK61 42 ISP, connecting to 42 ISpyWiFi antenna, description 40 association, description 40 BCMCFI, description 39 BSSID, description 40 channel setting, description 39 encrypt, description 40 ESSID, description 39 IP (DHCP), description 39 IP (Static), de
Index O Object Store, storing applications 67 operating system finding version 81 how to upgrade 74 specification 90 operating system version, finding 4 operating temperature 90 options, CK61 3 orange key 10 P PACs (Protected Access Credentials) 59 parameters, configuring 23 PEAP choosing with WPA security 51 configuring with Profile Wizard 56 persistent storage manager, how to upgrade 74 physical specifications 90 ping a host, using ISpyWiFi 42 Power application, checking battery status 8 Power button 11 p
Index low battery icon 15 network icon 15 USB connection icon 16 volume icon 15 SD card using to copy and install files 69 using to install applications 69 using to upgrade computer 75 Secure Digital card description 19 inserting 20 using 19 security choosing between Microsoft and Funk 49 configuring 46 Microsoft 60 disabling 63 Funk, defining profiles 50 loading certificates 62 SmartSystems using to install applications 68 SmartSystems Foundation configuring 24 described 68 downloading 68 using to install
Index Avalanche Enabler password 71 using to install applications 70 WaveLink Avalanche,using to install applications 70 WEP definition 47 security configuring 53 configuring with Profile Wizard 55 troubleshooting 83 WiFi scanning with ISpyWiFi 40 wireless connection, checking status 37 connectivity, troubleshooting 82–83 LAN, specifications 91 114 printer, discovering 30 printer, selecting 30 printing application, creating 29 printing wizard 30 security, configuring 46 WPA configuring security 50 definit
Worldwide Headquarters 6001 36th Avenue West Everett, Washington 98203 U.S.A. tel 425.348.2600 fax 425.355.9551 www.intermec.