
User`s manual

Chapter 4 — Managing, Troubleshooting, and Upgrading the IF2
IF2 Network Reader User’s Manual 57
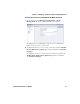
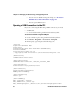
[GSerialInstall.Services]
AddService = usbser,0x0002,GSerialService
[GSerialService]
DisplayName = %GSERIAL_DISPLAY_NAME%
ServiceType = 1 ; SERVICE_KERNEL_DRIVER
StartType = 3 ; SERVICE_DEMAND_START
ErrorControl = 1 ; SERVICE_ERROR_NORMAL
ServiceBinary = %10%\System32\Drivers\usbser.sys
LoadOrderGroup = Base
[Strings]
LINUX = "Linux"
GSERIAL = "Gadget Serial"
GSERIAL_DISPLAY_NAME = "USB Gadget Serial Driver"
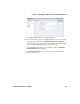
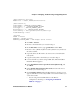
4 Click File > Save As.
5 Browse to the folder that you created in Step 1.
6 In the File name: text box, type gserial.inf, and click Save.
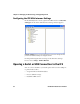
7 Browse to the c:\Windows\Driver Cache\i386 directory and locate
the driver.cab file.
8 Open the driver.cab file with a .cab extraction tool and find the
usb.sys file.
9 Copy the usb.sys file to the folder you created in Step 1.
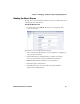
10 Connect the IF2 to your PC using a USB cable. The Found New
Hardware Wizard appears.
11 Select Install from a list or specific location (Advanced), and
click Next.
12 Select Include this location in the search, and enter browse to
the folder you created in Step 1.
13 Click Continue Anyway when the Windows Logo Testing screen
appears. The IF2 is connected by a USB connection. From here you
can do these tasks:
• You can assign an initial IP address to the IF2 for
configuration. For help, see “Assigning an Initial IP
Address” on page 7.