
Use and Care Manual


#180 to #220 grit sandpaper. Do not sand through the grain raise layer. This conditions the wood to accept
water based finishes.
All top coats (water, oil, lacquer, wax, etc.) may be used over Water Based Stains if they have dried
properly.
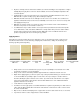
All Wood Stains may be intermixed to create custom colors or may be lightened by adding Natural Stain.
A second coat of stain will produce a slightly darker color.
If working in high temperatures or low humidity, Wood Stains may be thinned with 10-20% water or General
Finishes Extender (3 to 6 oz. per quart) to improve open time for application.
Tinting may be accomplished by adding 2 oz of Wood Stain and 2 oz. of water to a pint of Top Coat (or 4 oz.
of each to a quart). Mix the water and stain together first, then add this mixture to tint the Top Coat. Stir well.
Use only tack cloths made for water based products (containing no linseed oil).
Always stir the contents well. Stirring reduces the thickness of the stain and distributes pigments that may
have settled to the bottom of the can.
It is essential to apply a wet, liberal amount of stain with a foam brush or a latex paint pad applicator to
insure easy workability. If too little stain is used, the surface can dry too quickly causing an uneven
appearance.
Divide your project into manageable sections (top, side, drawer, door).
Stain a complete section and wipe off the excess evenly with the grain using paper towels or a clean cloth.
Check for missed spots and lap marks before moving to the next section. Immediately correct lap marks by
rewetting the entire working area with stain and wiping the excess off.
Sanding between coats of any stain or top coat is referred to as Buffing. We do NOT recommend buffing
between coats of stain because you may remove an area of stain that cannot be re-blended. If you must buff
because you have imperfections that need to be smoothed out, do so with caution using a superfine sanding
pad or #320 or #400 grit sandpaper. Do not buff prior to the first application Top Coat.
On most projects three or four coats of Top Coat is just right. On projects receiving extra wear such as table
and desk tops, additional coats will add more protection. Tip: use our High Performance Polyurethane for
even more durability. For more instructions about applying Top Coats, click here.
Application of Water Based Milk Paints and Glaze
Water based Milk Paints can be used with glazes and water based stains to create decorative finishes such as
distressing, antiquing, faux marble, rag rolling, or color washing. Creating these layered techniques requires using
layers of color combined with sanding techniques. The results are stunning and well worth the effort.
1. Distressing is a technique of marking the wood to give the character of generations of use. Start by
gathering the essentials of character building; hammers, nails, screws, old hardware, literally anything you
can pound into the wood that would leave an imprint. Then start hammering away. If it’s been a long week
and you need a lift, start a little character therapy project for yourself. Get rid of all that stress and finish a
piece of furniture at the same time!
2. Antiquing is another form of distressing using sanding techniques, often followed by glazing to give the
appearance of an antique piece of furniture that has been well taken care of over the years but, has slight
natural wear and discoloration on the doors, edges, or sides. Walk into any furniture store and the trend
toward using stains and finishes to create an antique look becomes abundantly clear. Corners and other
recesses show the remains of an "old" finish while more exposed surfaces seem to have been "worn away"
by time and use. This look of aging did not come from time but from a simple finishing technique that, with a
little practice, you can master. Besides applying stains and topcoats, this process involves selective sanding
of the "base stain" and wiping in of a "top stain," so it's best to use scrap wood get a hands-on feel for how
the stains will look on the particular wood you're using. Here's how to do it all, step by step.