
Use and Care Manual


Dry time is normally 2-4 hours under ideal conditions (70° and 70% humidity). Cooler temperatures or higher
humidity will prolong dry time to 8-10 hours. Good ventilation, air movement and higher temperatures will
accelerate dry time.
Sanding between coats of any stain, paint or top coat is referred to as Buffing. Buff between each coat of
Milk Paint with a superfine sanding sponge, #320 or #400 grit sandpaper.
Milk Paint dries with a low luster sheen. Although it can be used as a one-can finish, we recommend one
application of Water Based Top Coat for increased durability or to increase sheen. It is not necessary to buff
after applying final Top Coat.
Milk Paints are rated for exterior use, and do not require a Top Coat when used in outdoor applications.
water based Top Coats are not intended for exterior use.
Use Milk Paint for all your outdoor furniture. It is not just an interior product! Classic interior/exterior paints
for use with furniture, crafts, and cabinets. Milk Paint is a sturdy outdoor finish perfect for outdoor furniture.
Uniquely engineered from the latest paint technology, Milk Paints can be used directly from the can to
produce a high quality satin sheen. No mixing messy powders!
Applying Glazes
Glaze Effects are translucent water based colors that may be used over any water based stain or paint to create
beautiful decorative finishes such as distressing, antiquing, Strie, marble effects, shabby chic, burnishing, color
washing, rag rolling and wood graining.
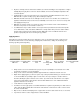
Winter White Glaze
over Antique White
Milk Paint
Yellow Ochre Glaze
over Antique White
Milk Paint
Red Sienna Glaze
over Antique Milk
Paint
Van Dyke Brown
Glaze
over Antique Milk
Paint
Burnt Umber
Glaze over Antique
White Milk Paint
Pitch Black Glaze
over Antique White Milk
Paint
Always test the color on the underside of the project. It is your responsibility to insure that the color is what
you want. Do not practice on your new furniture!
Always stir the contents well. Stirring distributes pigments that have settled to the bottom of the can.
Option: Before applying glaze you have the option of top coating first, which will help you control the amount
of color and facilitate the spreading of glaze over the surface. The Top Coat layer is smoother and less
absorbent, allowing the glaze to slide across the surface. If you want a rustic look with more color, skip the
Top Coat layer and apply the glaze directly to the paint. Start with two base coats of Milk Paint following
application instructions shown above.
Let the final base coat dry 2-4 hours.
Pour Glaze color into a paper plate covered with aluminum foil or painter's tray. Working one small section at
a time, apply the Glaze liberally with a foam brush, synthetic brush or paint pad over entire section, keeping
the surface wet with Glaze.
Wipe off excess with absorbent wiping cloths or paper towels to achieve desired look. Do not use Tee-shirts.
If you want to rework a section, simply rewet the surface with Glaze.