
Use and Care Manual

Work quickly, so that the Glaze color does not dry before finishing a section. If necessary, mask off smaller
sections around raised areas such as bead board and moldings. Glazes dry fairly quickly, so plan your
sections before beginning.
If working in high temperatures or low humidity, Glaze Effects may be thinned with 10-20% water or General
Finishes Extender (3 to 6 oz. per quart) to improve open time for application.
Let dry 2-4 hours. Apply water based Top Coat for additional durability or to increase sheen.
Application of Water Based Top Coats
If you are applying Water Based Top Coat over an oil based stain, allow the oil stain to dry a minimum of 48
hours under ideal conditions.
Water based top Coats are milky white in the can, but will dry to a crystal clear finish. Stir contents well to
insure that all the ingredients are mixed together.
Apply with a foam brush,latex paint pad applicator, or by spraying.
Apply Top Coats liberally using smooth even strokes working in the direction of the grain. Use enough
material to provide a wet film. Do not over brush! Top Coats self level beautifully.
Top Coats have *burn in* characteristics and may slightly lift some of the color during the application of the
first coat (particularly red colors).
On most projects three or four coats of Top Coat is just right. On projects receiving extra wear such as table
and desk tops, additional coats will add more protection. Tip: use our High Performance Polyurethane for
even more durability.
Dry Time of Top Coats
Dry time is normally 2-4 hours under ideal conditions (70° and 70% humidity).
Cooler temperatures or higher humidity will prolong dry time to 8-10 hours.
Good ventilation, air movement and higher temperatures will accelerate dry time.
Buffing Top Coats
Do not buff the stain prior to the first application Top Coat.
It is important to buff in between each application of Top Coat for the smoothest possible finish.
After Top Coat has dried, buff between each application with #320 or #400 grit sandpaper or superfine
sanding sponge.
Remove dust with a clean cloth.
It is not necessary to buff final Top Coat.
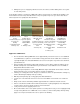
Distressed & Antique Finishes
Finishing furniture is an art form - you can create whatever you want. The terms "distressing" and "antiquing" are
often used interchangeably in the wood finishing world. These techniques can be used separately or together along
with glazing to obtain the degree of "aging" that you desire.